Agent Panel
The Agent Panel is an AI-powered development assistant that helps you build and modify your Flutter app through natural language conversations. Simply describe what you want to create or change, and the AI will help you implement it.
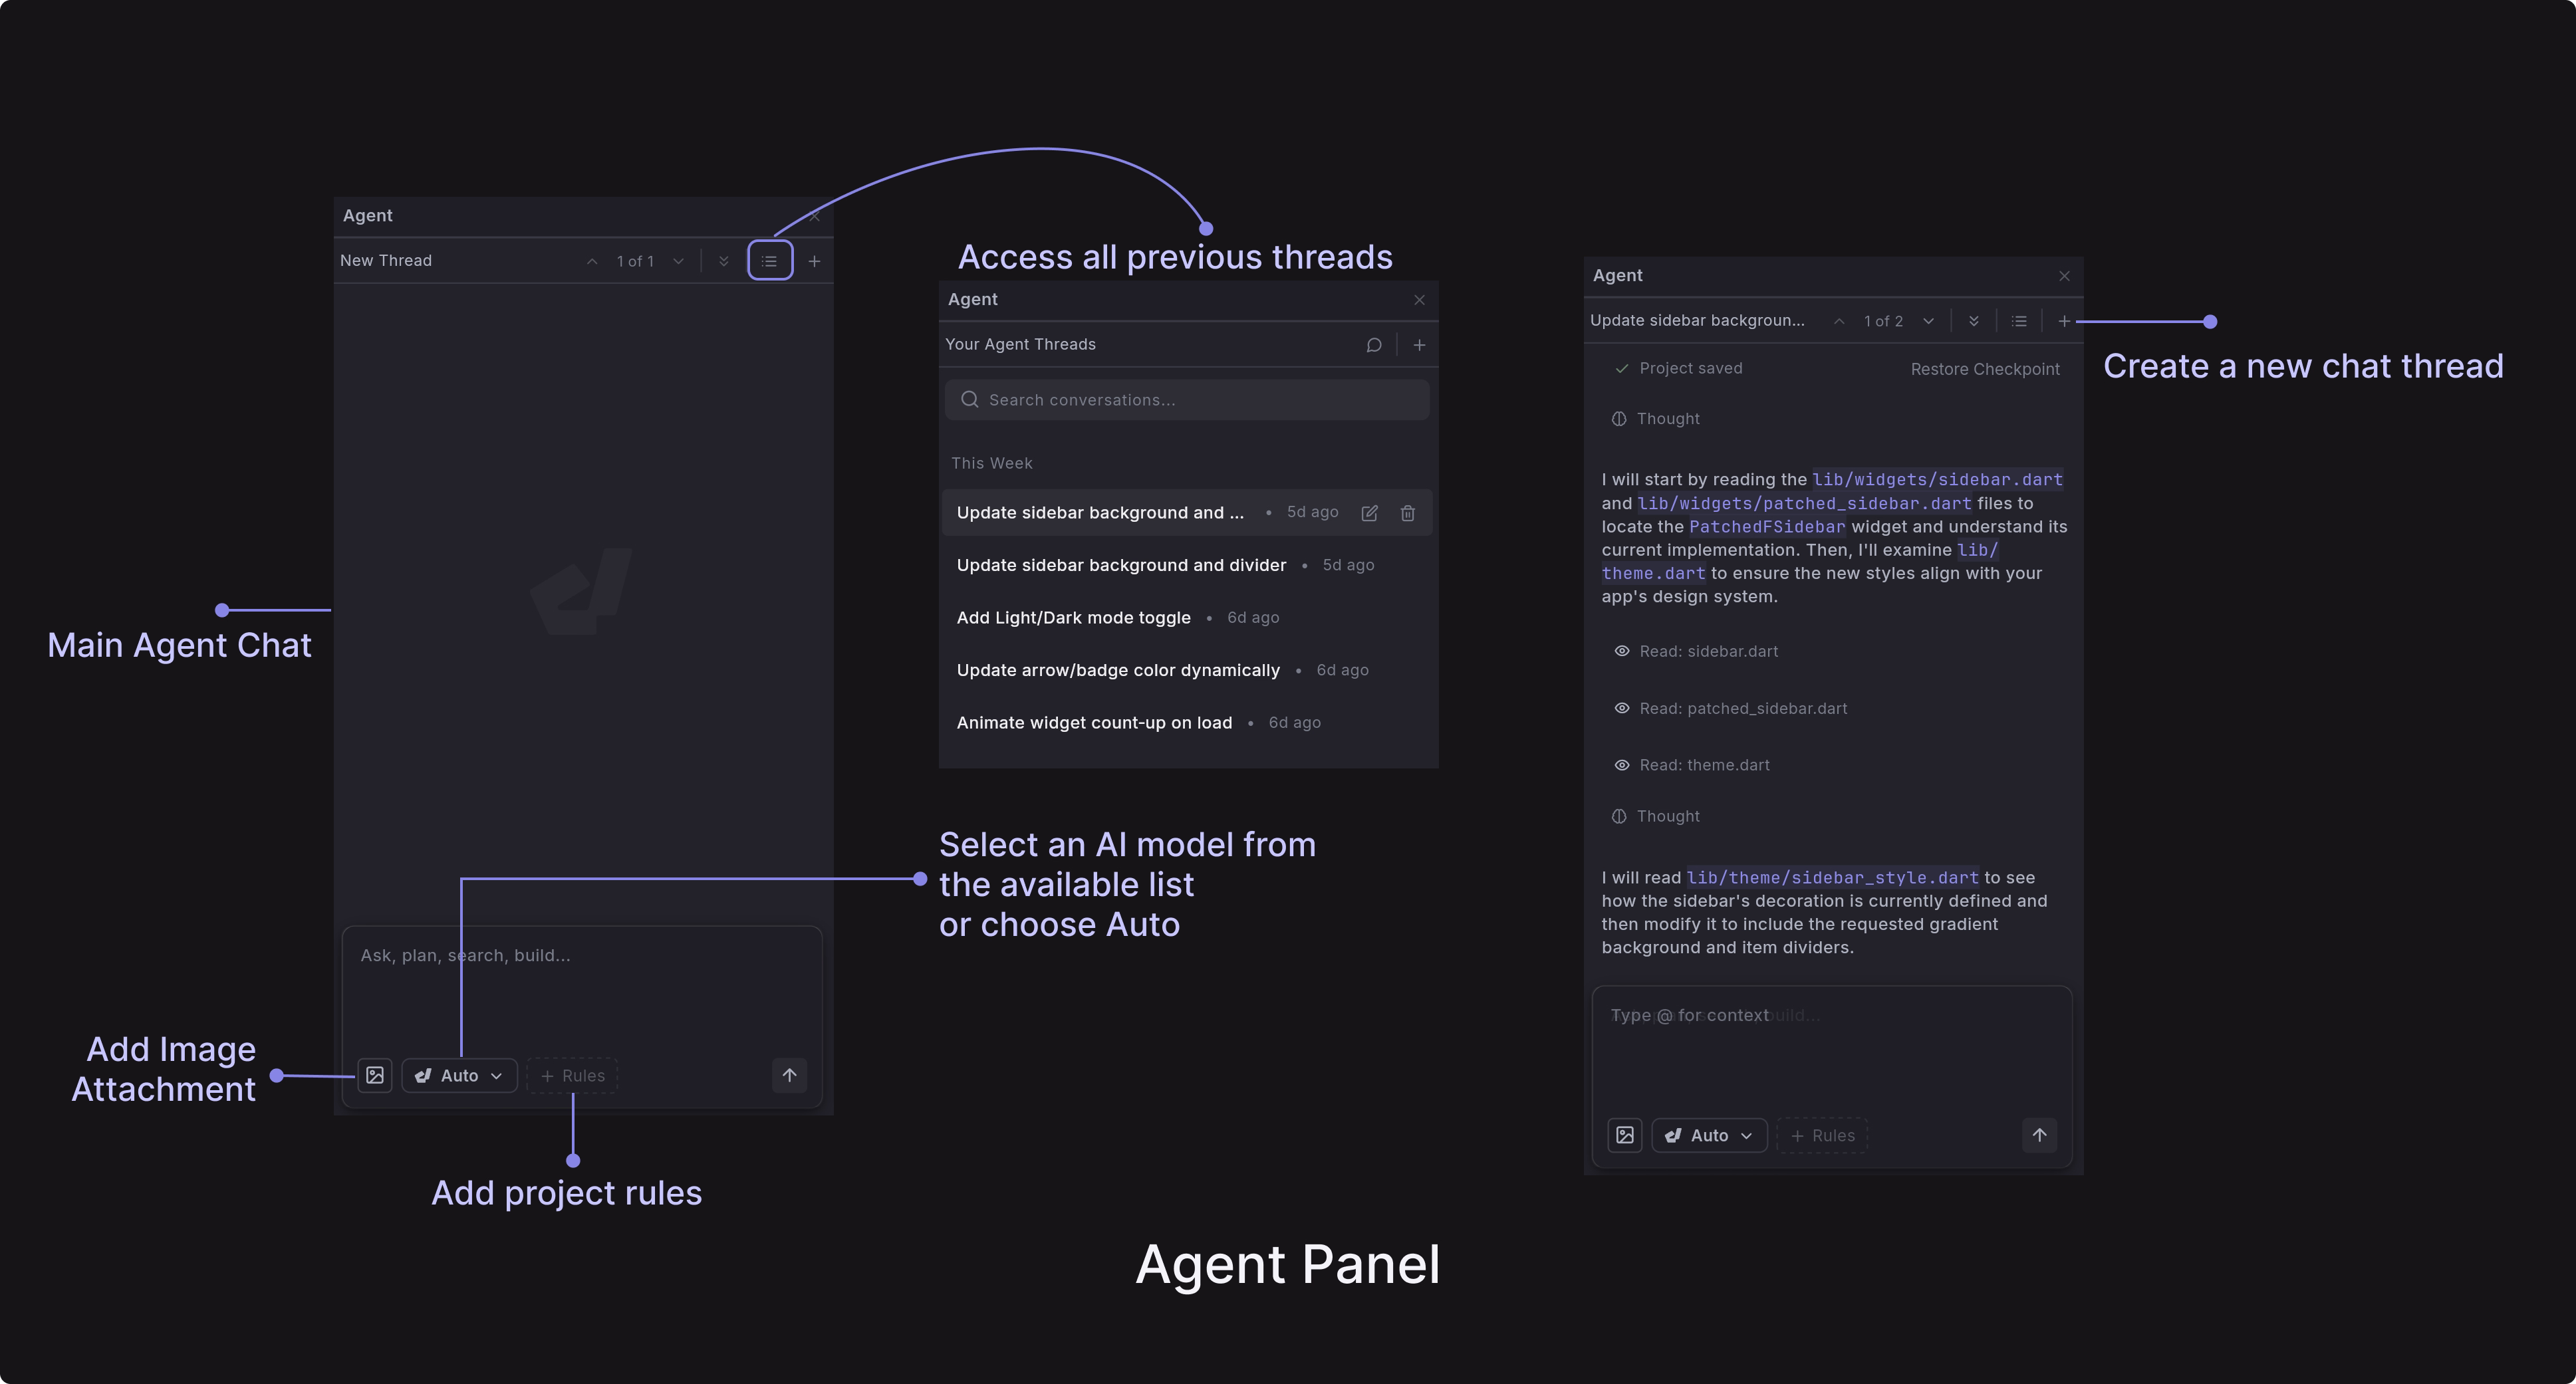
To access the agent chat, click on the Agent Panel button in the right sidebar to open the chat interface. Type your request in the message box at the bottom. For example:
- "Add a blue button that says 'Submit'"
- "Create a login form with email and password fields"
- "Make the text larger and change the color to red"
Agent Context
The Agent Panel automatically understands your current project context, but you can provide additional information to help the AI give you more accurate and relevant assistance.
The AI automatically has access to:
- Your current app's code and structure
- The widget you currently have selected
- Recent changes you've made
- Your project's dependencies and configuration
- Your project-level guideline files to keep generated code consistent.
Image Attachments
Use the Attach Image button in the message box to add screenshots or images to your conversation. This can help the AI understand:
- Visual designs or mockups you want to implement
- Current state of your app for reference
- Specific UI elements you want to modify
- Before/after comparisons for changes
Screenshot Mode
Instead of trying to describe your current app's appearance in words, you can instantly capture what the AI needs to see. This is much faster and more accurate than explaining complex layouts, colors, or visual relationships through text alone.
You can capture screenshots via the Preview tab from the Content Panel. Click the camera button (📷) in the bottom-right corner of the preview area.
Add to Agent
The "Add to Agent" feature enhances AI conversations by providing detailed context about specific widgets. When activated, it automatically:
- Captures technical details including widget type, properties, and location
- Takes a screenshot of the selected widget
- Records the widget's position in the tree hierarchy
- Adds all this information to the AI's context
This gives the AI agent comprehensive understanding of the components you're working with, enabling more accurate assistance.
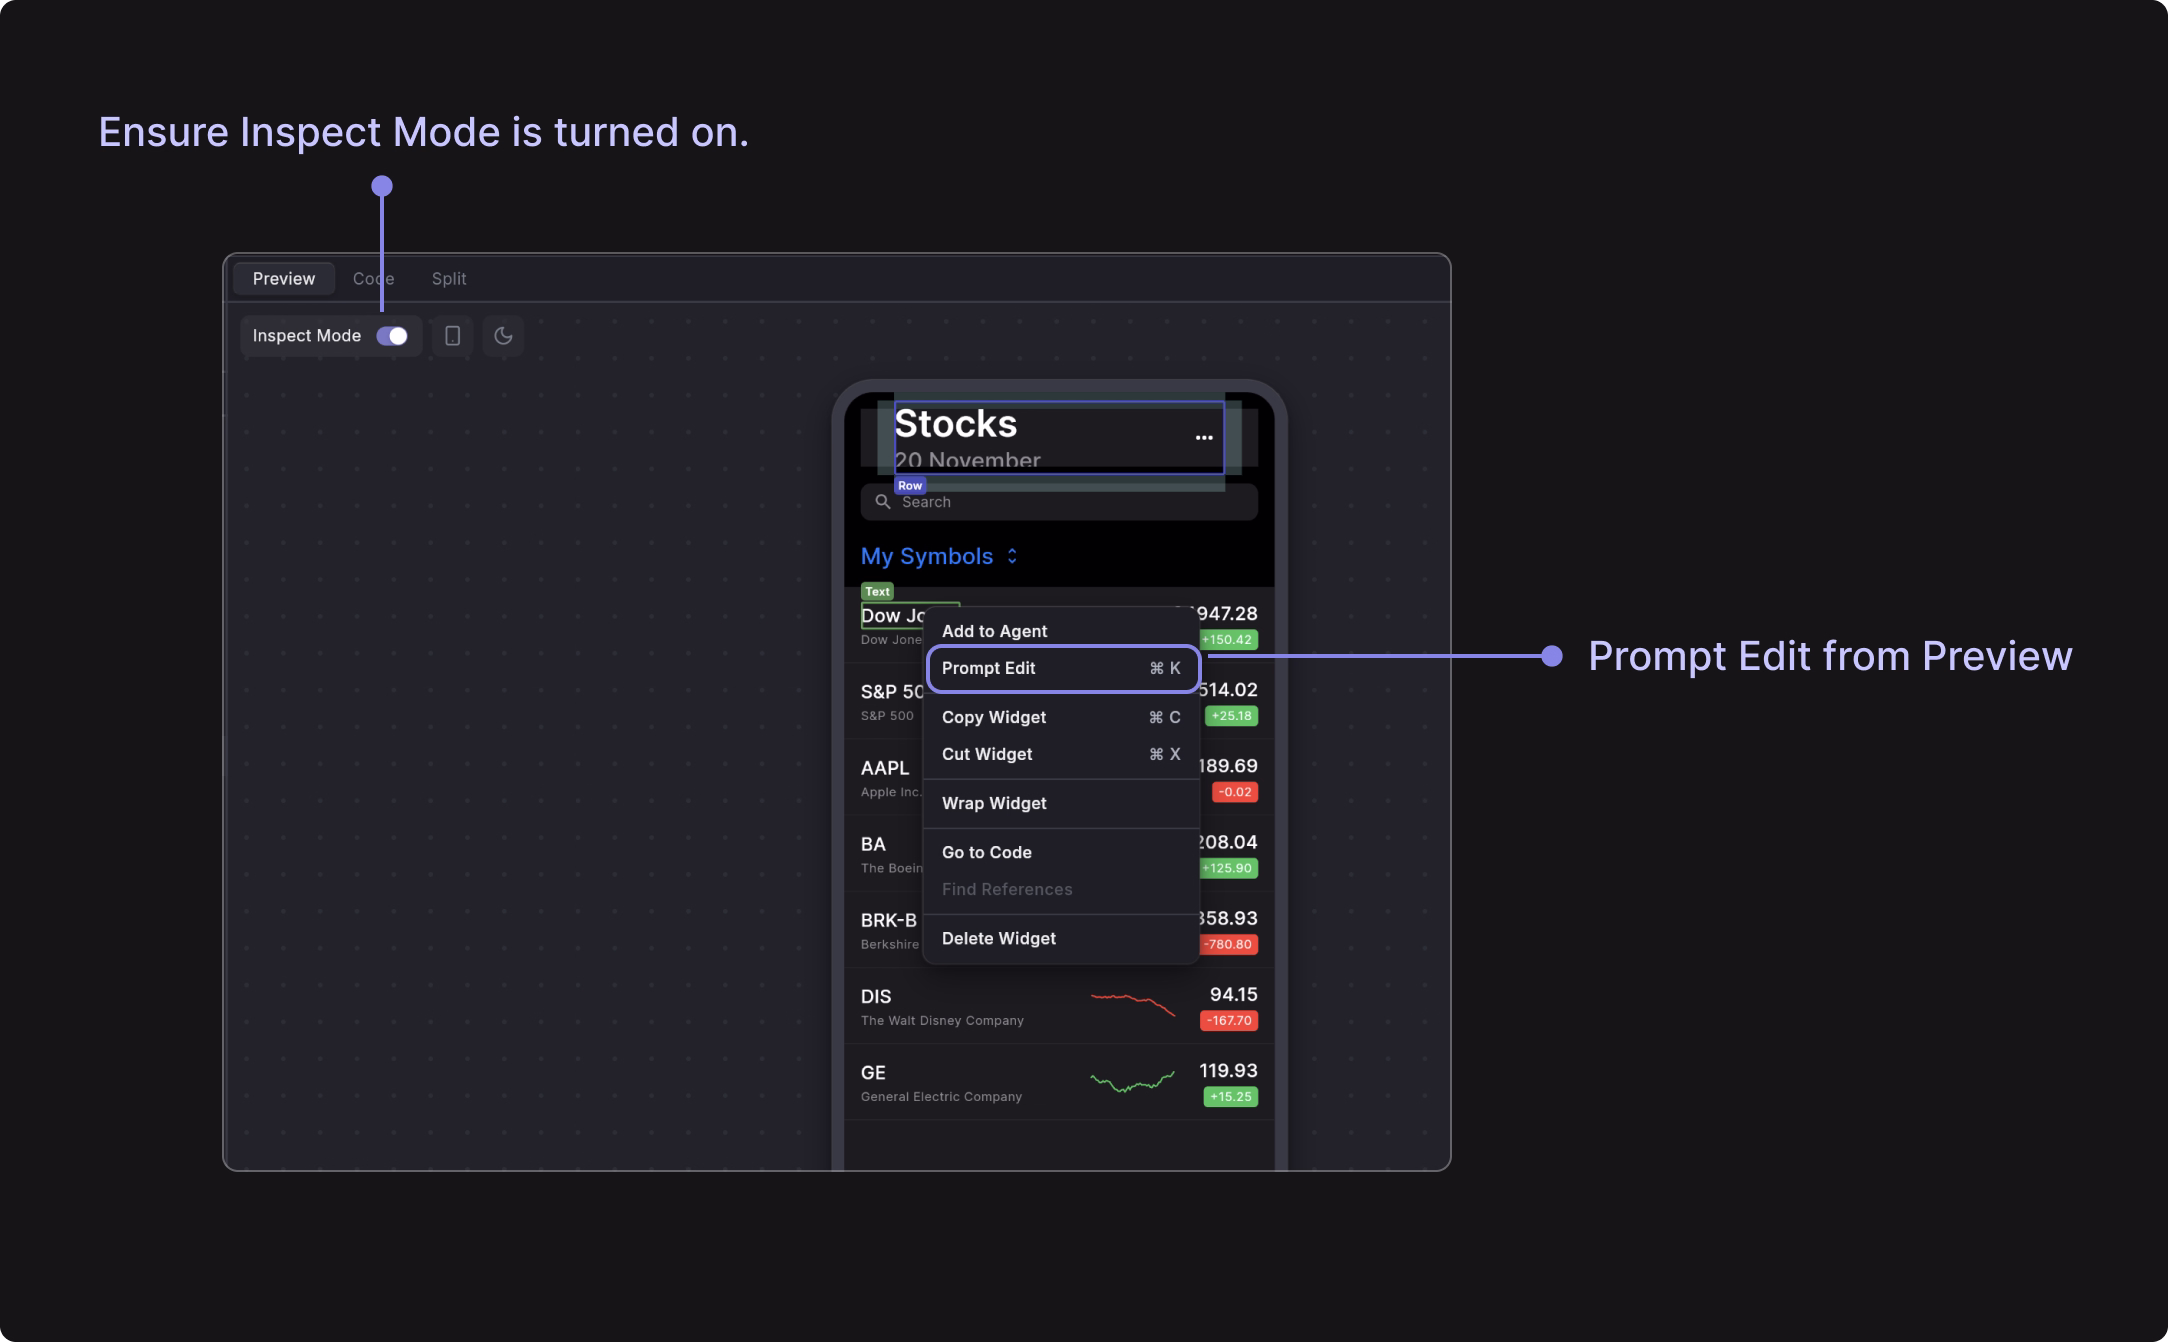
Prompt Edit
Prompt Edit is a quick editing feature that lets you make changes to specific widgets without opening the full Agent Panel. The dialog is designed for single-purpose edits, keeping you focused on the specific widget without distractions.
To use the Prompt Edit feature, right-click on any widget in the Widget Tree Panel and select "Prompt Edit" from the context menu.
You can also edit widgets directly from the Preview app using Prompt Edit:
- Enable Inspect Mode in the Preview panel.
- Right-click on any widget you want to modify.
- Select "Prompt Edit" from the context menu.
- Enter your editing instructions in the prompt dialog.
This provides a quick way to make targeted widget changes without leaving the Preview view.
App Logs
The Agent Panel can automatically access your app's debug logs and console output to help diagnose issues and understand your app's behavior. This is particularly useful when debugging problems or explaining errors to the AI.
When you ask the AI about errors, debugging, or app behavior, it can automatically retrieve recent log entries from your running Flutter app. It typically fetches the most recent 200 lines of logs to get relevant context without overwhelming the conversation with too much information.
The agent can access the following:
- Print statements from your Dart code
- Flutter framework messages and warnings
- Error messages and stack traces
- Hot reload notifications
- Build process output
Project Rules
Dreamflow allows you to define custom project guidelines that are automatically loaded into the Agent’s context every time you generate or edit code. It ensures that the Agent always follows your preferred architecture patterns, coding standards, and testing conventions, without needing to repeat them in every prompt.
Without project rules, you repeat long instructions in every prompt, for example:
Add a login screen and use the BLoC pattern for state management, follow Clean Architecture, and place new features under /features/...
With project rules, you can define these standards once and then simply ask:
Add a login screen.
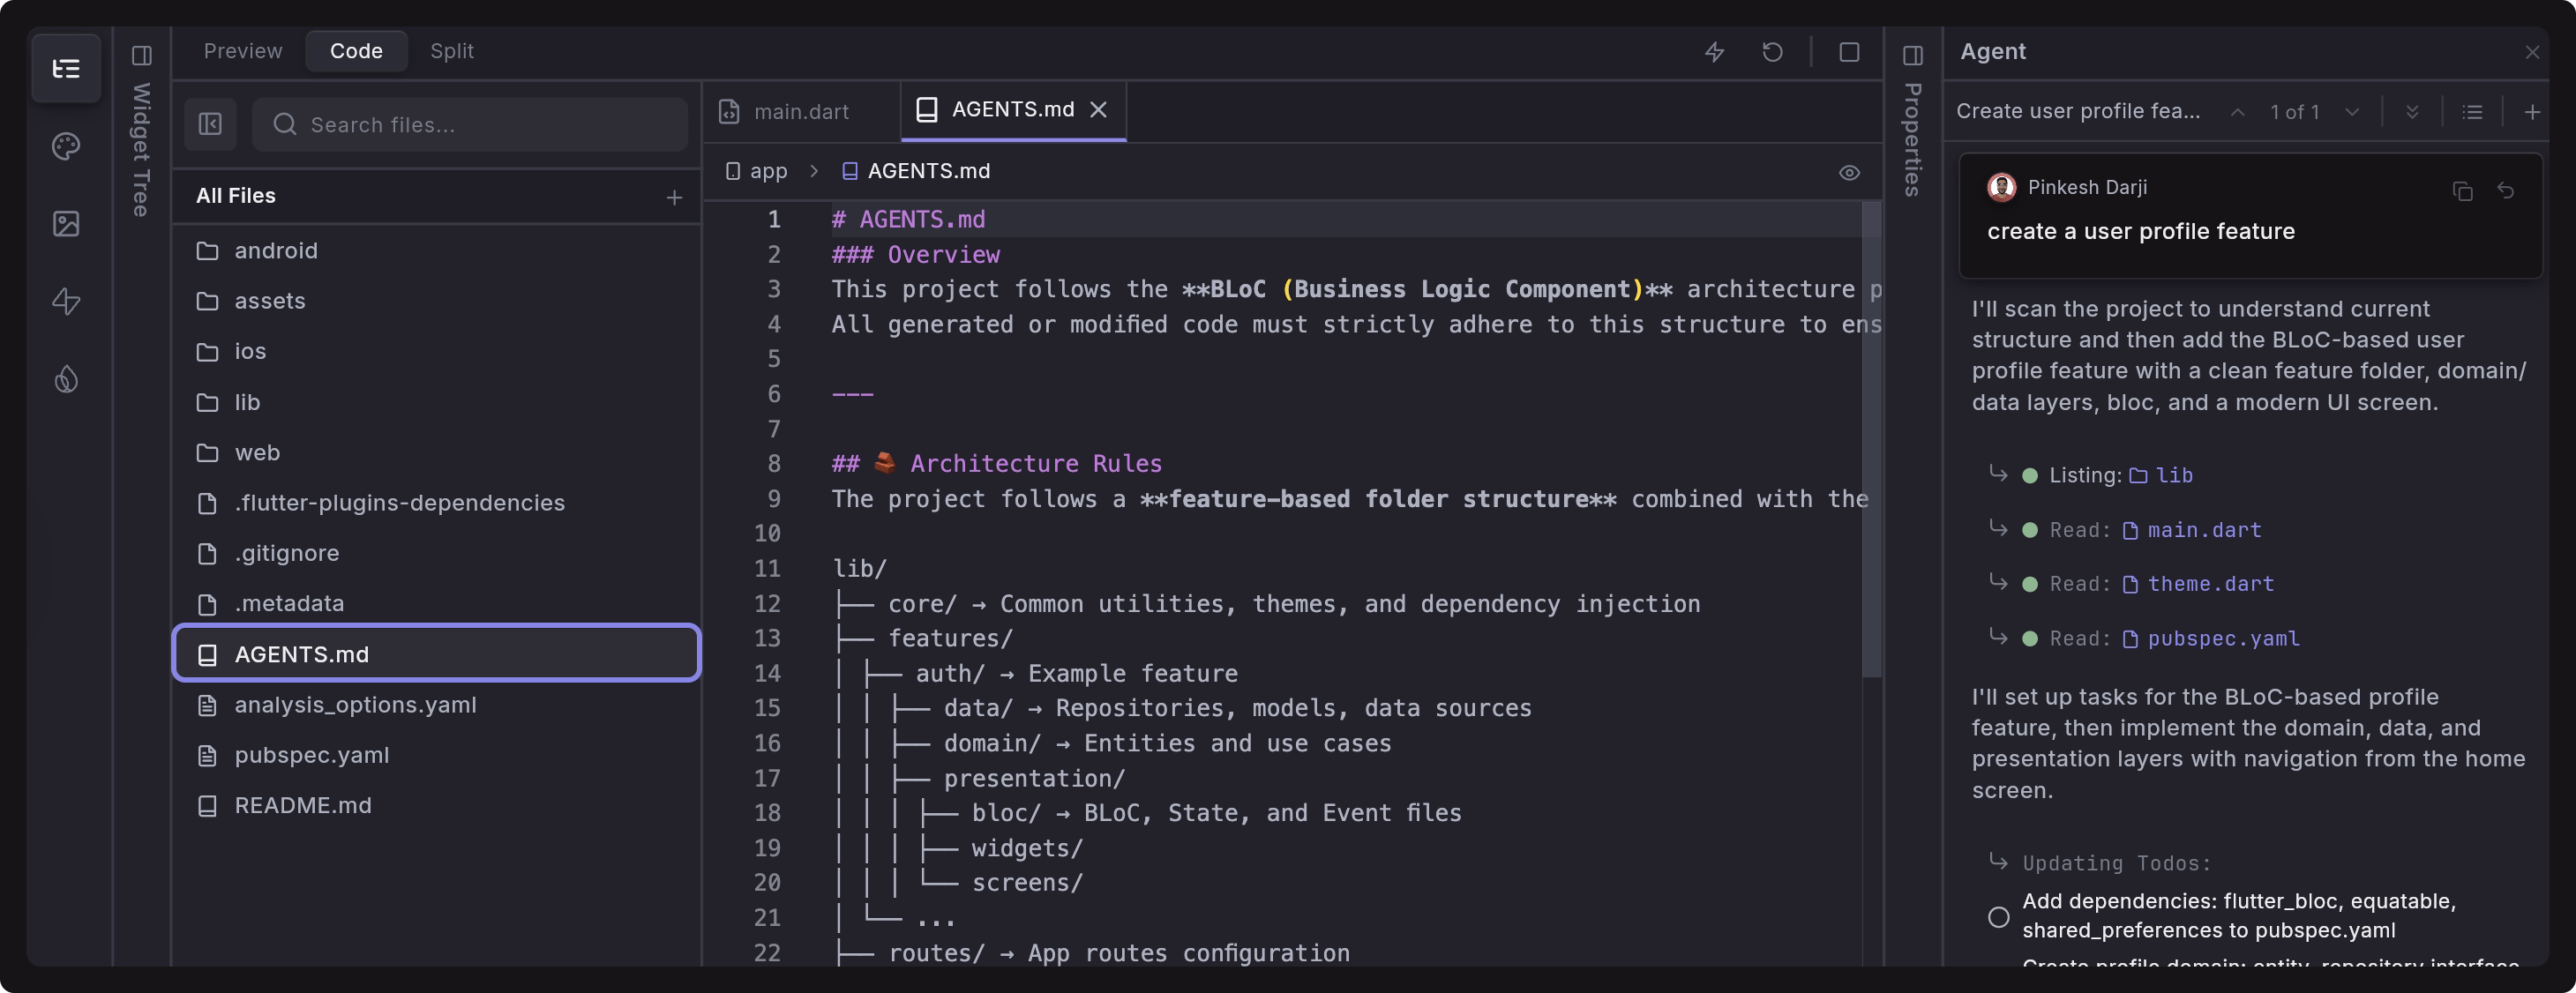
Dreamflow supports common rule file formats such as CLAUDE.md, .cursorrules, and ARCHITECTURE.md, but it is recommended to use the AGENTS.md file.
When the rule file is loaded into the Agent’s context:
- The file’s contents are appended to the system prompt and used to fine-tune how the Agent generates, edits, and structures code.
- These rules are applied to every Agent action, ensuring consistent behavior across your entire project.
- Your rules do not override Dreamflow’s internal system instructions, they simply guide and refine the Agent’s decisions to match your project’s standards.
Adding Project Rules
Follow these steps to add project rules:
Step 1: Create Rule File
To create a rule, open the Agent panel, select the Rules button, and click Generate AGENTS.md. Once the file is created, it will appear in the project root.
You can also manually create rule files with the help of ChatGPT or Claude. While creating the file, include your project’s coding standards, architecture pattern, folder structure, testing requirements, and security guidelines.
Here’s a sample prompt you can use to generate your AGENTS.md file:
Create a clean, production-ready AGENTS.md file written specifically for a Flutter project using the BLoC architecture pattern.
Its structure should clearly guide AI agents to always follow Flutter + BLoC best practices while keeping the file concise.
[Add any other project-specific details here].
Here are some sections you can include in the rule file:
- Architecture pattern: BLoC, Riverpod, MVVM, or Clean Architecture.
- Folder structure: How features, data, and UI should be organized.
- Coding standards: Formatting, naming, widget conventions, and logging.
- Testing requirements: Required test types, structure, and frameworks.
- Security guidelines: What not to log or expose.
Here’s an example output for the AGENTS.md file.
# AGENTS.md
## Architecture: BLoC
- Use flutter_bloc and equatable.
- Each feature must include: bloc/, state/, event/, and screens/.
- Keep business logic out of widgets.
- Use BlocBuilder and BlocListener for state updates.

## Folder Structure
features/[feature]/data/
features/[feature]/domain/
features/[feature]/presentation/

## Coding Standards
- Follow effective_dart; use const constructors.
- Use debugPrint() for logs (never print()).

## Security
- Never log PII, tokens, or credentials.
- Firestore access must be scoped to the authenticated user.
- Validate input before saving to database.
- Sanitize UI error messages.
Step 2: Place Rule File
You can add project rules at two levels:
1. Root-level Rule File: Place a rule file in the project root, beside pubspec.yaml.
- This file has global scope.
- It is always loaded before every Agent action, no matter which part of the project you're working in.
- Use it only for your most important, universal rules, such as:
- Architecture pattern (BLoC, Riverpod, MVVM…)
- Folder structure
- Naming conventions
- Coding style
- Security guidelines
2. Nested Rule File (Feature-Specific Rules): You may also create AGENTS.md files inside subfolders, such as:
/features/auth/AGENTS.md
/features/chat/AGENTS.md
/lib/widgets/common/AGENTS.md
Dreamflow will load these only when the Agent is generating or editing code inside that folder. Use nested rule files for:
- Feature-specific architecture
- Module boundaries
- API constraints
- UI or widget conventions
- Domain-level rules
Step 3: Run Agent Action
You can view or edit your rule file anytime from the Dreamflow File Editor. Once it’s saved, run any Agent command (for example, “Add a login screen”). Dreamflow will automatically load your rules and apply them to every generation.
Best Practices
- Keep the root-level
AGENTS.mdsmall and focused. - Use nested
AGENTS.mdfiles for detailed, module-specific rules to avoid bloating the Agent’s context. - Keep the rule file specific, short, and imperative.
- Keep must-follow standards at the top of the file.
- Avoid overly long explanations — keep it concise and readable.
- Update the file when your architecture or policies change.
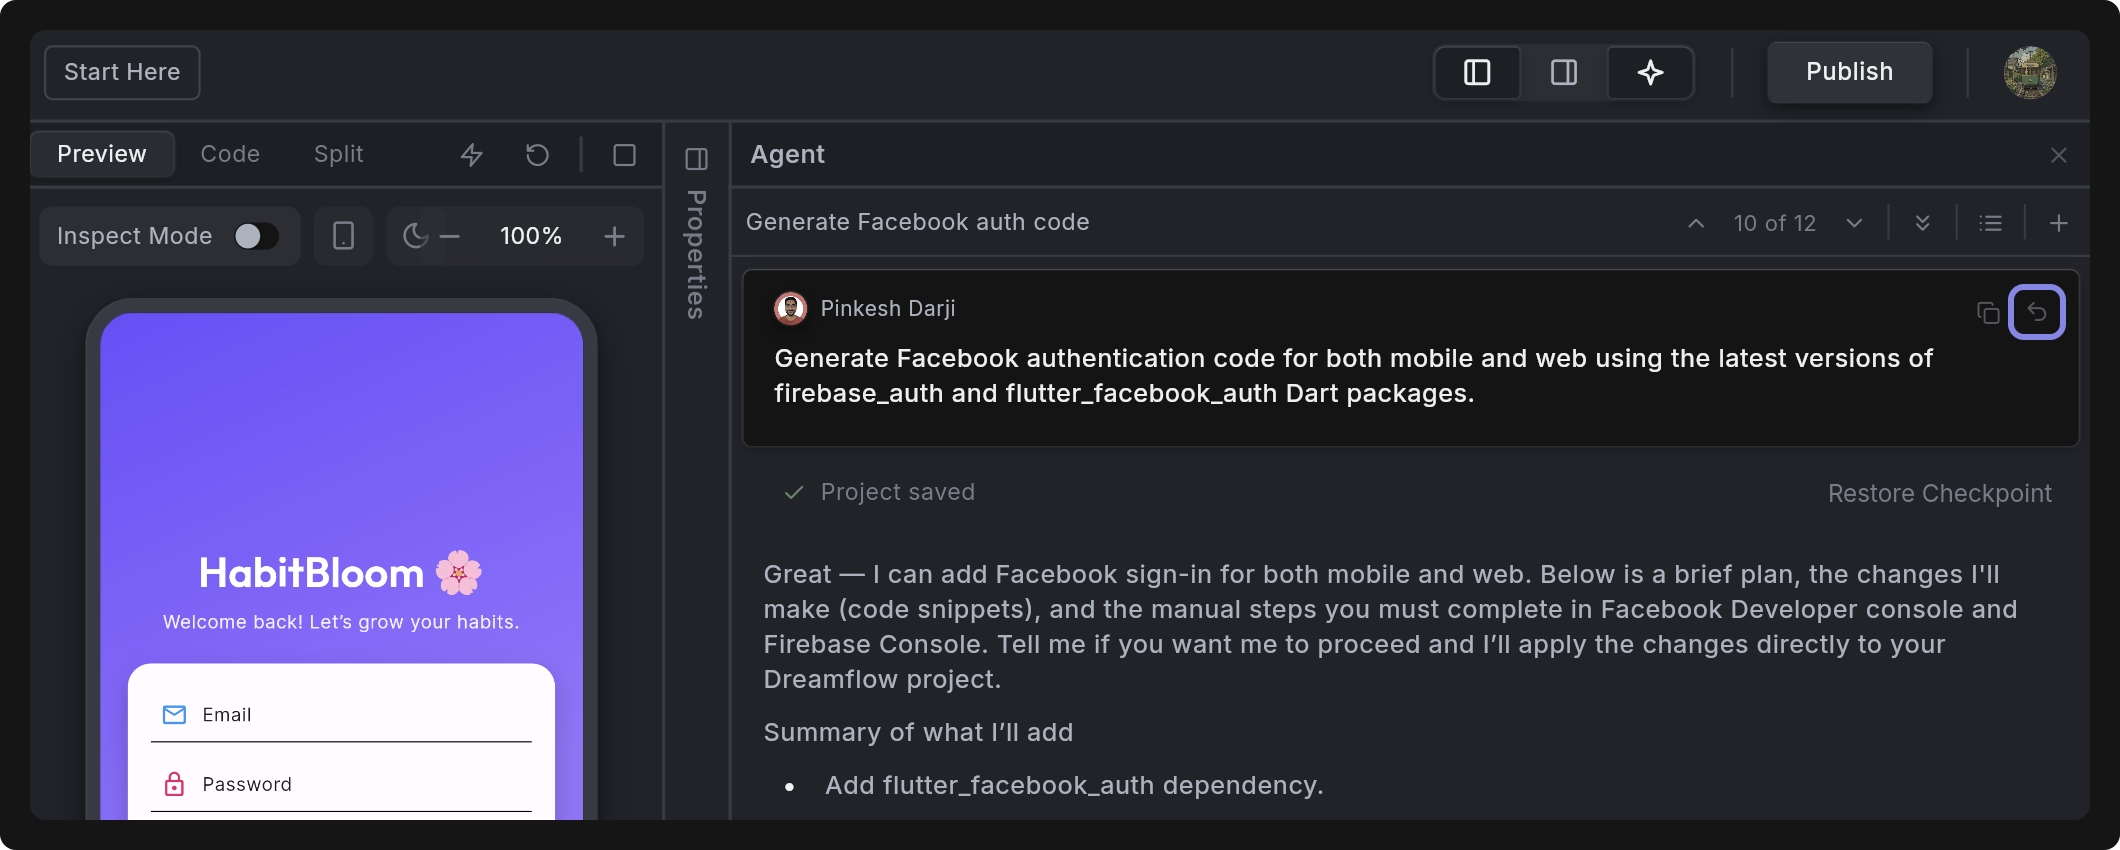
Restore Checkpoint
Restore Checkpoint lets you roll your project back to the exact state it was in before a specific agent prompt was executed.
This rollback includes:
- All changes introduced by the Dreamflow agent
- Any manual edits you made after that point
- Restore Checkpoint rewinds the entire project, not just the thread where you clicked the button.
- Because it’s destructive, use it carefully—especially if you frequently switch between threads or mix agent edits with manual edits.
To restore the project to a specific checkpoint:
- Open the agent thread.
- Use the thread navigation arrows to move to the exact message where you want to restore from.
- Click the Undo icon in the top-right corner of your message.
- A confirmation dialog will appear. Approve it to restore the checkpoint.
The Restore Checkpoint button appears only when:
- The agent is not currently generating
- The project was successfully saved before that generation began
OpenAI Integration
Dreamflow Agent lets you add AI-powered features to your app without needing your own OpenAI API key. When you use the Agent to generate an AI feature, Dreamflow automatically connects to OpenAI through a secure proxy using Dreamflow’s internal API key.
This allows you to test and experiment with AI capabilities instantly. All credit usage during development is billed to your Dreamflow account.
How It Works
Dreamflow automatically routes all AI-related requests through its OpenAI proxy, which securely handles authentication and API calls.
Your App → Dreamflow Proxy → OpenAI API
When you generate an AI feature through the Agent (for example, “Add an AI habit suggestion generator”), Dreamflow automatically includes an OpenAI configuration file similar to the one below:
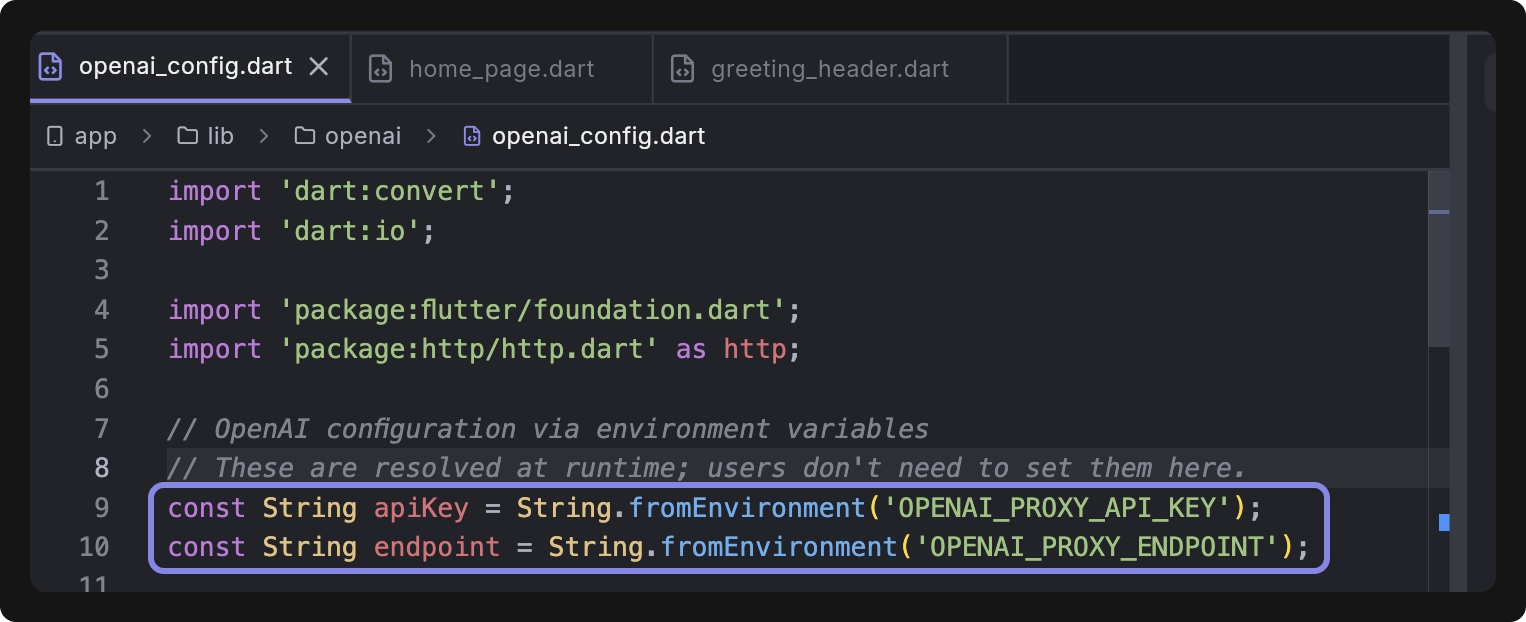
These environment variables are injected by Dreamflow when running your app in preview mode.
Update API Key
When you export your project or deploy it to production, you must update your configuration to use your own OpenAI API key instead of Dreamflow’s proxy.
You can do this directly inside the file generated by Dreamflow. Here’s an example:
// Replace these with your own OpenAI credentials
const String apiKey = 'YOUR_OPENAI_API_KEY';
const String endpoint = 'https://api.openai.com/v1';
FAQ
Project rules aren’t being applied. Why?
Your project rules file might not be in the right location. Make sure it’s placed in the project root, at the same level as pubspec.yaml.
Dreamflow isn’t detecting my project rules file.
Check the filename — it must exactly match one of the supported names: .cursorrules, CLAUDE.md, AGENTS.md, or ARCHITECTURE.md. Any typos or variations will be ignored.
The wrong project rules file is being used.
Dreamflow loads only the first file it finds in the priority order. If a higher-priority file (for example, .cursorrules) exists, it will take precedence. Remove or rename that file if you want Dreamflow to use another one.
I edited my rules file, but the Agent isn’t using the latest version.
After editing, save the file and re-run your Agent command. The updated rules will be loaded automatically.
The AI’s output seems inconsistent or off.
There may be conflicting or unclear rules in your file. Try simplifying the instructions and making them more explicit.
Isn’t .cursorrules only for the Cursor IDE?
.cursorrules only for the Cursor IDE?Originally yes, but Dreamflow supports .cursorrules for compatibility with existing projects. If a .cursorrules file is present in your project root, Dreamflow will automatically load it — it has the highest priority among all supported rule files.
Do these rules override Dreamflow’s system prompts?
No. They append to the system prompts. Dreamflow keeps its built-in logic, and your rules simply provide additional context.
Can I edit or view the existing files?
Yes — you can open them directly in Dreamflow’s File Editor.
Can I use multiple rules files?
You can keep several for compatibility, but Dreamflow will only load the first one found based on priority order. For consistency, it’s best to keep a single canonical file.
Do I need to reload Dreamflow after adding a rules file?
No. Simply add the file and re-run any Agent action. If Dreamflow doesn’t automatically pick it up, you can try reloading the project.