Pre-checks Before Publishing
Before publishing your app, it’s important to run through a checklist to ensure quality, compliance, and readiness for release. These pre-checks help confirm that your app works as expected, meets platform requirements, and provides a smooth user experience.
Here’s a comprehensive list of these prechecks:
- Functionality Testing: Test the app manually across devices to verify that every feature behaves correctly, user interactions respond as intended, and no crashes or unexpected errors occur.
- Get Feedback: Gather feedback from users or testers to receive valuable insights and potential areas of improvement before the public release.
- Optimizations & Enhancements: Review your app’s overall performance and make sure all assets are optimized. This includes, but is not limited to:
- Making sure images are properly sized and compressed to reduce load times.
- Minimizing large files, unused assets, or unnecessary dependencies.
- Checking that animations and transitions run smoothly without lag.
- Enable caching strategies where appropriate.
- User Interface (UI): Review UI consistency across different devices, screen sizes, and resolutions.
- Accessibility Checks: Use Flutter’s
Semanticswidget on images and buttons to provide meaningful descriptions for assistive technologies. Verify that TalkBack (Android) and VoiceOver (iOS) correctly interpret UI elements. Check color contrast with Flutter’s theming system and ensure that navigation using gestures or keyboard input remains accessible across all screens. - Security Measures: Safeguard user data by using HTTPS for all network requests, encrypting sensitive information, and following best practices for authentication and storage. Ensure compliance with legal standards like GDPR or CCPA, if applicable.
- Compliance with Store Guidelines: Carefully review submission policies for both Apple’s App Store and Google Play Store. Pay attention to metadata, privacy policies, restricted content rules, and minimum functionality requirements.
- Localization and Internationalization: If your app targets users in multiple countries, consider adding multi-language support.
- License and Third-Party Attributions: Adhere to licenses and include necessary attributions for third-party libraries and assets.
- Prepare Marketing Assets: Prepare all the necessary marketing assets, such as screenshots, app icons, and promotional text.
- Error Logging & Monitoring: Integrate crash reporting and analytics (e.g., Firebase Crashlytics, Sentry) before release. Try triggering test crashes in debug or staging builds to confirm reports are collected correctly.
- Offline & Poor Network Support: Validate app behavior with no connectivity and high-latency/packet-loss scenarios. Provide cached content, retry/backoff for API calls, and clear offline states.
Add App Launcher Icon
An app launcher icon is the small image that represents your app on a device’s home screen.
When you create a new app in Dreamflow, it sets a default Dreamflow logo as the launcher icon. To give your app a unique identity, you should replace this with your own custom icon. Follow the steps below to update the launcher icon:
-
Go to the Assets module in Dreamflow and upload your icon image. For best results, use a square, high-resolution source image (i.e., 1024×1024 px) to ensure your app icon looks sharp across all devices and sizes.
-
Update the code to use the new app icon. Dreamflow uses the
flutter_launcher_iconspackage to set launcher icons for both platforms. You can either:-
Ask the Agent to do it automatically. For example, you can say:
I uploaded app_icon.png to the Assets module. Please set it as the app launcher icon using flutter_launcher_icons. -
Or do it manually by updating the
image_pathin yourpubspec.yamlfile to point to the newly uploaded app icon. Here is the example configuration inpubspec.yamlfile:flutter_launcher_icons:
android: true
ios: true
image_path: assets/images/app_icon.png
remove_alpha_ios: true
-
- The Agent can’t generate a launcher icon image for you; you need to upload your own image file in the Assets module.
- The app icon is generated during native builds (Android/iOS) before deployment. However, if you want to verify that it’s configured correctly, you can download and run the app locally on your machine. To do so:
-
Ensure your Flutter environment is properly set up by following the instructions for Android or iOS, depending on the platform you want to test.
-
Download the project, open it in your preferred IDE, and run:
dart run flutter_launcher_icons -
Build and run the app on a device, then check the device’s home screen to confirm the new icon appears.
-
Platform-Specific Icon Configuration
If you want to use different icons for Android and iOS, you can set platform-specific paths. This is useful if your design team provides unique assets for each platform.
To do so, upload separate icons for each platform to Assets module, then you can either:
-
Ask the Agent to do it automatically. For example, you can say:
I uploaded separate icons for Android (app_icon_android.png) and iOS (app_icon_ios.png) to the Assets module. Please configure flutter_launcher_icons to use separate icons for both the platform. -
Or manually update your
pubspec.yamlas shown below:flutter_launcher_icons:
android: true
ios: true
image_path_android: assets/images/app_icon_android.png # Path to the Android app icon.
image_path_ios: assets/images/app_icon_ios.png # Path to the iOS app icon.
remove_alpha_ios: true
Adaptive Icons for Android
Android supports adaptive icons, which allow your app icon to adapt to different shapes (circle, square, squircle, etc.).
To setup adaptive icons, you can either use this online tool or use these resources to create one. Upload them to Assets module, then you can either:
-
Ask the Agent to do it automatically. For example, you can say:
With image background:
I uploaded icon_bg.png and icon_fg.png to the Assets module.
Please configure flutter_launcher_icons to use icon_bg.png as the adaptive icon background and icon_fg.png as the foreground, with a 16% inset.
With solid color background:
I uploaded icon_fg.png to the Assets module.
Please configure flutter_launcher_icons to use a solid white background ("#FFFFFF") and icon_fg.png as the adaptive icon foreground, with a 16% inset. -
Or manually update your
pubspec.yamlas shown below:flutter_launcher_icons:
android: true
ios: true
image_path: "assets/images/app_icon.png"
# For adaptive icon support:
adaptive_icon_background: "assets/images/icon_bg.png" # image or solid color ("#FFFFFF")
adaptive_icon_foreground: "assets/images/icon_fg.png" # your logo / symbol image
adaptive_icon_foreground_inset: 16 # optional padding percentage (default is 16)
- Both
adaptive_icon_backgroundandadaptive_icon_foregroundmust be set for adaptive icons to be generated. - If you do not specify adaptive layers,
flutter_launcher_iconswill fall back to generating legacy (non-adaptive) icons.
Adaptive Icon Resources
See the following resources for more information on Android adaptive icons.
Create Adaptive Icon
- Create app icons in Android Studio
- Figma template (requires login)
- Bjango templates include adaptive icons
- Adobe XD template
Adaptive Icon Fundamentals
FAQs
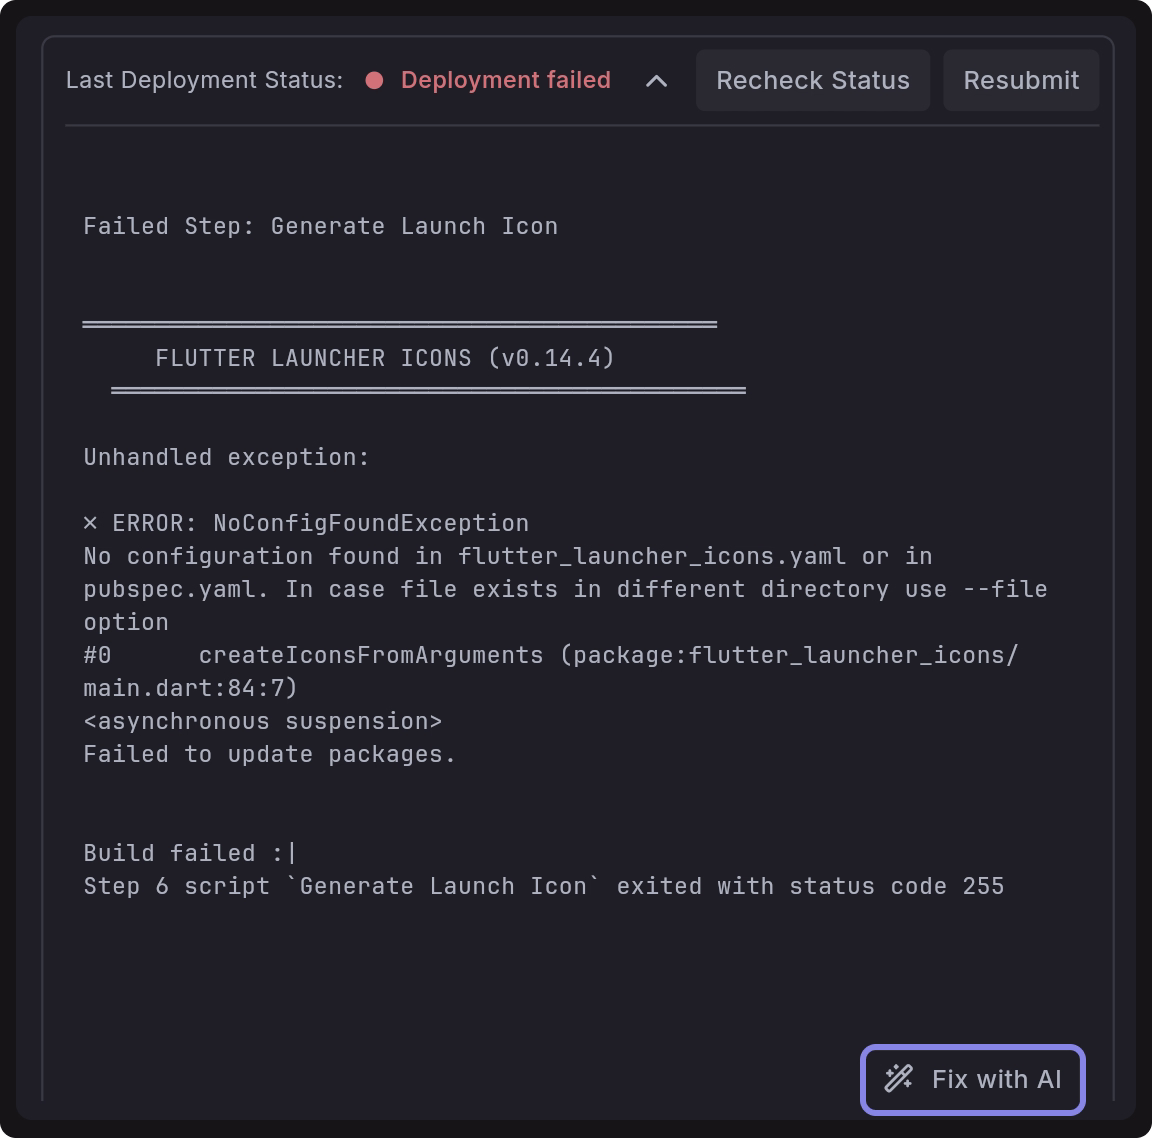
I am getting ✗ ERROR: NoConfigFoundException – No configuration found in flutter_launcher_icons.yaml or in pubspec.yaml. How do I fix it?
This error means the flutter_launcher_icons package hasn’t been properly added to your project. To fix this, you can:
-
Add it manually: Open your
pubspec.yaml, add theflutter_launcher_iconsdependency with required configuration, then refresh dependencies by clicking Refresh Dependencies button at bottom left side. See the detailed guide on adding app launcher icon. -
Use the Agent: Click Fix with AI button when the error appears, and the Agent will add the required configuration for you.
Why am I seeing this error PathNotFoundException: Cannot open file, path = 'assets/images/icon.png' (OS Error: No such file or directory, errno = 2) ?
This error occurs because the app icon file could not be found at the specified path. To fix this, make sure you’ve added a launcher icon Assets module. Refer to adding app launcher icon section for step-by-step instructions.