Firebase
Dreamflow makes it easy to integrate Firebase into your app with a guided, step-by-step setup. This process connects your project to Firebase, generates all necessary configuration, and even creates ready-to-use client code and database rules with AI.
By integrating Firebase, you gain access to services such as Authentication, Firestore Database, Cloud Storage, Hosting and more, giving your app a secure backend for managing users, data, and serverless logic.
1. Connection
The first step is to connect Dreamflow with your Google account so it can create new Firebase projects or link to existing ones.
To connect Dreamflow with Firebase, open the Firebase tab in Dreamflow, then click Connect to Firebase. When the OAuth window appears, sign in with your Google account, review, and approve the requested permissions. These permissions allow Dreamflow to create Firebase projects, manage configurations, and deploy security rules.
Once complete, Dreamflow will confirm the connection with a Connected status.
Initial Firebase Project Setup
If this is your first time connecting to Firebase, you must create a new project in the Firebase Console and accept the Terms of Service before continuing.
Open the Firebase Console and ensure you are signed in with the correct account. Click Get started tile, enter a project name, accept the terms, and complete the setup. During this process, you can disable Gemini AI and Analytics features if they are not required.
When the console displays the message “Your Firebase project is ready”, close the tab and return to Dreamflow. Click Proceed to continue. It may take a few minutes for the new project to appear in Dreamflow.
Here’s how to do it step by step:
2. Project Setup
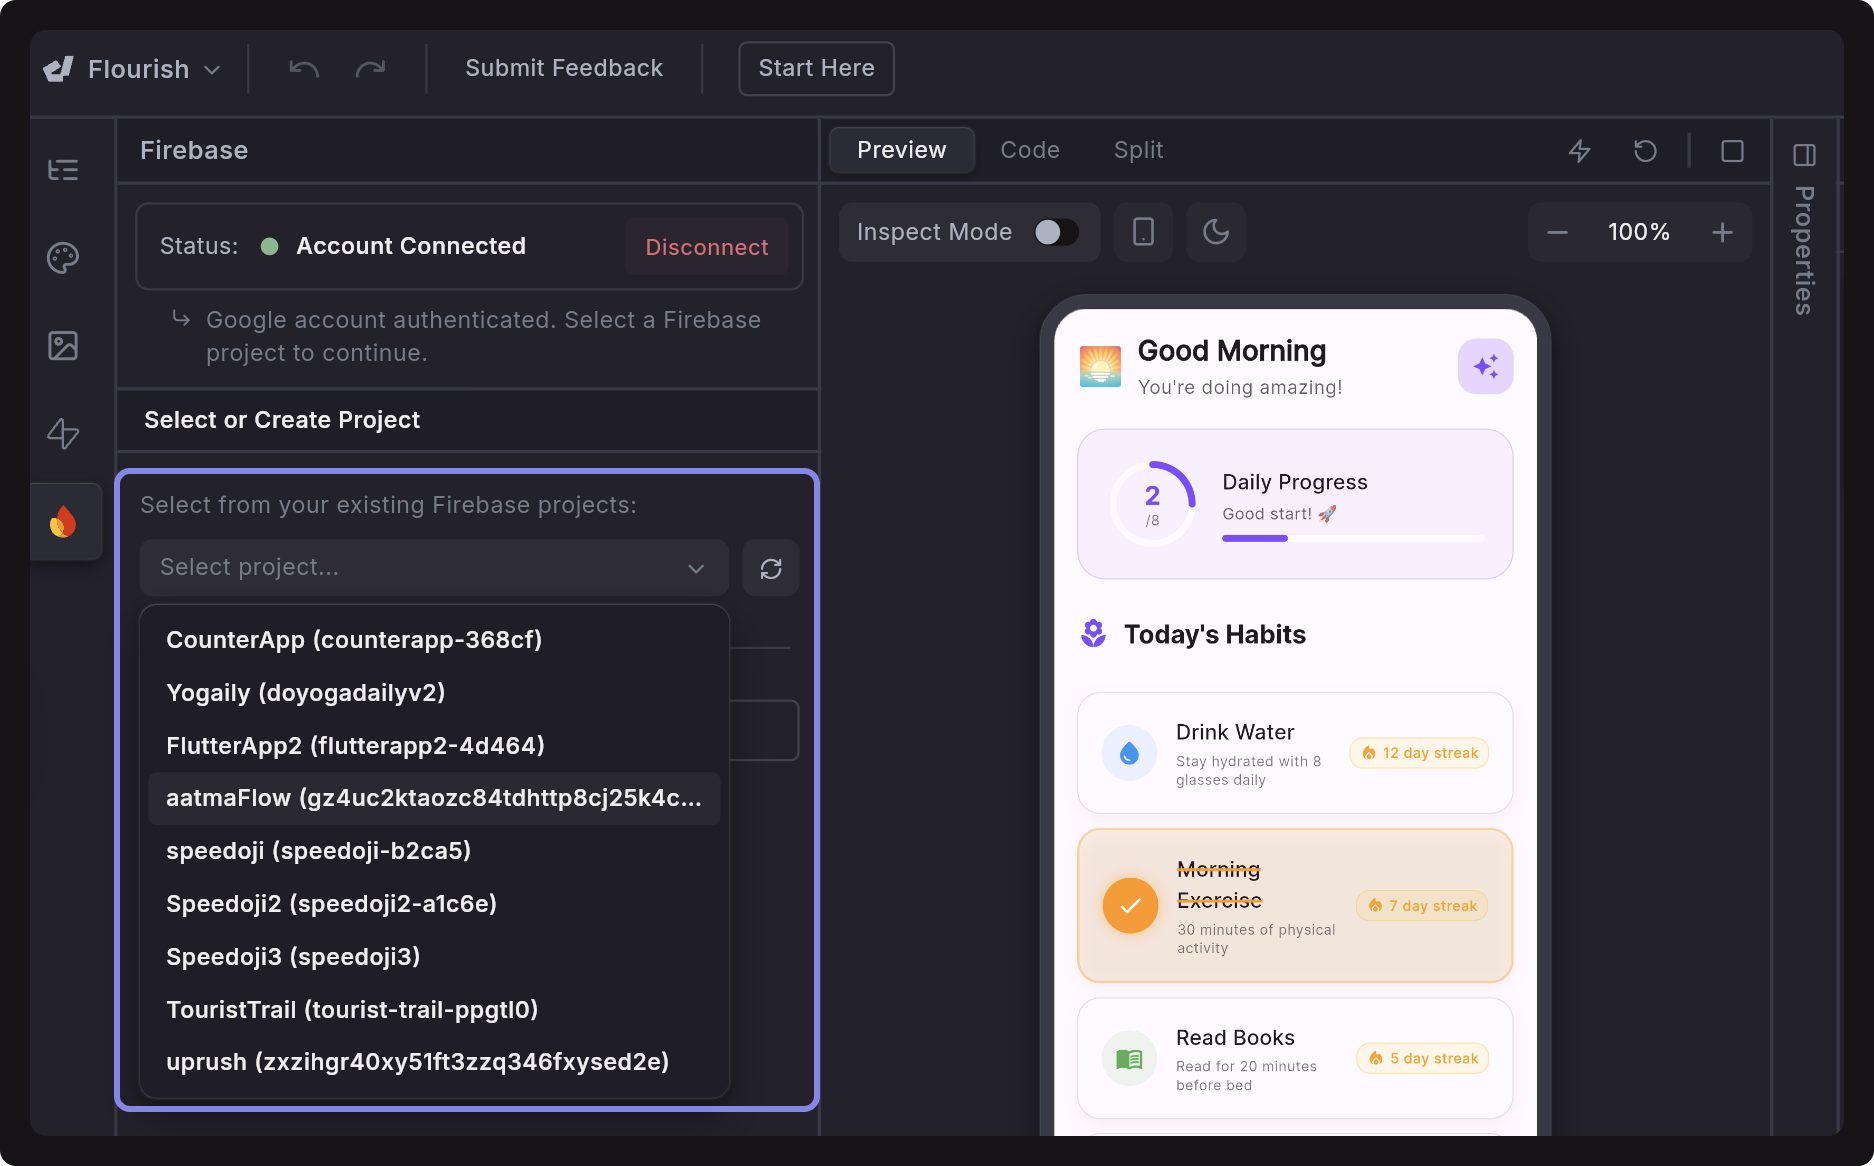
After connecting your Google account, the next step is to set up a Firebase project, which will serve as the backend for your app. You can do this in two ways:
-
Select an existing Firebase project: Choose from the list of your existing Firebase projects.
-
Create a new Firebase project: Let Dreamflow automatically create and configure a new Firebase project for you.
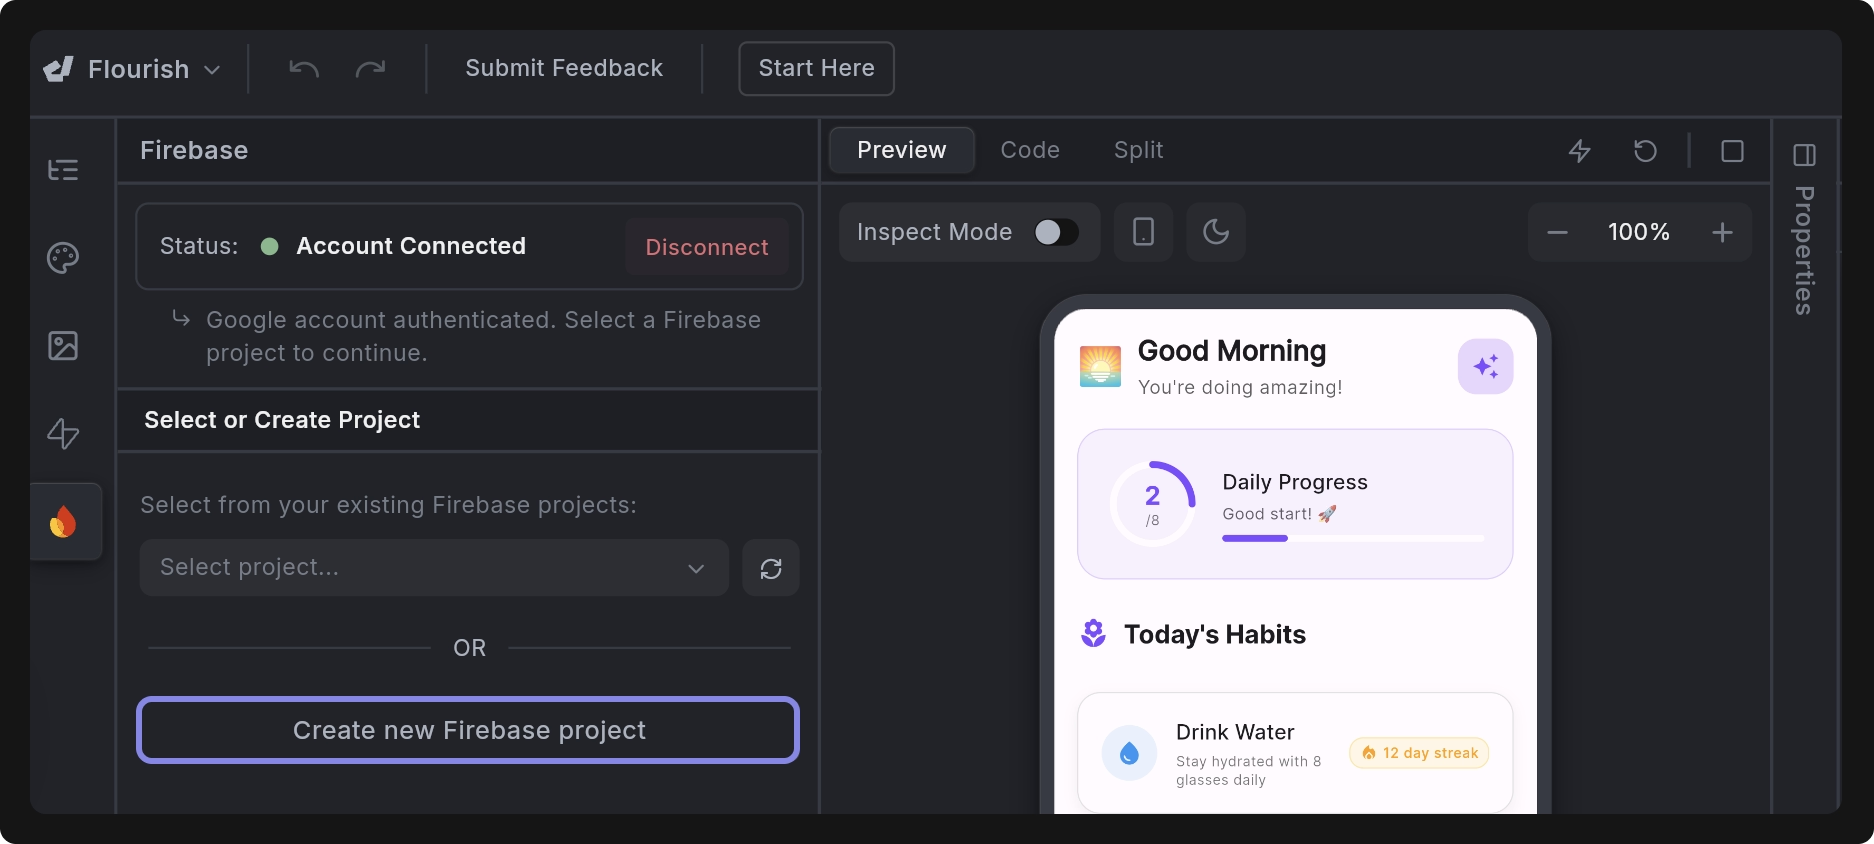
Once the project is linked, you need to specify the following:
- Target Platforms: Choose the platforms you want to support (Web, iOS, Android, macOS, Linux, Windows). Web is always enabled by default, so your app can be previewed inside Dreamflow. Selecting the right platforms ensures Firebase generates configs for each build target.
- Bundle ID: Enter a unique Bundle ID (e.g.,
com.yourcompany.appname). This must match the app identifier in your platform-specific builds (iOS bundle ID, Android package name). If you skip this, Firebase cannot configure services for mobile apps.
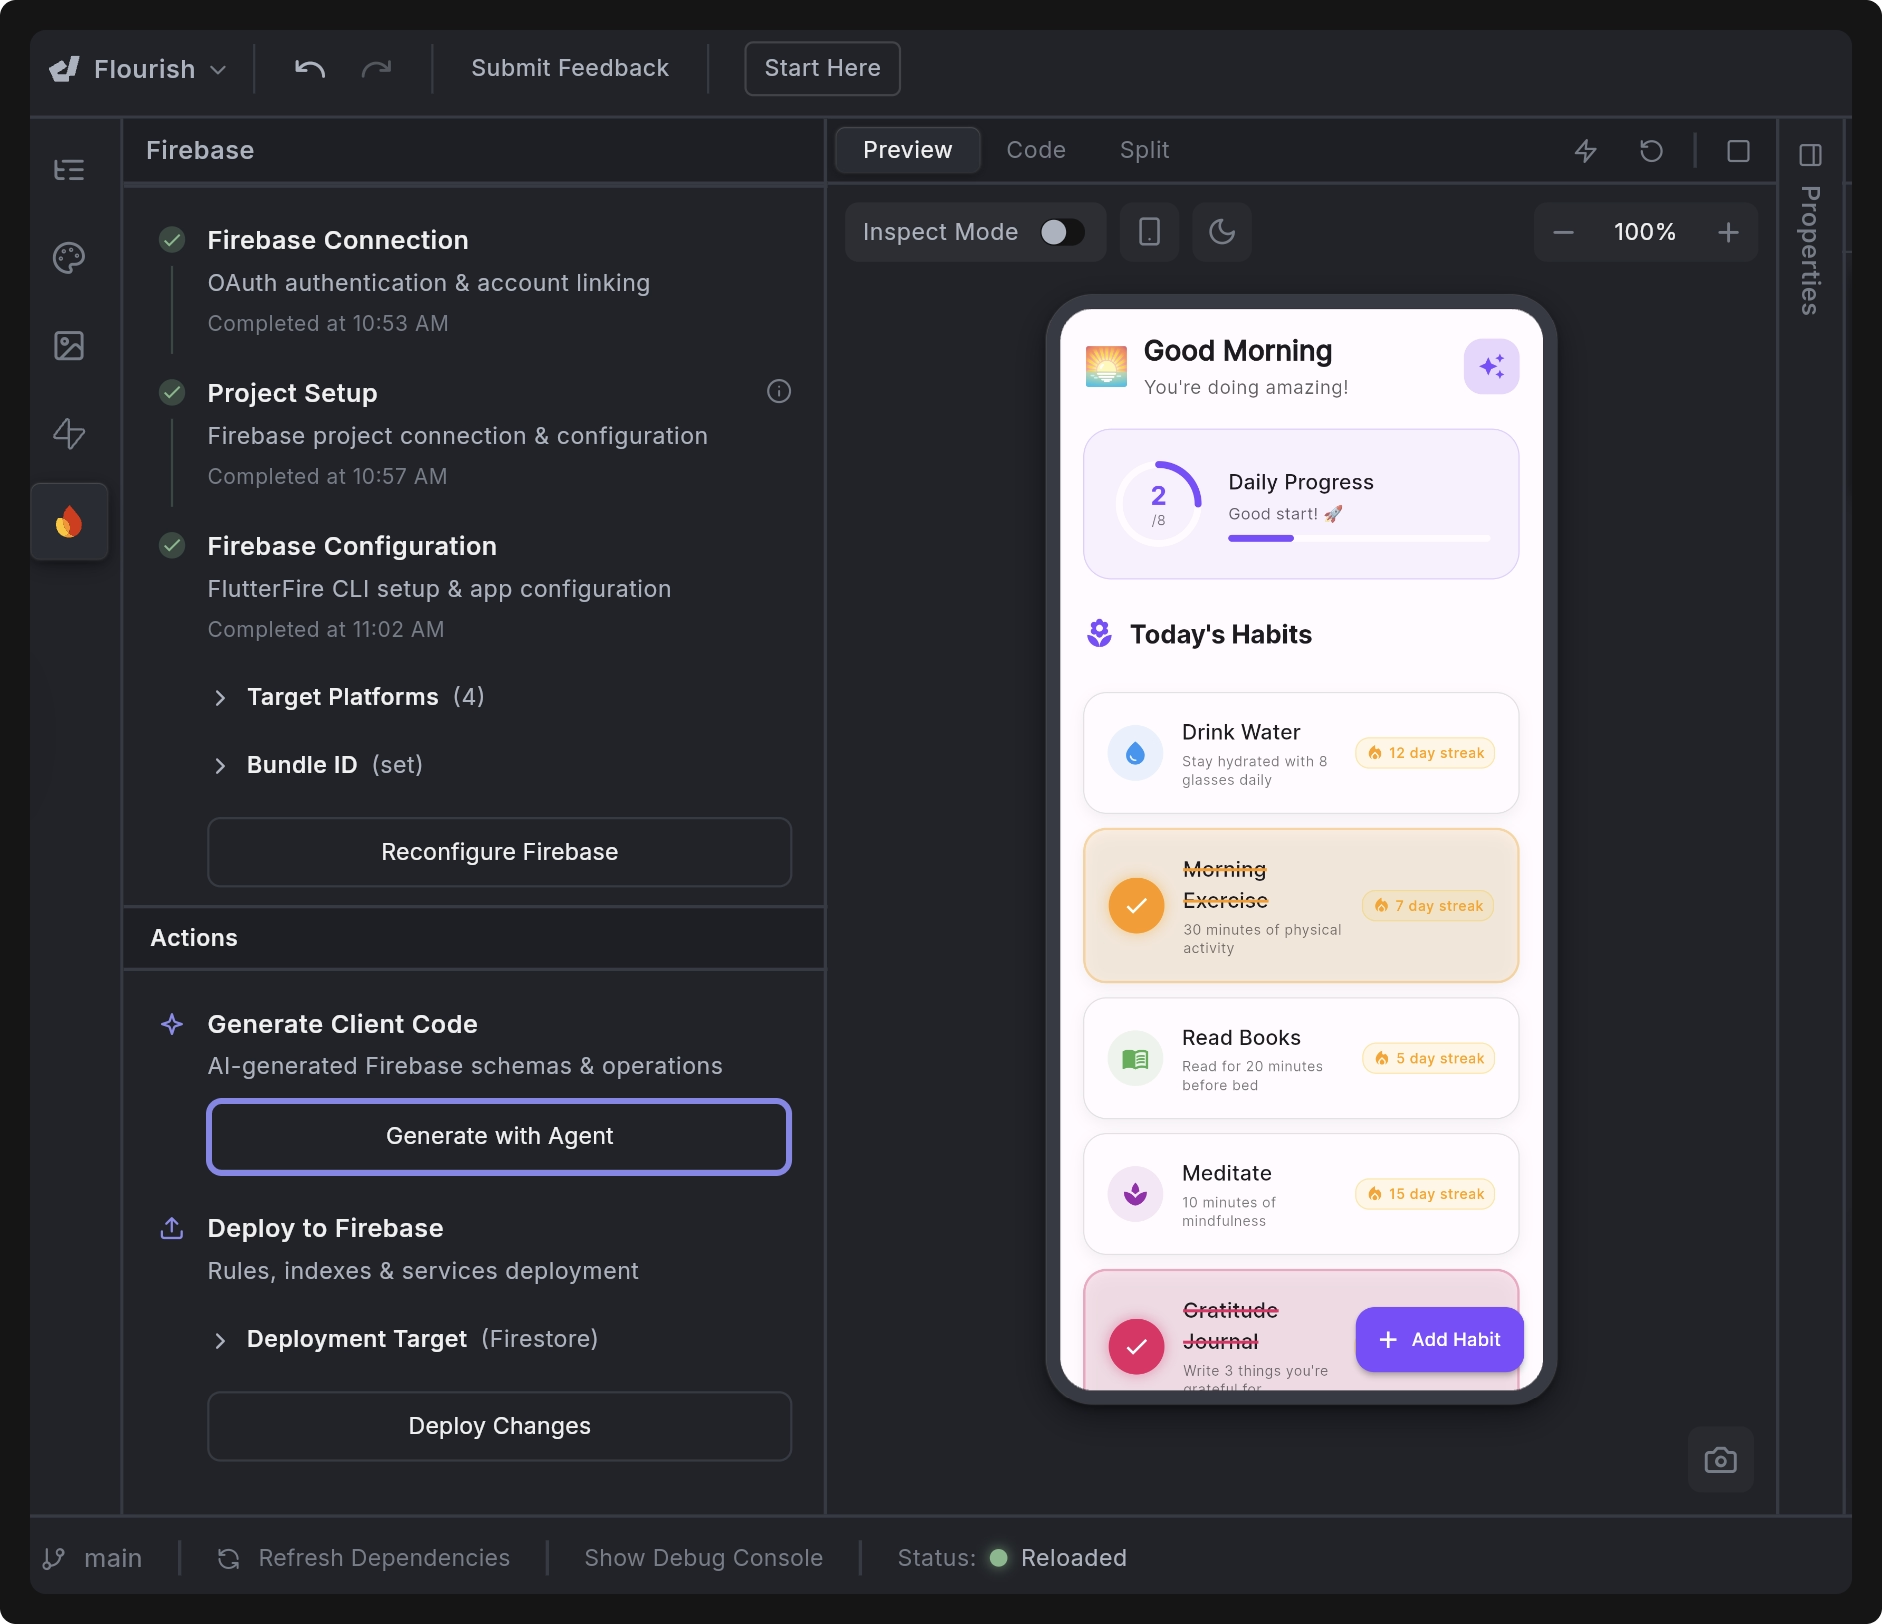
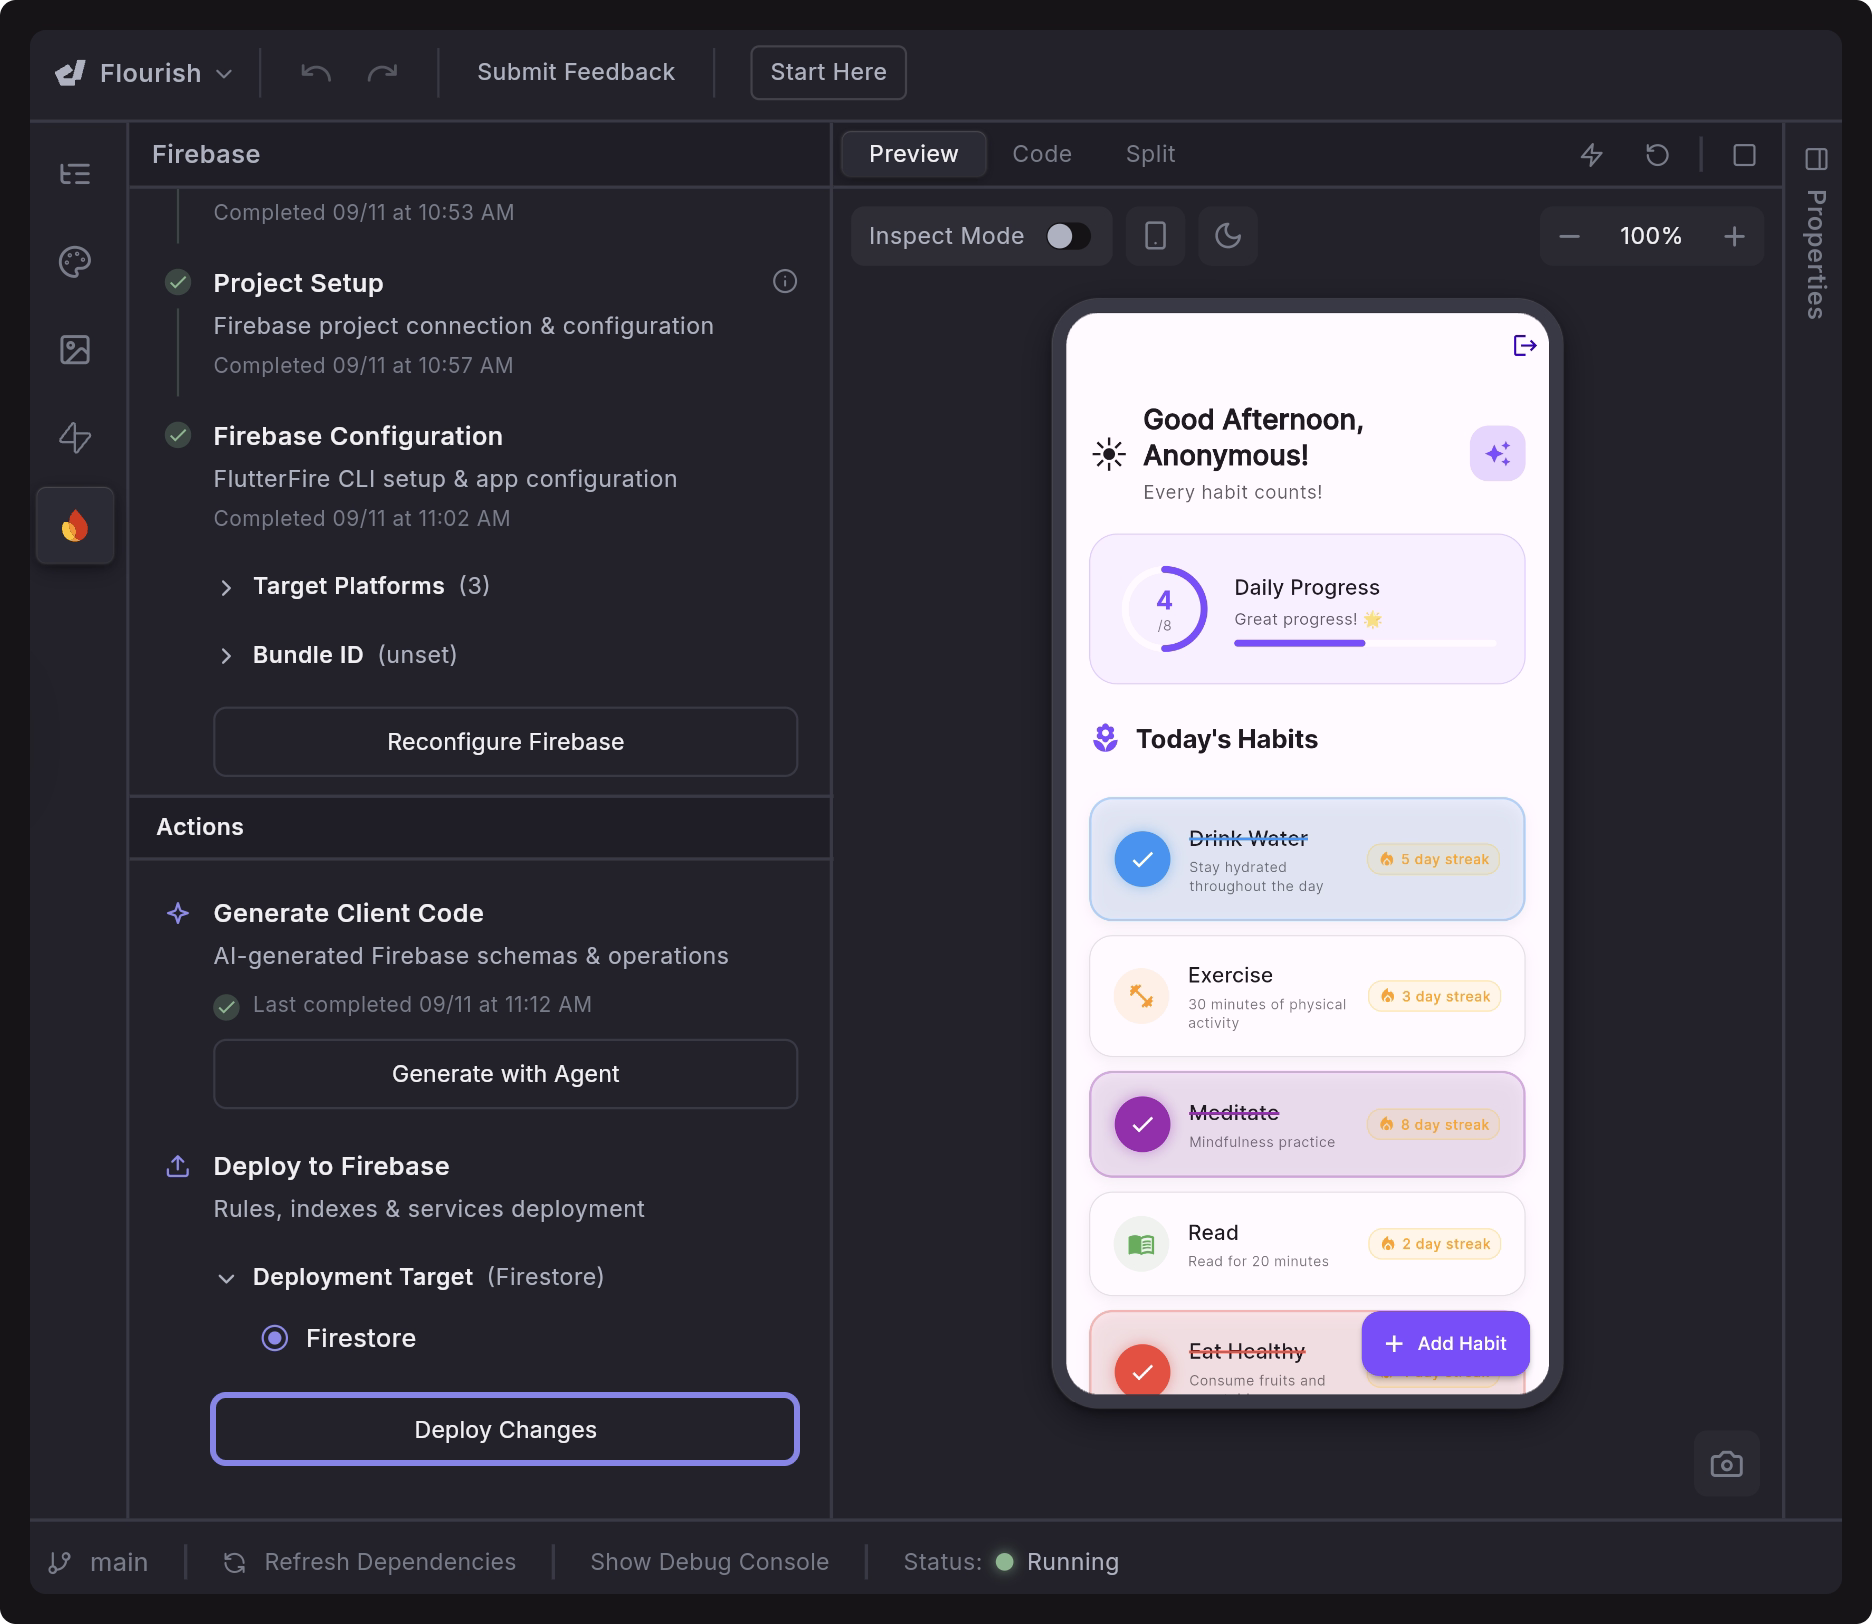
When these details are set, click Configure Firebase to complete the setup.
Behind the scenes, Dreamflow uses the FlutterFire CLI to handle the configuration. This process generates a firebase_options.dart file containing project-specific credentials such as API keys, app ID, and messaging sender ID. These credentials ensure your app is properly connected to Firebase services.
Once configured, changing the Bundle ID later will require reconfiguring Firebase and may break existing builds. Choose carefully before proceeding.
3. Generate Client Code
Once your Firebase project is linked and configured, click Generate with Agent to automatically add the code needed to access Firebase services. This step automates a complete Firebase integration tailored to your app, wiring up authentication, Firestore, state management, and updating the existing app logic with little to no manual effort.
- This step is optional, but we strongly recommend doing it. It saves significant development time by scaffolding schemas, services, and security rules automatically to ensure your Firebase integration is both secure and production-ready from the start.
- The generated code is fully editable and serves as a starting point for customization.
Code Generation Breakdown
When you click Generate with Agent, Dreamflow performs several background steps, including (but not limited to):
- Firebase Configuration Files
- Creates and updates core Firebase files such as
firebase.json,firestore.rules,firestore.indexes.json, andfirebase_options.dart. - These files define how your app connects to Firebase, which services are enabled, and enforce security rules and query indexes.
- Creates and updates core Firebase files such as
- Firestore Schema & Services
- Generates a
firestore_data_schema.dartfile to define collections and documents. - Implements a
firebase_service.dartrepository class to handle Firestore operations (CRUD, queries, synchronization). - Adds indexes and security rules to enforce per-user access control.
- Generates a
- Authentication System
- Creates an
auth_service.dartfor sign-in/sign-out logic. - Adds an
auth_wrapper.dartto manage authentication state across the app. - Updates
main.dartto initialize Firebase and route users based on authentication state.
- Creates an
- App Screens
- Updates app pages to fetch and display live data from Firestore instead of hardcoded values.
- Adds authentication screens to handle user sign-in and sign-up flows.
- Dependencies & Compilation
- Updates
pubspec.yamlwith required Firebase dependencies. - Resolves version conflicts and ensures successful compilation.
- Updates
After Dreamflow generates code for Firebase services, you must enable those services in the Firebase Console for them to function correctly. For example:
- Authentication: Enable required sign-in methods such as Email/Password or Social Sign-in.
- Firestore Database: Activate Firestore in the console to store and retrieve data.
- Firebase Storage: Enable Storage to handle file uploads and downloads.
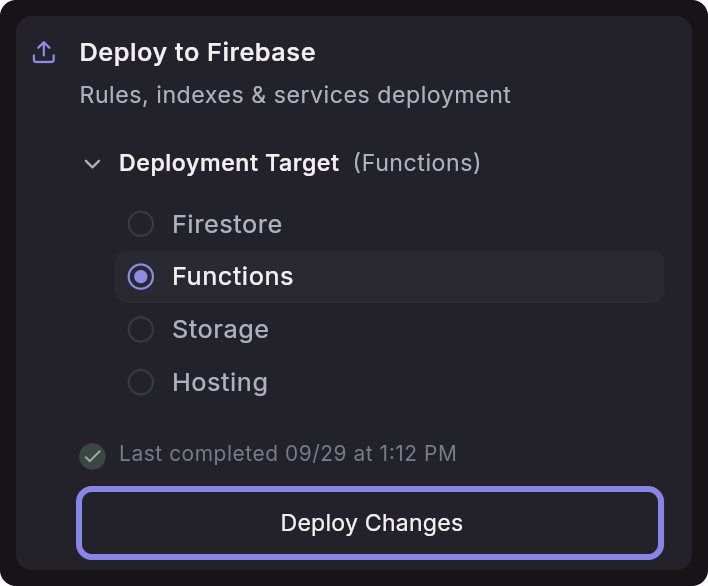
4. Deploy to Firebase
The final step is to deploy the generated schemas, indexes, and rules to Firebase so they become active in your project. For example, in a habit tracker app, Dreamflow deploys rules that allow only the authenticated user to modify their habits collection.
To deploy to Firebase:
- In the Actions panel, go to Deploy to Firebase. Under Deployment Target, select the Firebase service you want to deploy to (default is Firestore).
- Click Deploy Changes.
- Until you deploy, rules and schemas only exist in Dreamflow and are not sent to Firebase.
- Dreamflow uses the Firebase CLI to push security rules, indexes, and any additional configurations (e.g., Auth, Storage) to Firebase.
This step is critical for security, as without rules, your Firestore may be open to anyone.
5. Configure Authentication
If the generated client code includes authentication-related functionality, you must configure sign-in providers in the Firebase Console to make it work.
To enable authentication, click Configure Authentication. This opens the Authentication page in the Firebase Console, where you can select a sign-in provider such as Email/Password, Google, or Facebook. Enable the chosen provider, configure its settings (for example, OAuth credentials for Google or Facebook), and click Save. Repeat this process to enable any additional providers required by your app.
Here’s an example of enabling email/password authentication:
Google Authentication
To configure Google Sign-In for your app, follow these steps:
1. Enable Google Authentication in Firebase Console
In the Firebase Console, go to Authentication > Sign-in method, select Google, and enable it. Click Save to confirm.
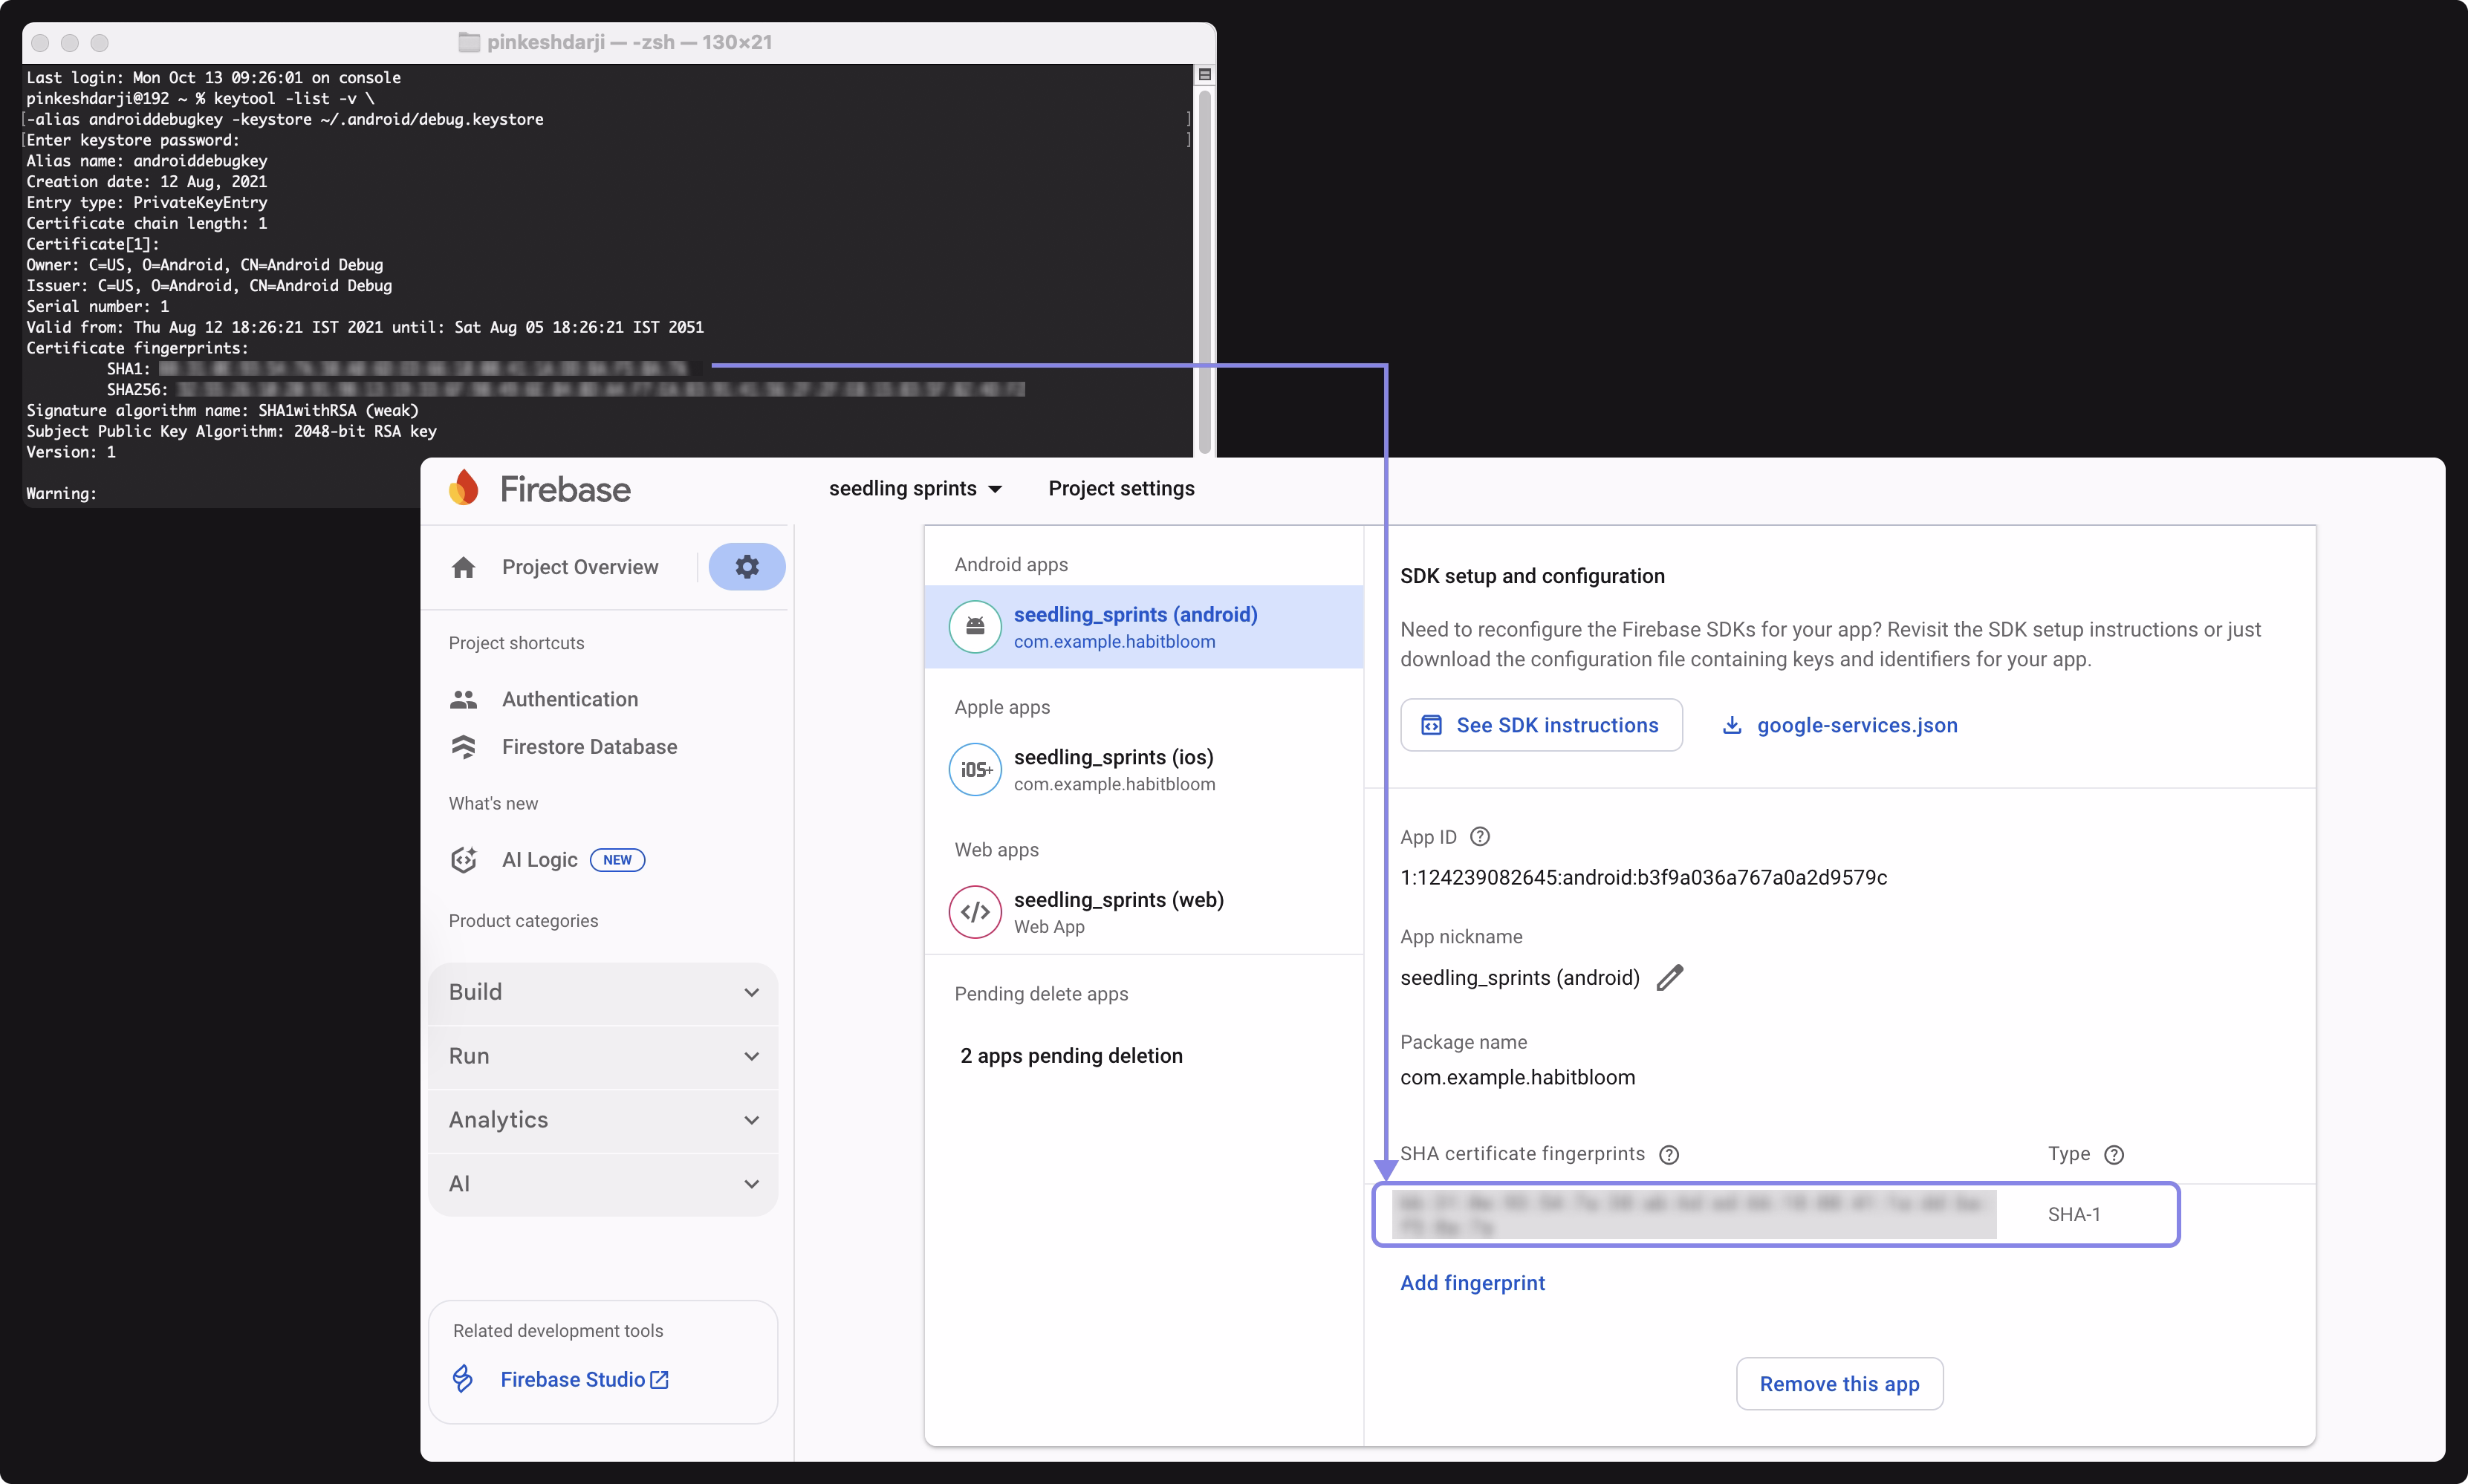
2. Add SHA-1 Key for Android
For Android apps, generate your SHA-1 key by following the instructions in the Google Developer Guide. Then, open the Firebase Console > Project Settings, scroll to Your Apps section, select your Android app, and under SHA certificate fingerprints, click Add fingerprint. Paste the SHA-1 key and click Save.
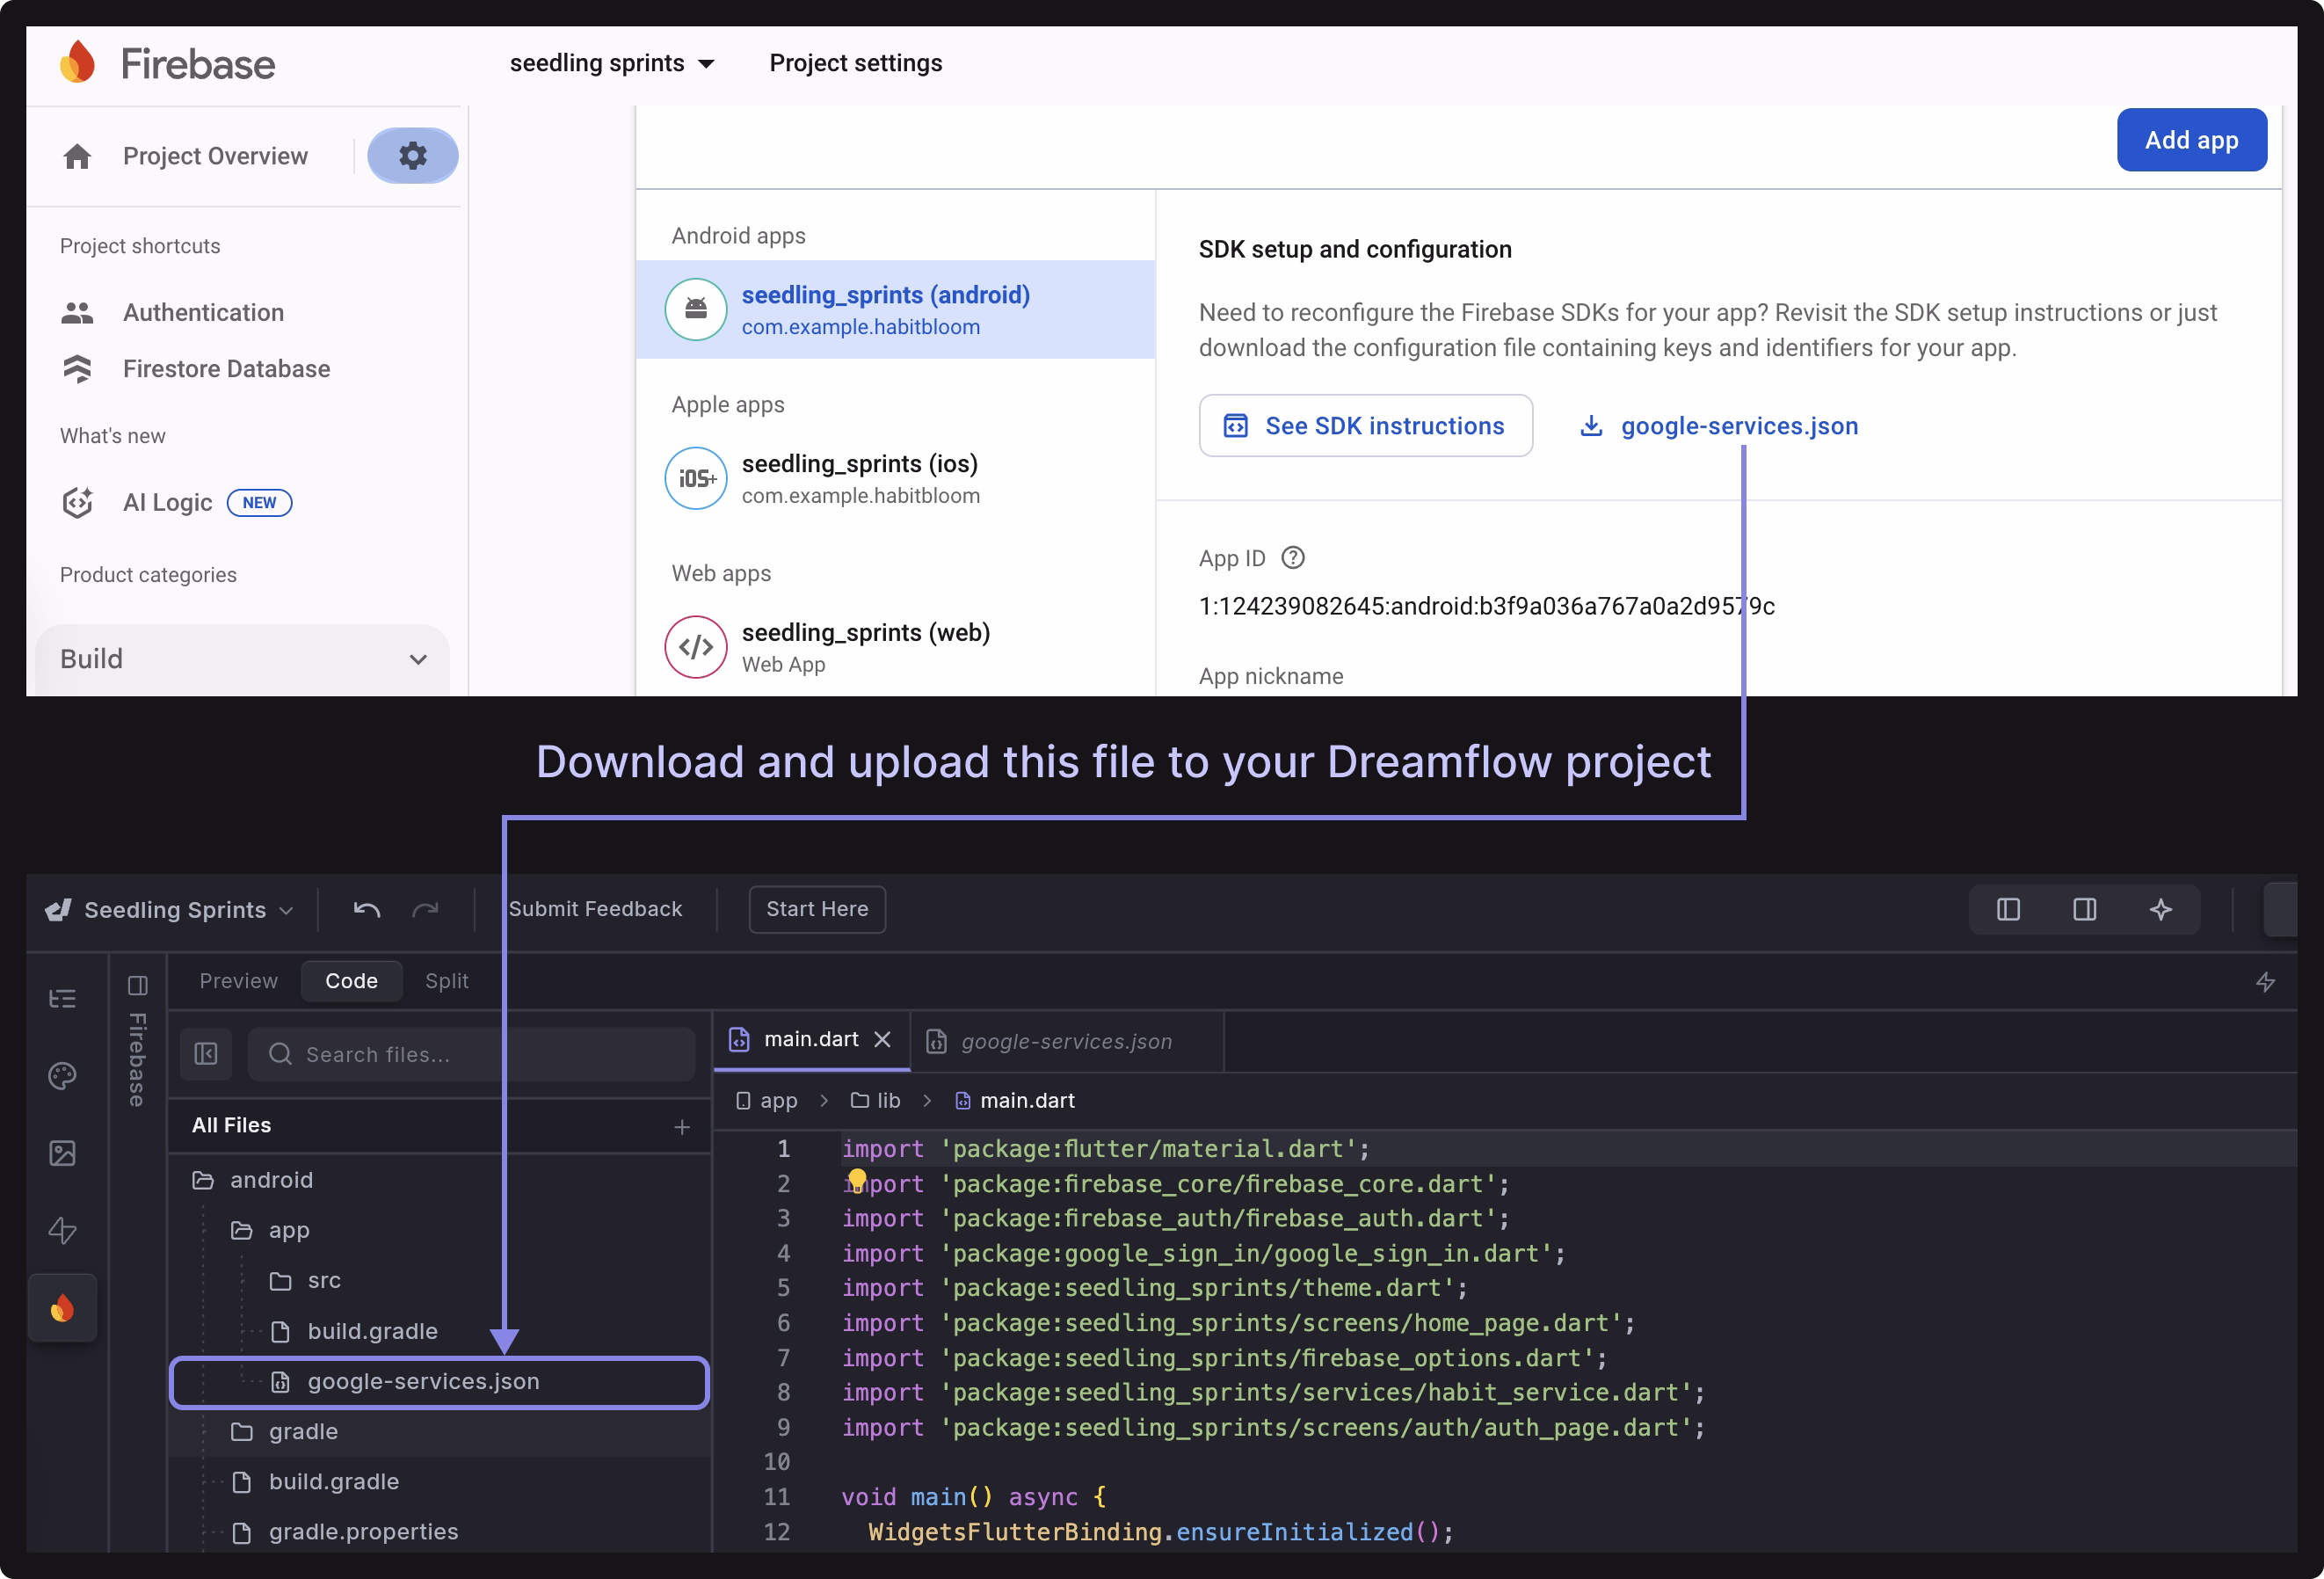
3. Update Firebase Configuration Files
After enabling Google Authentication, download the latest Firebase configuration files, i.e., google-services.json for Android and GoogleService-Info.plist for iOS, from the Firebase Console, and then upload these files to your Dreamflow app at the following location:
- Place the
google-services.jsonfile inside your project atandroid/app/. - Place the
GoogleService-Info.plistfile insideios/Runner/.
4. Add Google Authentication Code
You can add the Google sign-in code manually or let the Dreamflow Agent generate it for you. Here’s the sample agent prompt you can try:
Generate Google Sign-In authentication code for both mobile and web using the latest versions of firebase_auth and google_sign_in Dart packages.
5. Add Authorized Domain
If you’re building for the web and want to test authentication while running your app in Dreamflow, follow the steps in the Add Authorized Domain section to add your Dreamflow preview domain to the Authorized Domains list in the Firebase Console.
Facebook Authentication
To enable Facebook login in your app, follow the steps below:
1. Set Up a Facebook Developer App
Before getting started, create and configure your Facebook Developer App. During setup, enable the Facebook Login product and complete the basic configuration.
2. Enable Facebook Authentication in Firebase Console
-
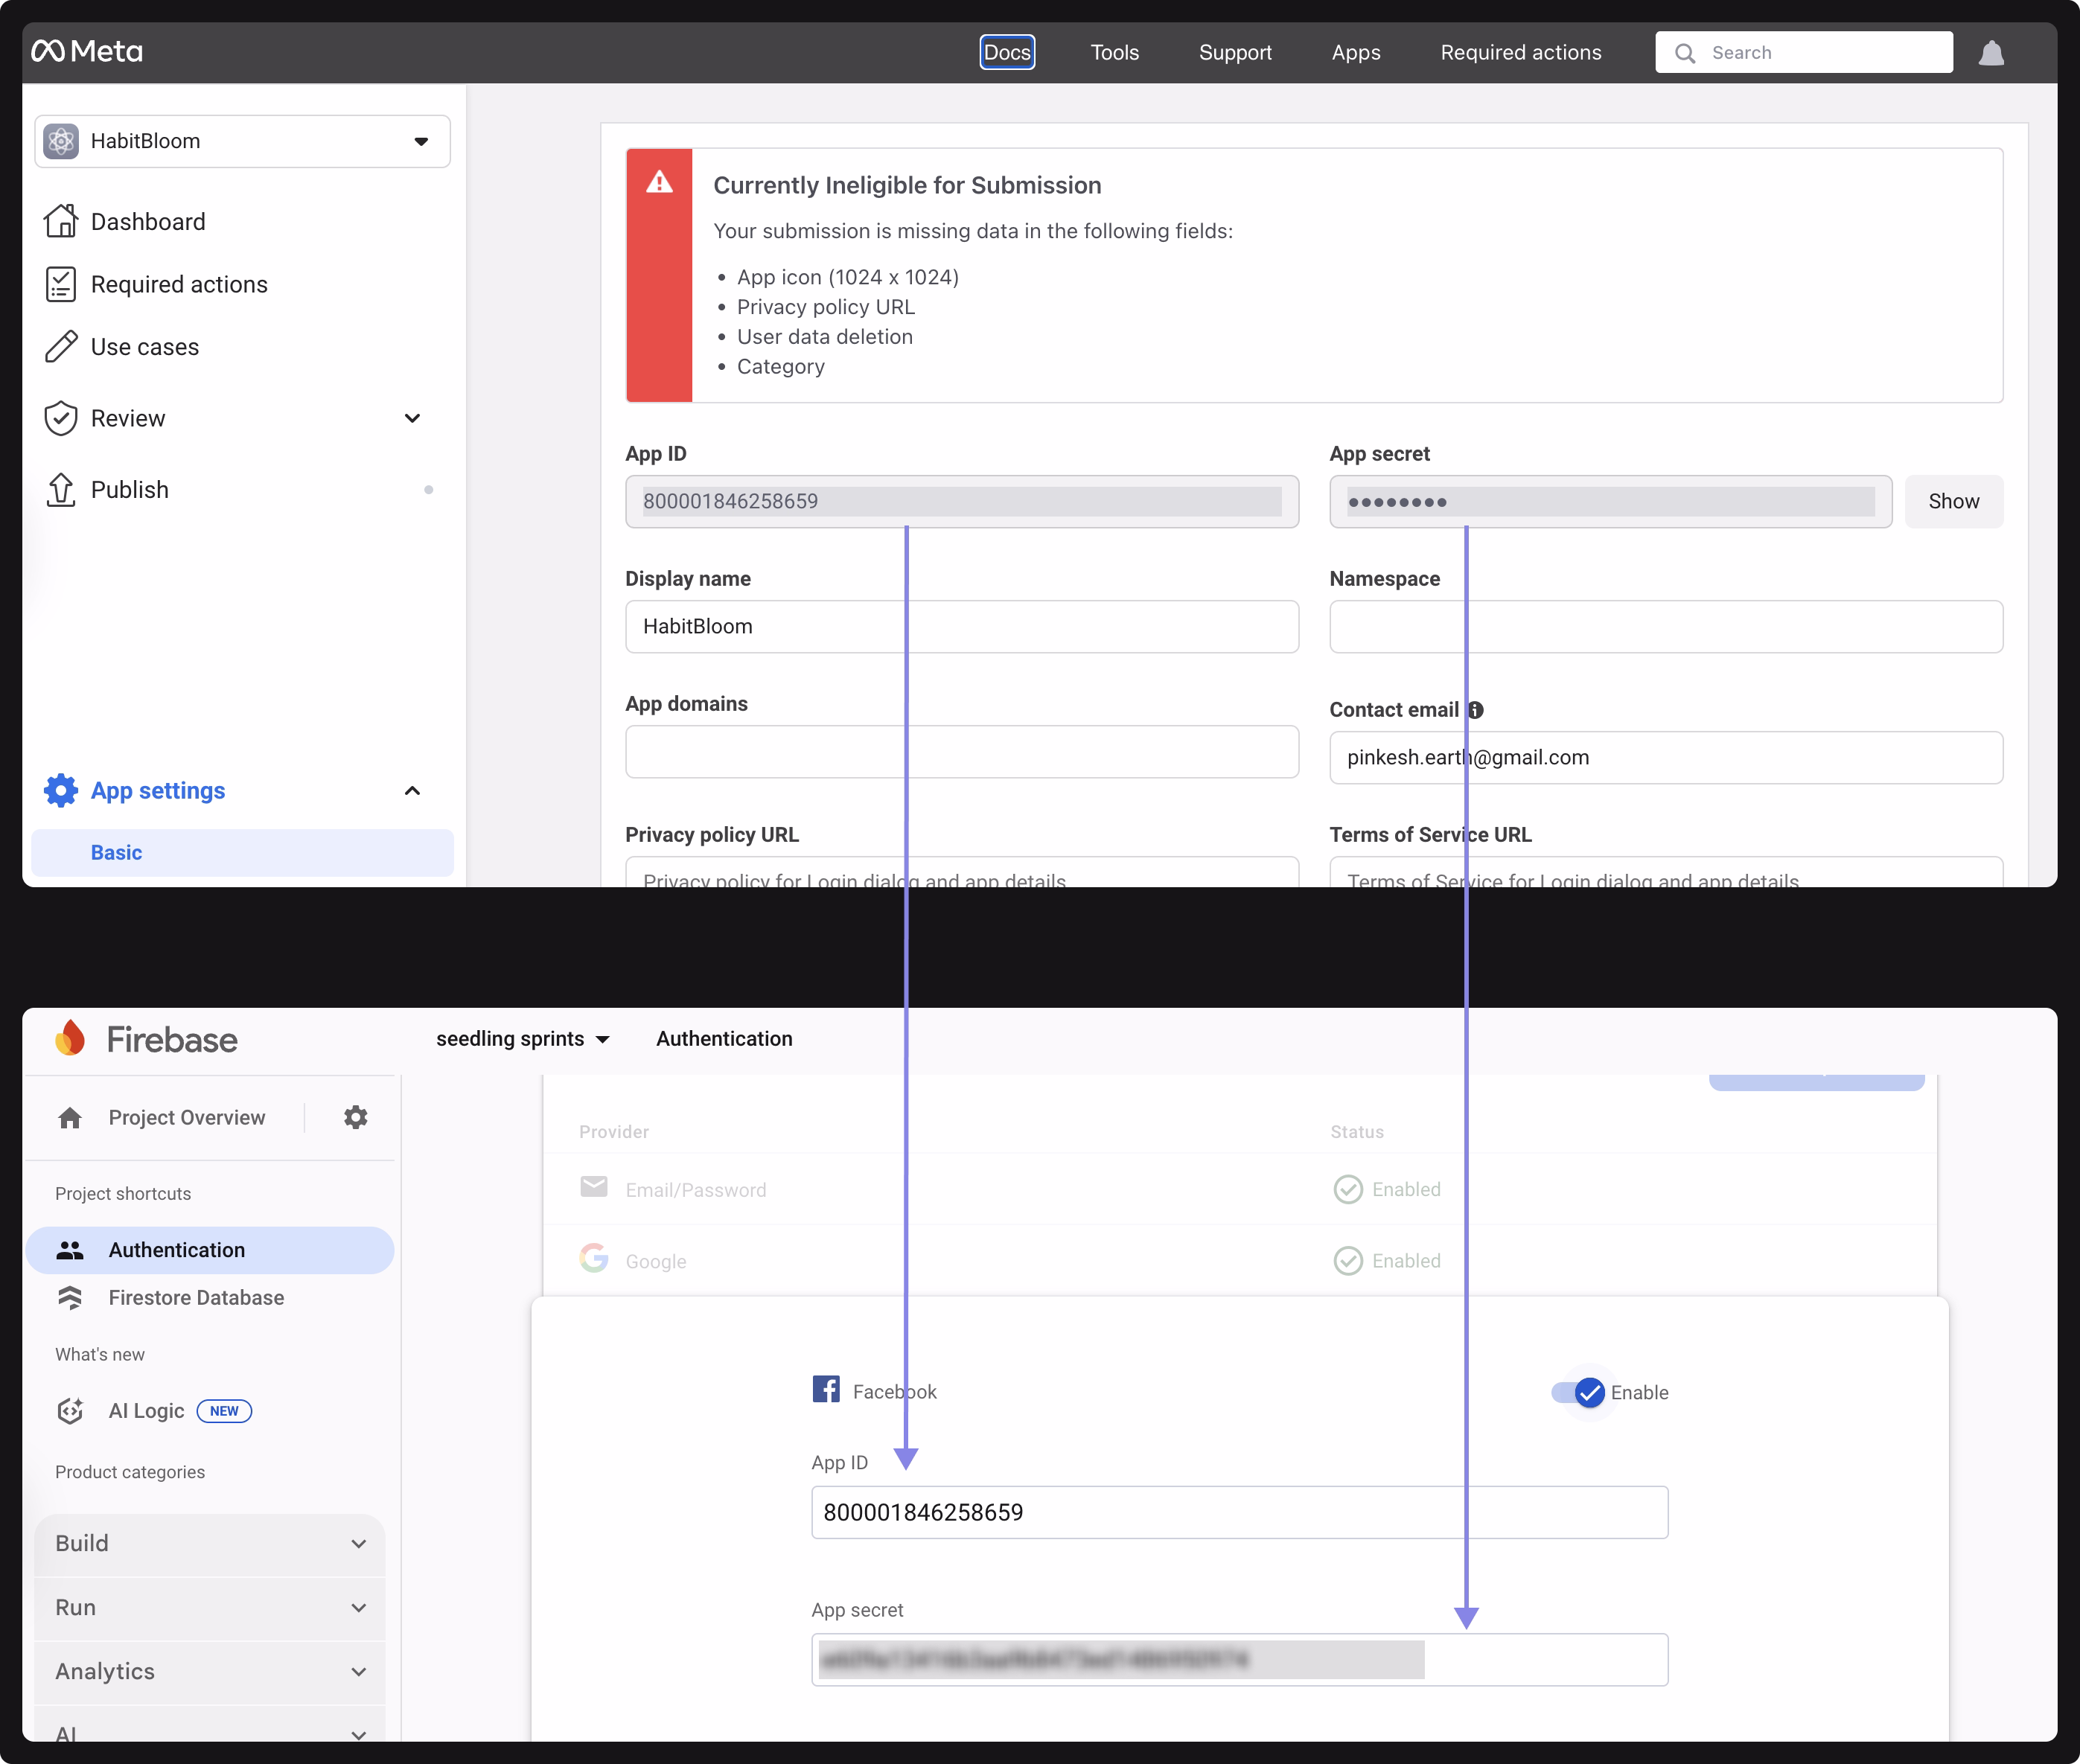
In the Firebase Console, go to Authentication > Sign-in method. Select Facebook and enable it.
-
You’ll be prompted to enter your App ID and App Secret, which you can find in your Facebook Developer App Dashboard under App Settings > Basic.
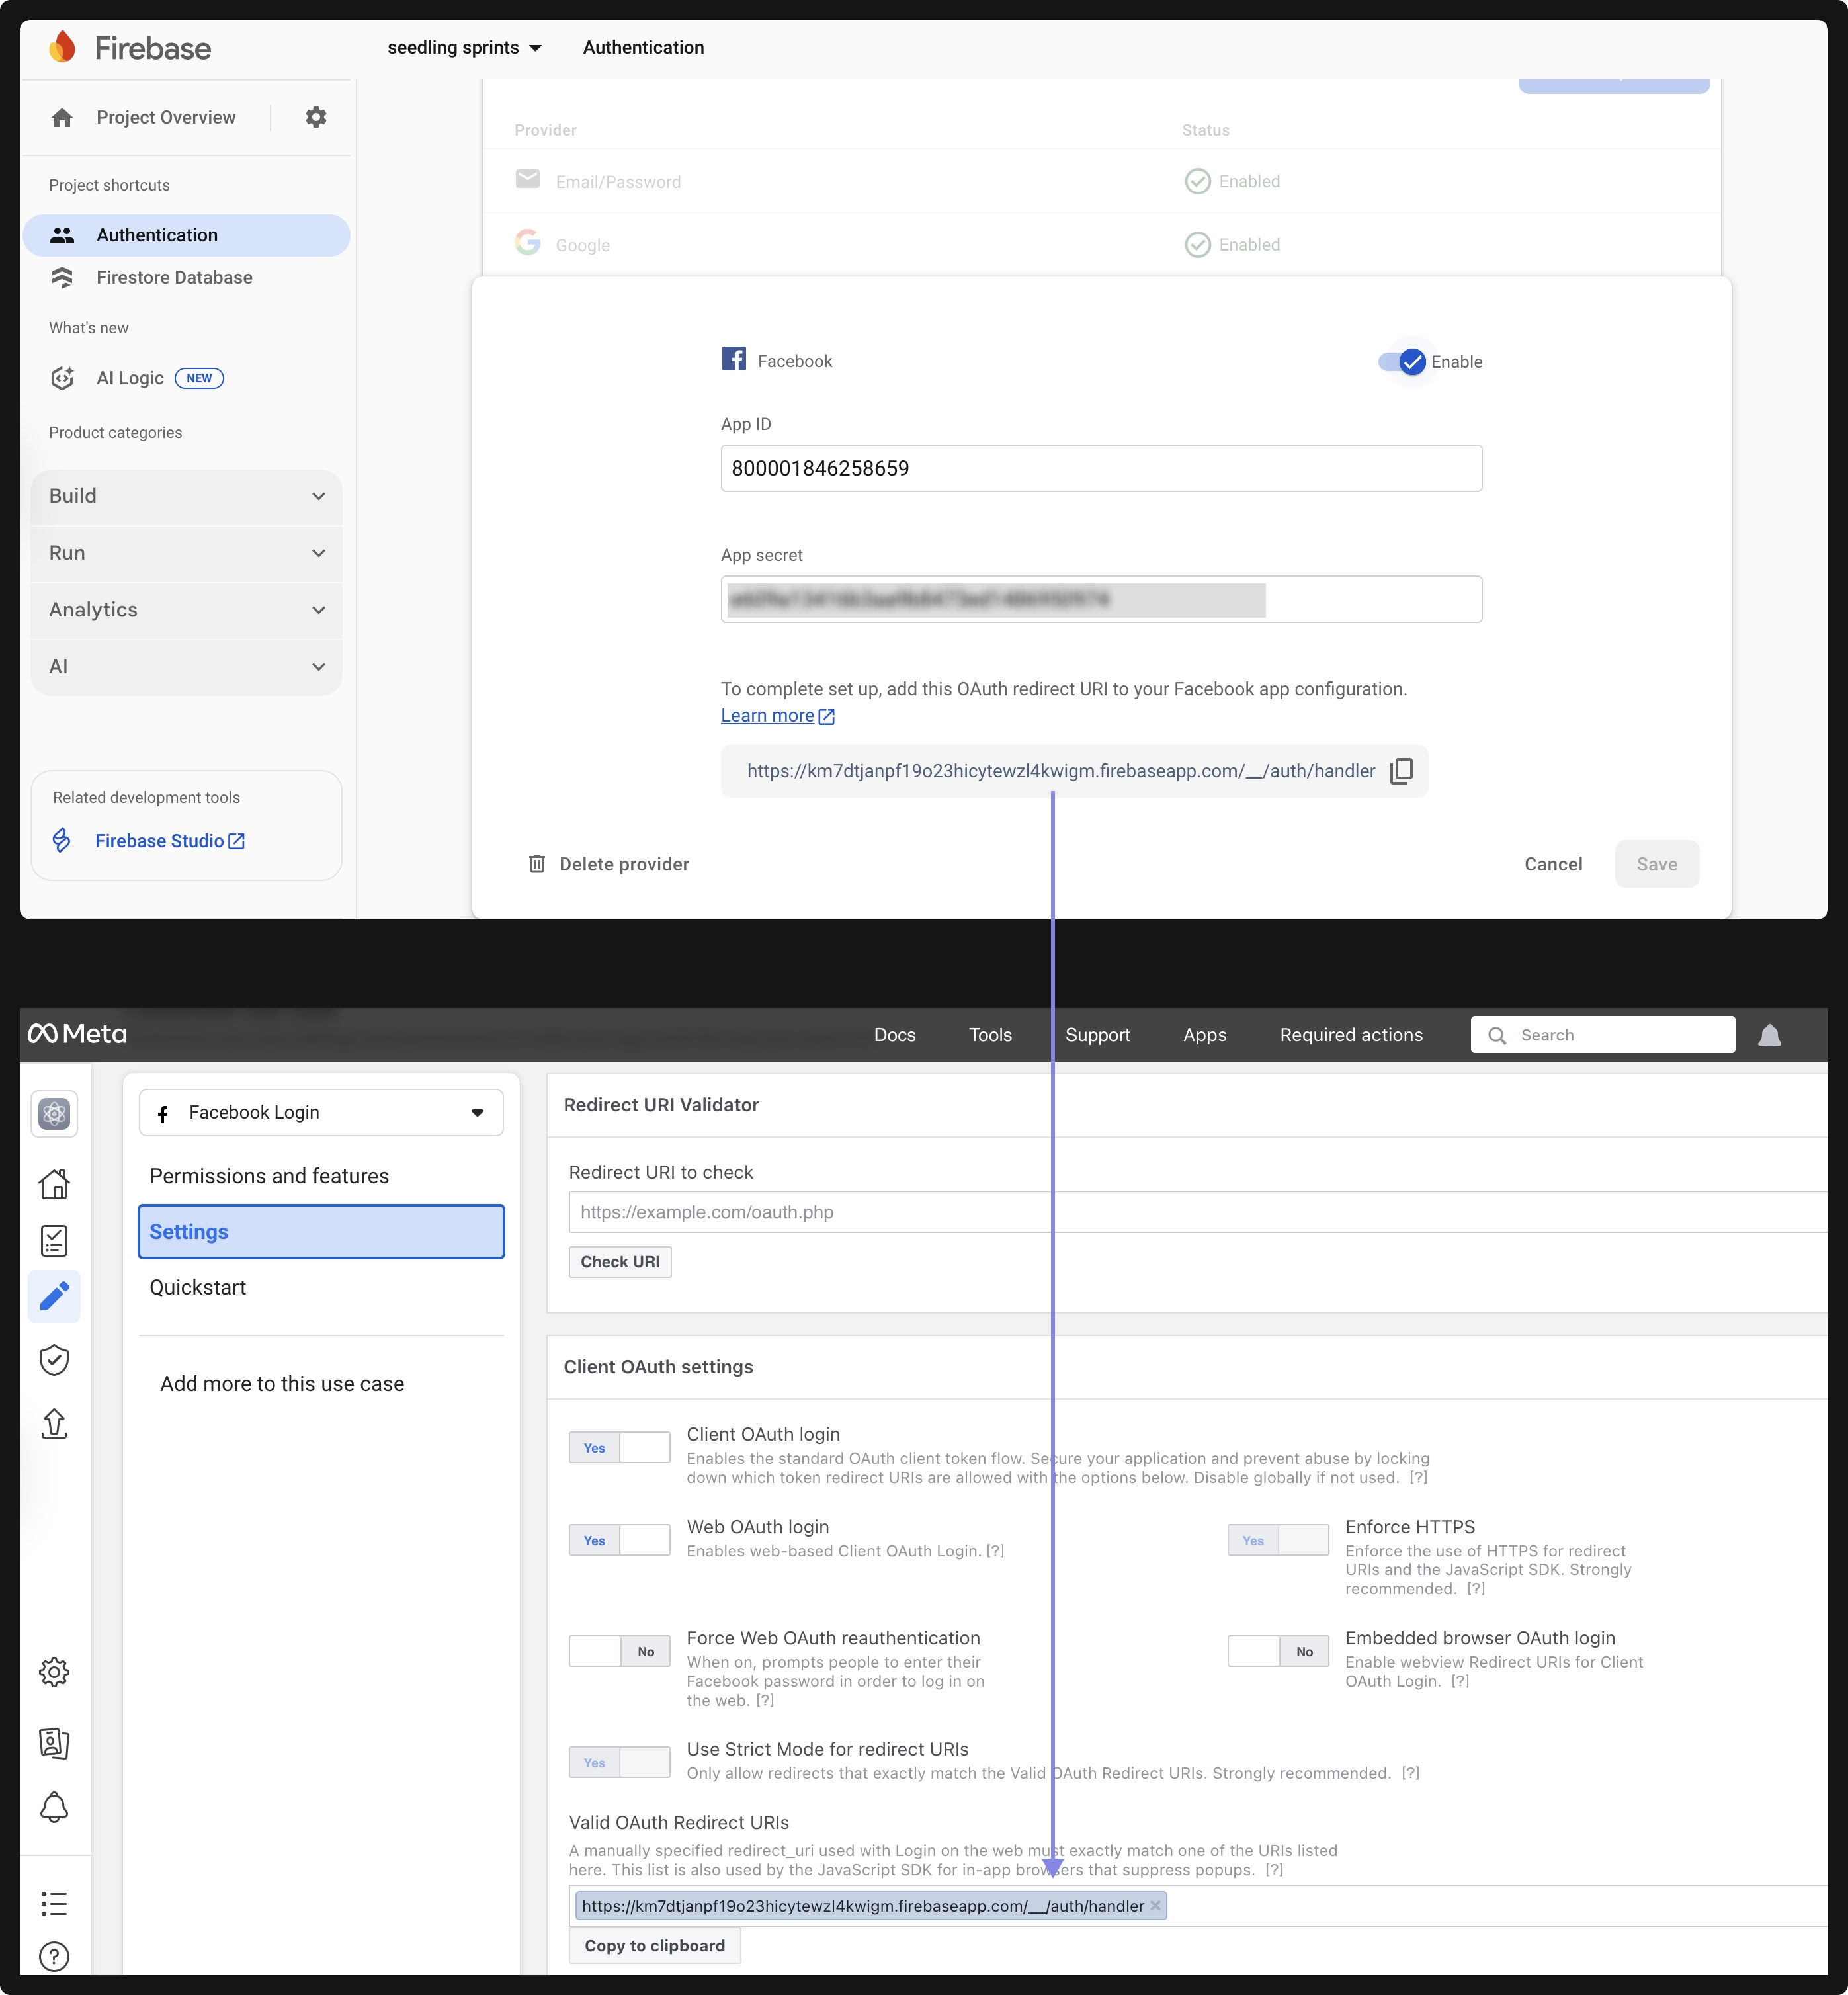
-
Copy the OAuth Redirect URI displayed in Firebase and add it to your Facebook app settings under Facebook Login > Settings > Valid OAuth Redirect URIs.
-
Click Save in Firebase once everything is configured.
3. Add Facebook Authentication Code
You can add the Facebook sign-in code manually or let the Dreamflow Agent generate it for you. Here’s the sample agent prompt you can try:
Generate Facebook authentication code for both mobile and web using the latest versions of firebase_auth and flutter_facebook_auth Dart packages.
4. Configure Platform-Specific Code
Once the authentication code is added, you’ll need to configure your project for Android and iOS to ensure the Facebook sign-in works properly.
- For Android: Follow the setup guide in the Facebook Android configuration documentation.
- For iOS: Refer to the Facebook iOS configuration guide.
5. Add Authorized Domain
If you’re building for the web and want to test authentication while running your app in Dreamflow, follow the steps in the Add Authorized Domain section to add your Dreamflow preview domain to the Authorized Domains list in the Firebase Console.
Apple Authentication
To configure Apple Sign-In for your app, follow these steps:
1. Firebase Console Setup
Open Firebase Console > Authentication > Sign-in method. Enable Apple as a sign-in provider. Keep this page open, you’ll return here after configuring Apple in the Developer portal.
2 Apple Developer Setup
Go to the Apple Developer portal > Identifiers list and follow the steps below:
2.1 Create an App ID (for iOS app)
Follow Apple’s official instructions to create an App ID. During the setup process, make sure you enable the Sign In with Apple capability, then finish by selecting Continue and Register to create the App ID.
2.2 Create Service ID (Required for Web & Android)
- Click + to add new identifier.
- Select Services IDs > Continue.
- Enter the Identifier and Description. For Identifier, you can set it by appending “.signin” to your bundle ID (e.g.,
com.awesomeorg.uplift.signin), or use any unique identifier. - Check Sign In with Apple and then click Configure.
- Select your App ID as the Primary App ID.
- Under Website URLs:
- Domains: Add your Firebase domain (e.g.,
yourproject.firebaseapp.com). Do NOT include "https://" - just the domain. - Return URLs: Add
https://yourproject.firebaseapp.com/__/auth/handler(Replace "yourproject" with your actual Firebase project ID).
- Domains: Add your Firebase domain (e.g.,
- Click Next > Done > Continue > Register.
2.3 Create a Key (required for Firebase)
- Go to Keys section.
- Click + to add new key.
- Enter the Key Name, e.g., "Apple Sign In Key for Firebase".
- Check Sign In with Apple.
- Click Configure and select your App ID.
- Click Save > Continue > Register.
- Click Download to get the
.p8key file. Save this file securely - you can only download it once! - Note down the Key ID (shown on the page, e.g., ABC123XYZ) you’ll need this in Firebase Setup.
2.4 Connect Apple to Firebase
- Go back to Firebase Console > Authentication > Sign-in method > Apple.
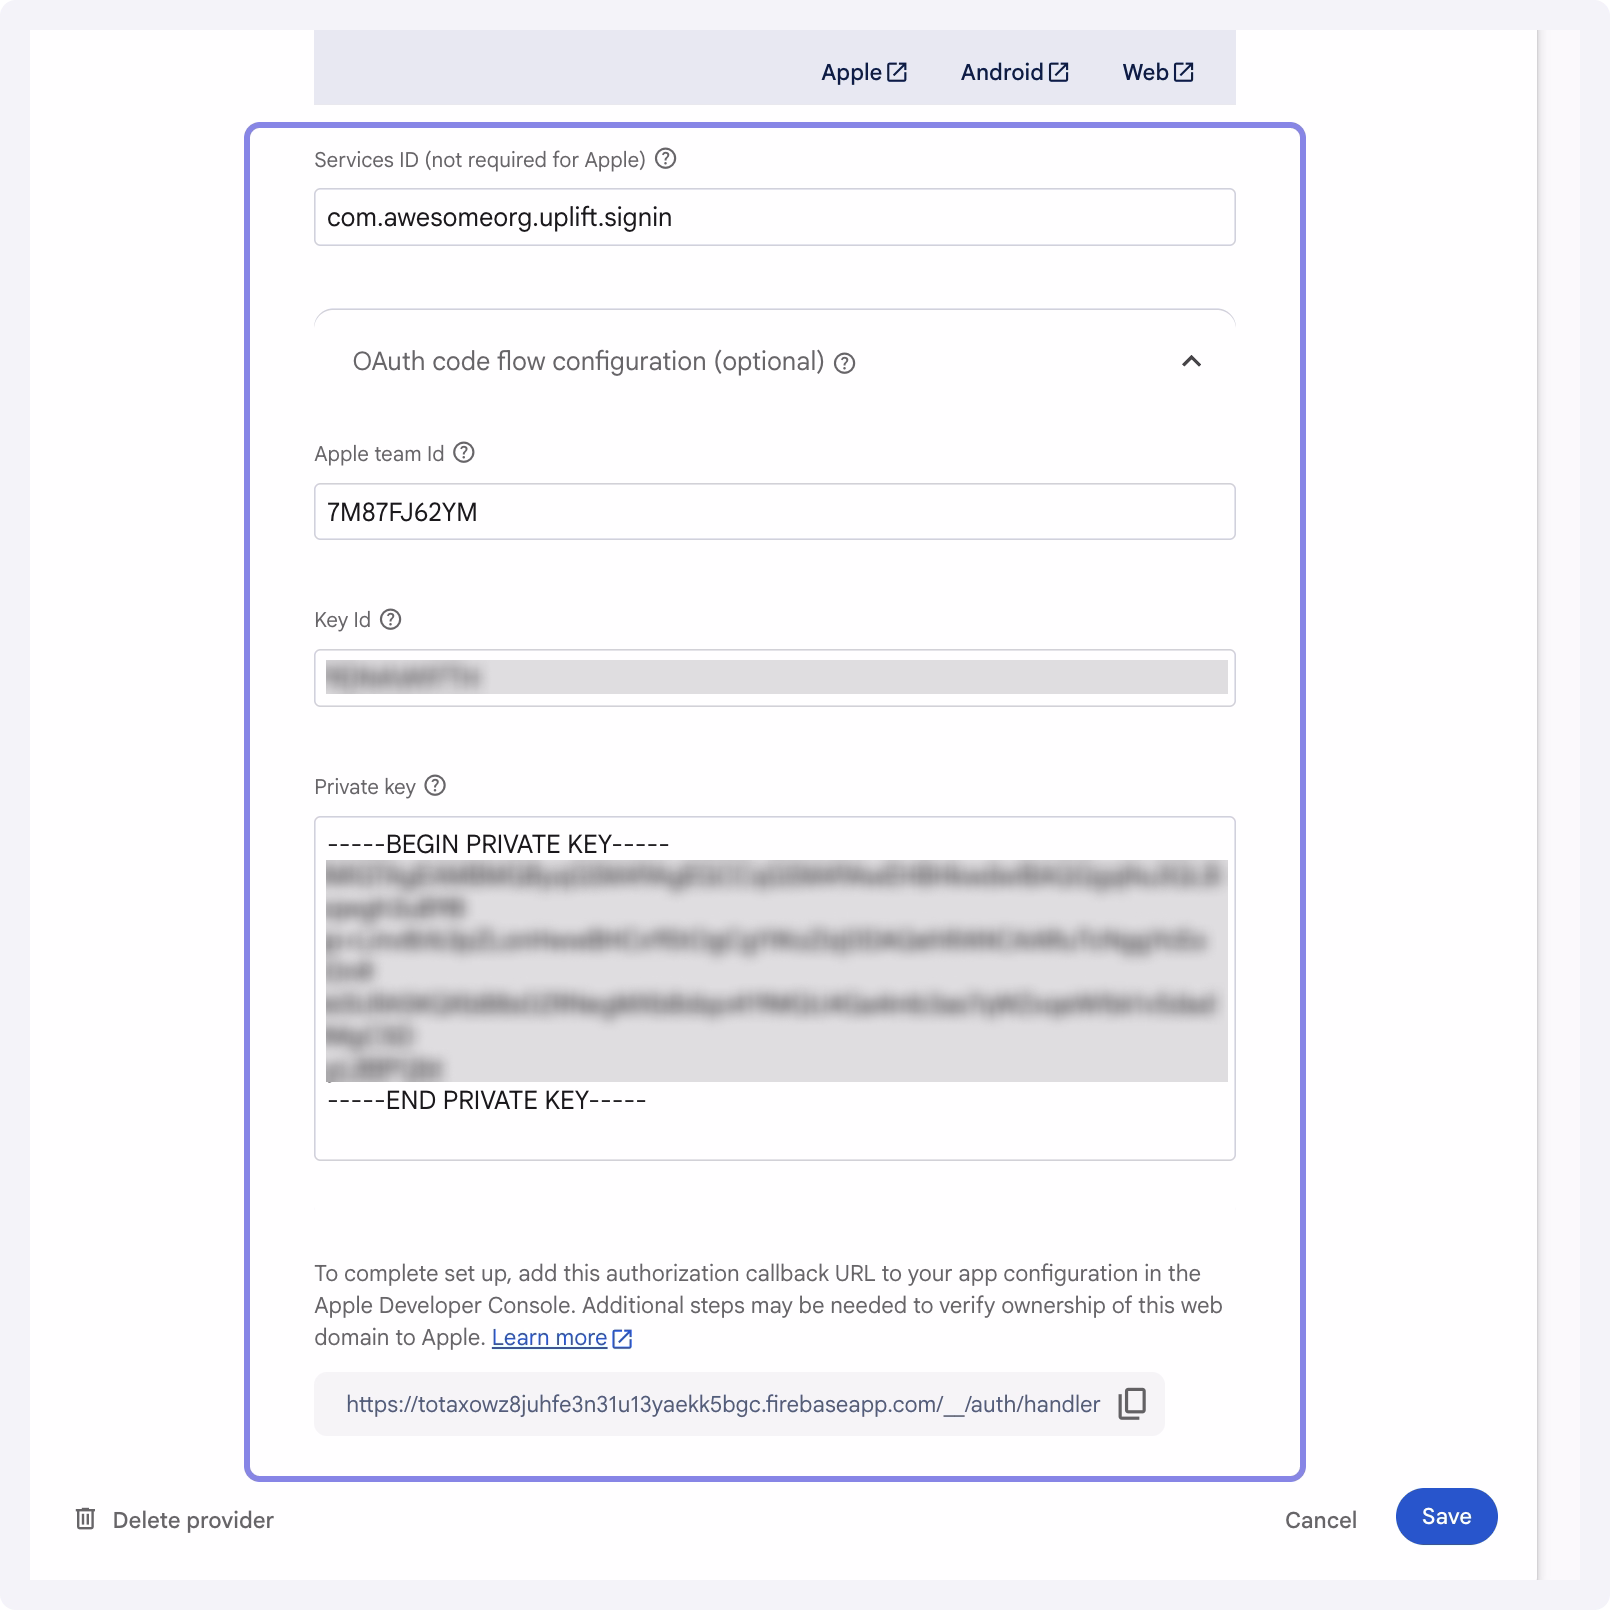
- Under OAuth code flow configuration, fill in the following:
- Service ID: The Service ID you created in Step 2.2 (e.g.,
com.awesomeorg.uplift.signin). - Apple Team ID: Found in your Apple Developer account under Membership Details.
- Key ID: The Key ID from Step 2.3.
- Private key: Paste the content of
.p8file downloaded in Step 2.3.
- Service ID: The Service ID you created in Step 2.2 (e.g.,
- Click Save to complete the configuration.
3. Add Apple Authentication Code
You can add the Apple sign-in code manually or let the Dreamflow Agent generate it for you. Here’s the sample agent prompt you can try:
Generate Apple Sign-In authentication code for both mobile and web using the latest versions of firebase_auth package.
4. iOS Setup
- Download your project and open ios/Runner.xcworkspace in Xcode
- Select the Runner project in the navigator
- Select the Runner target
- Go to Signing & Capabilities tab
- Click + Capability and add Sign In with Apple
- Make sure your Bundle Identifier matches exactly what you set in the Dreamflow.
- Select your development team
- Run the app to test Apple sign in.
- For Android and Web: Make sure you have completed the OAuth code flow configuration in the Firebase console.
- User Info Only on First Sign-In: Apple only returns the user’s name and email on the first successful sign-in. You should store this data (e.g., in Firestore or your backend) the first time you receive it. On subsequent sign-ins, these fields will be
null/ omitted. - “Hide My Email” (Private Relay): Some users choose “Hide My Email” when signing in. Apple then provides a proxy email, e.g.,
abc123@privaterelay.appleid.com. To send emails through the proxy email to the users’ personal inboxes, you'll need to configure private email relay service.
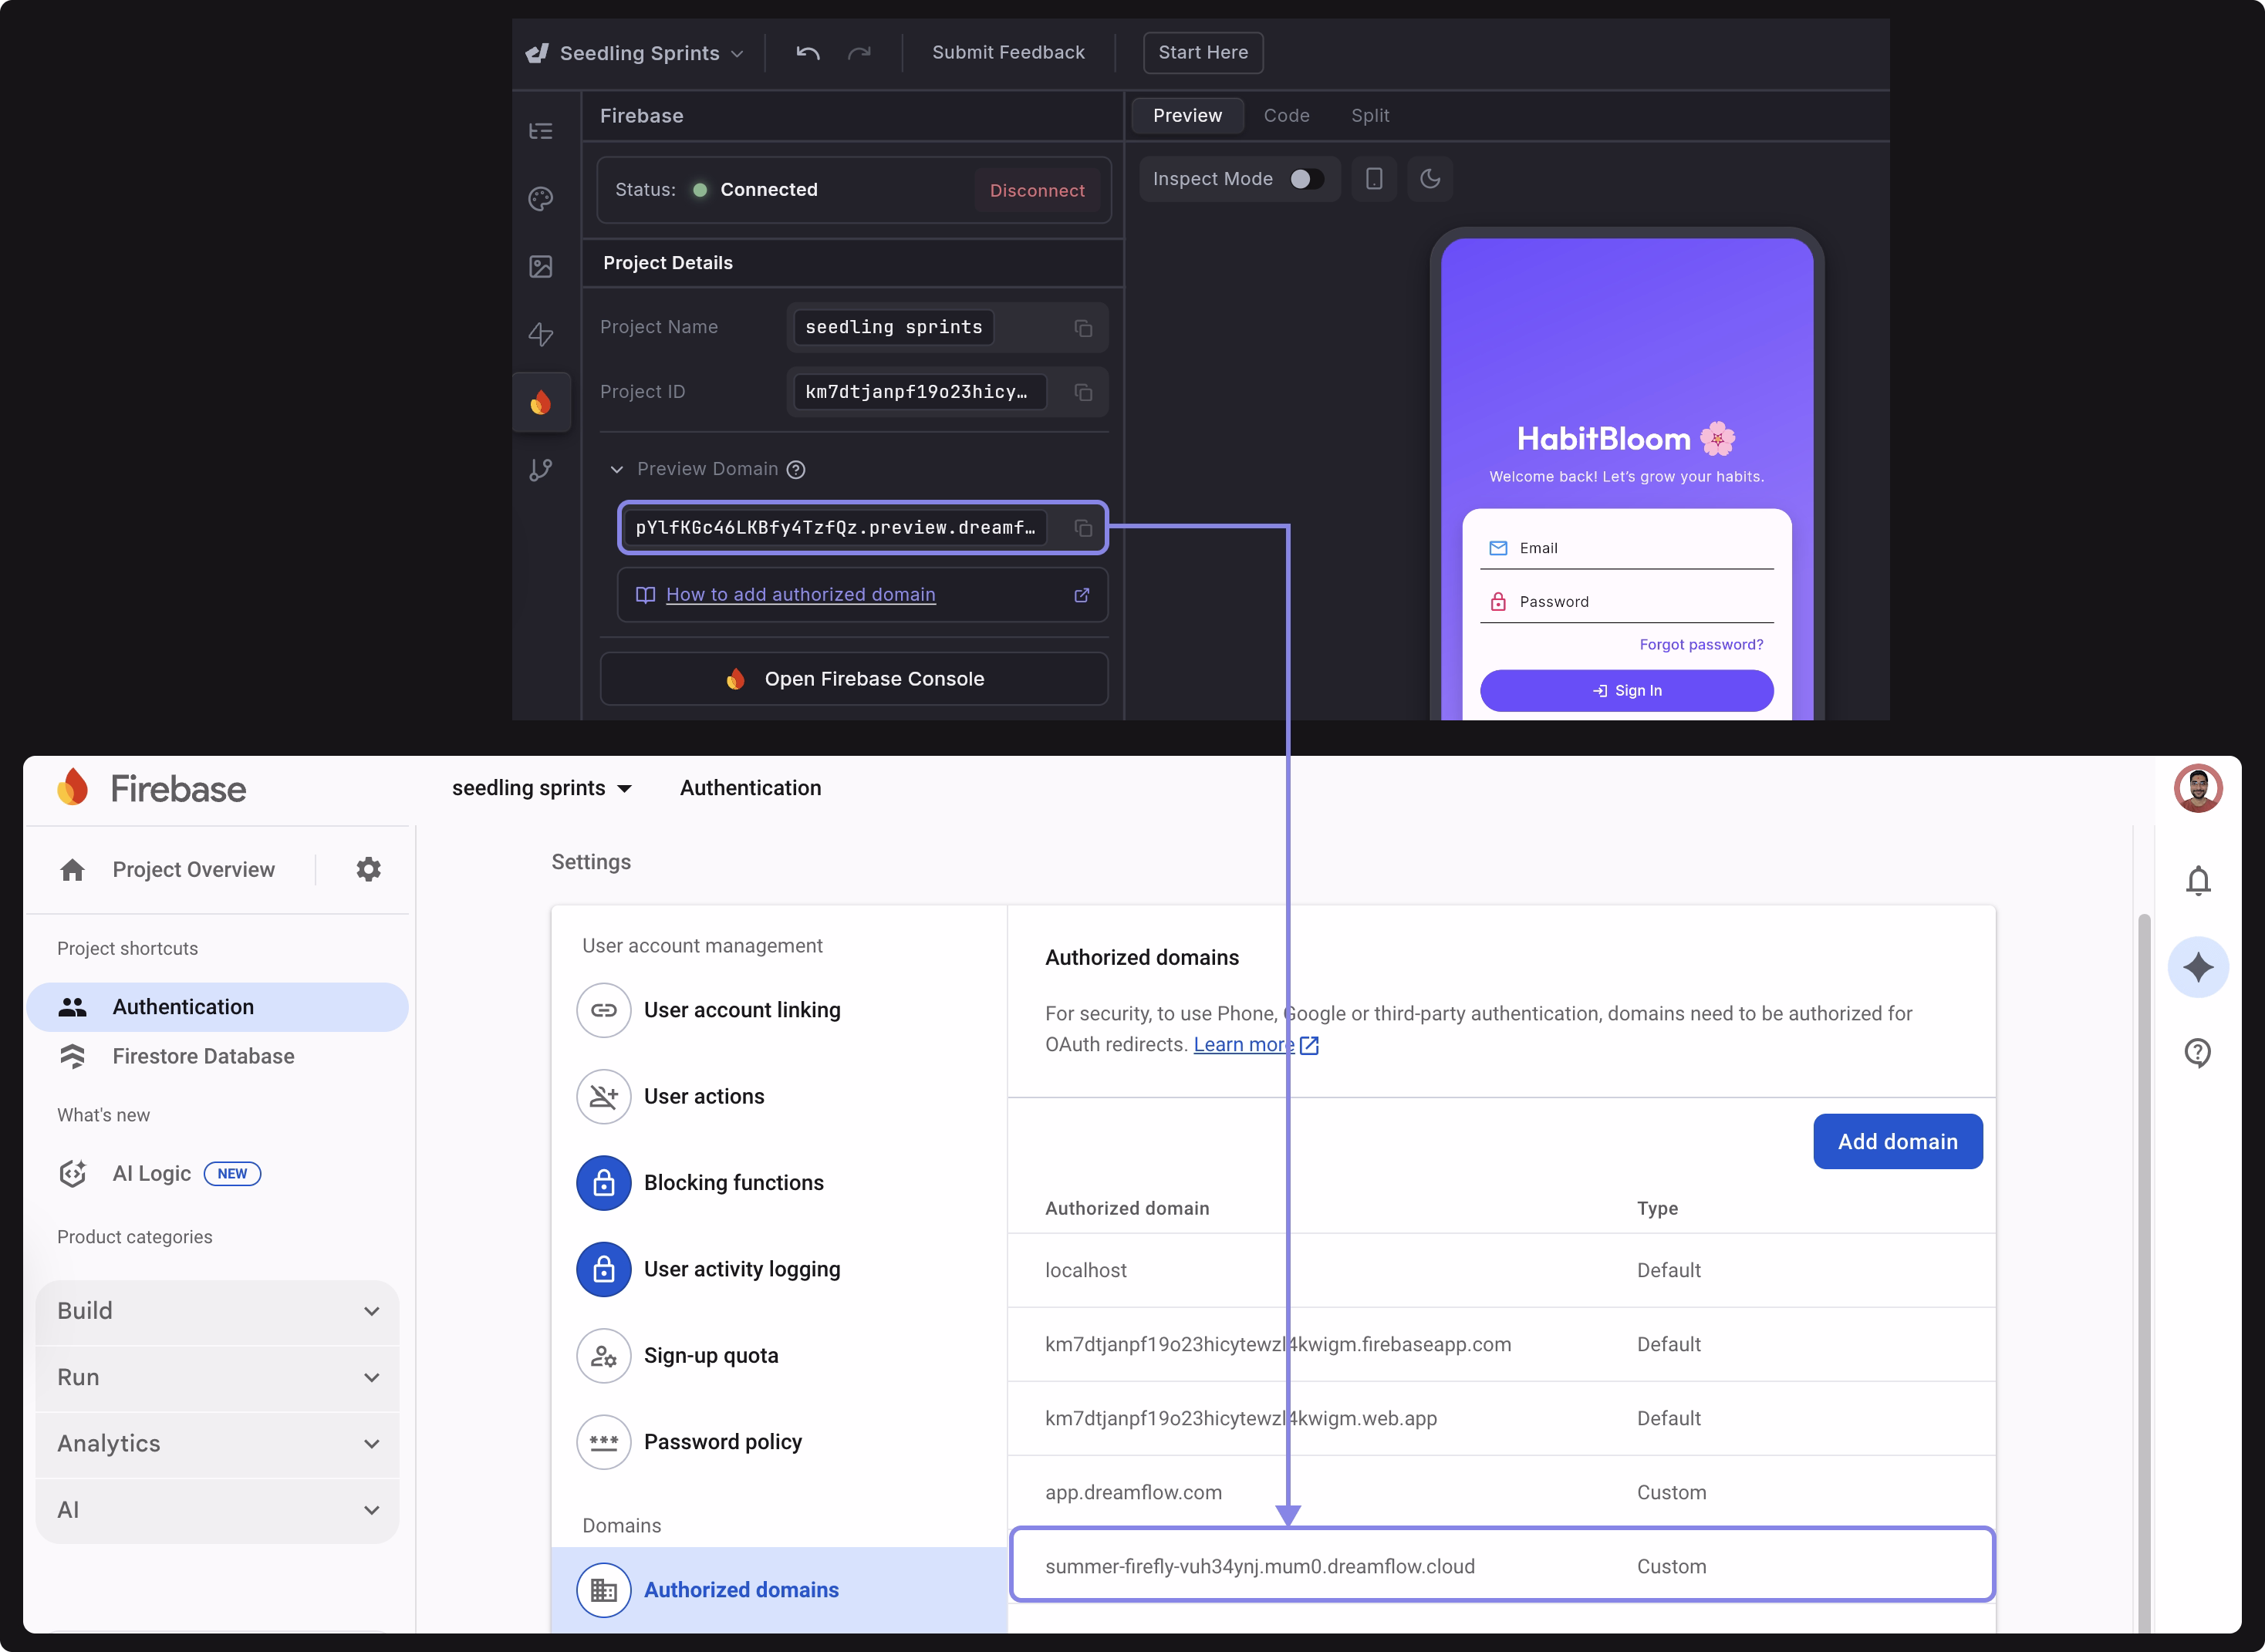
Add Authorized Domain
If you’re building for the web and want to test authentication while running your app in Dreamflow, you must add your Dreamflow preview domain to the Authorized Domains list in the Firebase Console.
To add authorized domain:
- Copy the Preview Domain from the Project Details panel.
- Go to the Firebase Console → Authentication → Settings → Authorized Domains. Click Add Domain, paste the copied Dreamflow domain, and click Save.
- Reload and test your app.
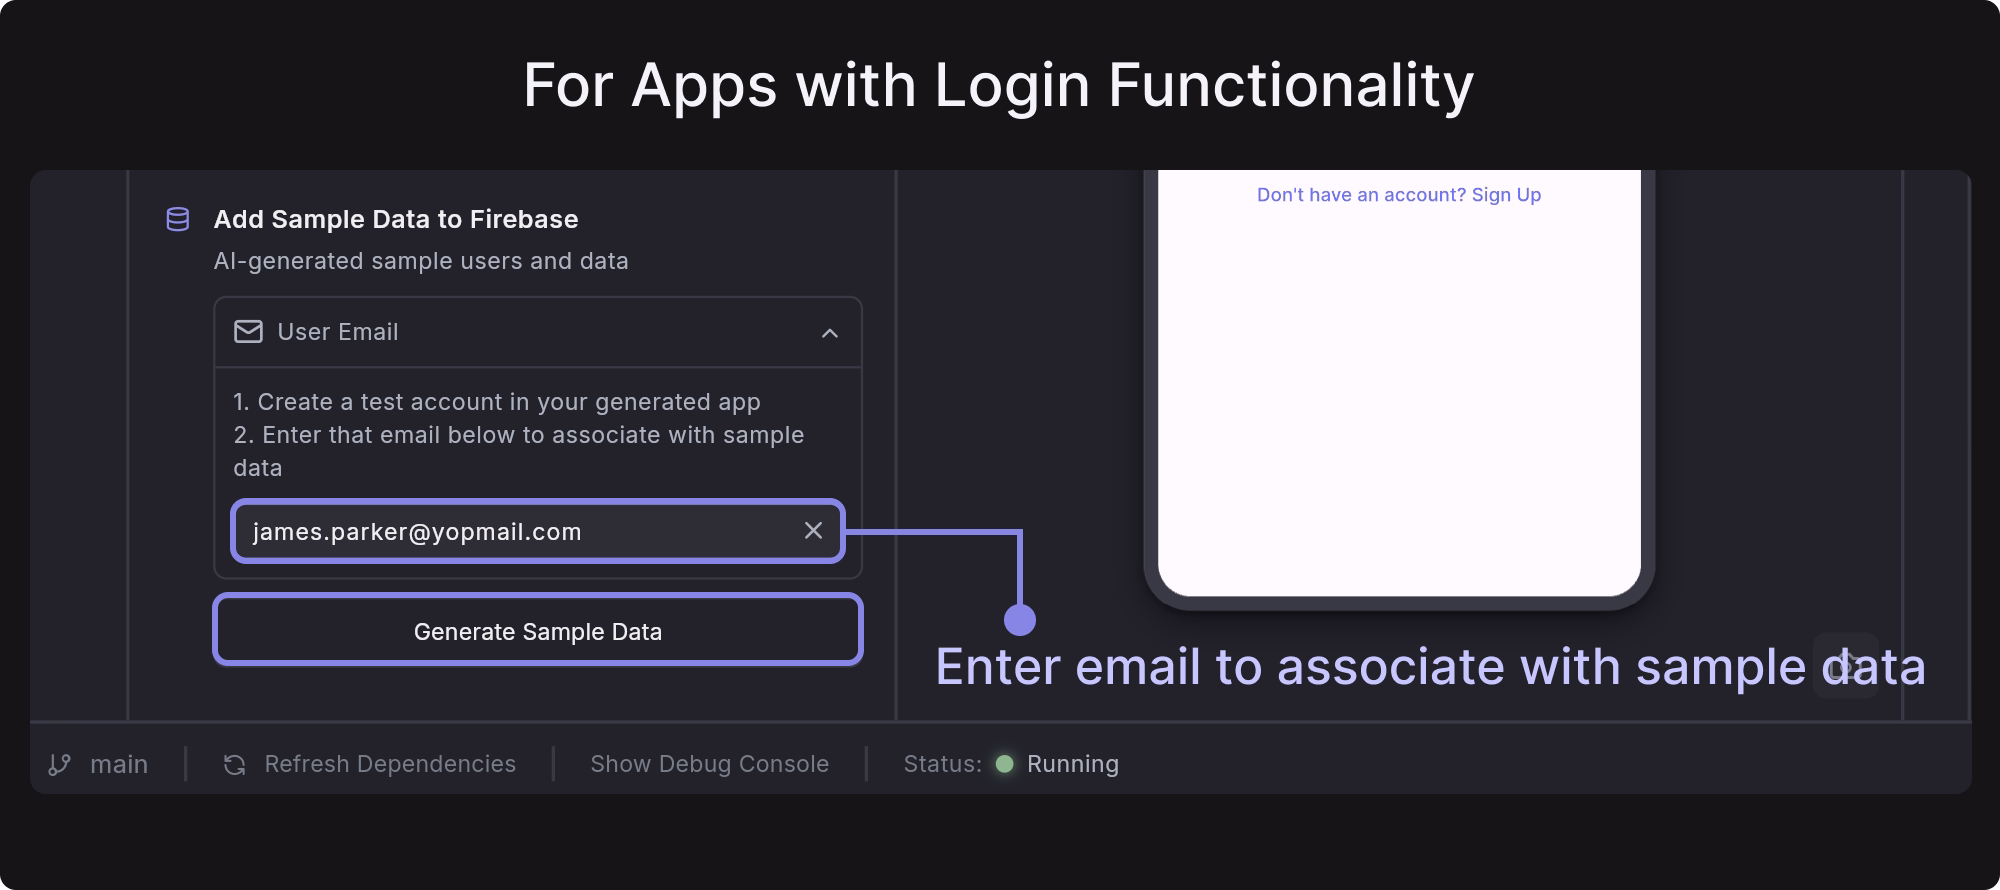
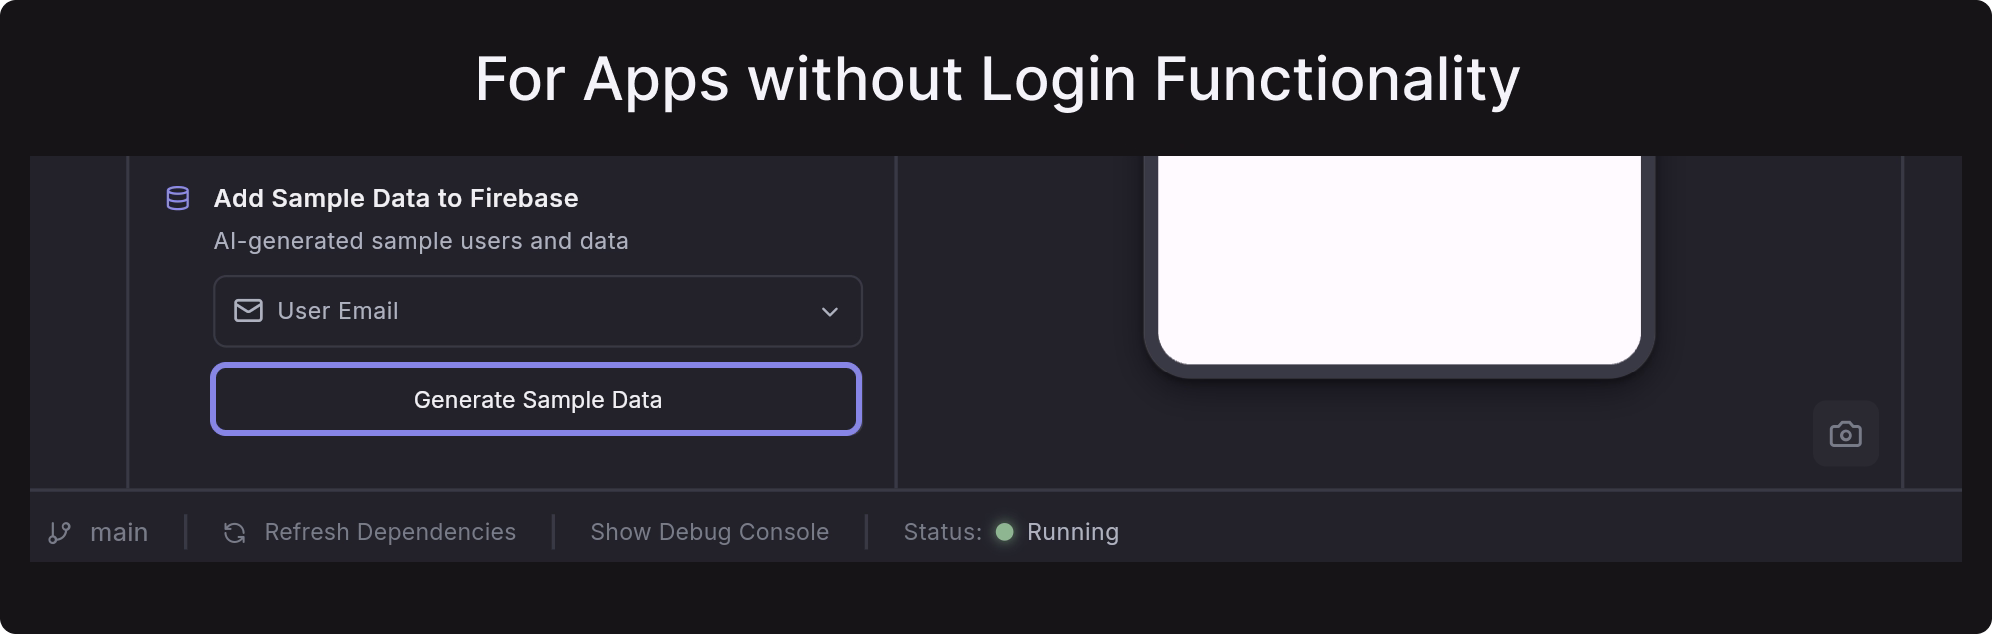
Add Sample Data to Firebase
Dreamflow lets you add sample data to your Firebase project for easier development and testing. The generated data follows your app’s schema, so you can quickly check how your app works with populated users, collections, and documents.
To add sample data from Dreamflow, go to the Firebase > Sample Data, and follow the instructions below:
- For Apps with Login Functionality: First, sign up in your app using an email and password. After logging in, enter the same email address in the User Email field and click Generate Sample Data. This will generate sample records linked to that user account.
- For Apps without Login Functionality: You can skip the email step, as it’s optional. Simply click Generate Sample Data to generate test documents directly in your Firestore Database.
You can only generate sample data once. If you need to modify or remove the sample data later, you can do so directly in the Firebase Console under Firestore Database.
This process only inserts sample data into the Firestore Database for the specified user email. It does not create a user in Firebase Authentication. Make sure the user with the specified email exists in Firebase Authentication to be able to access the data.
You can directly add a user to Firebase Authentication. To do so, open the Firebase Console and navigate to Authentication > Users. Click Add user in the top-right corner, enter the user’s email and password, and then click Add User to create the account.
Enable Billing
Certain Firebase services, such as Cloud Functions, require billing to be enabled before they can be used. If your project uses other Firebase services beyond their free tier limits, for example, Cloud Firestore, Cloud Storage (over 5 GB), or Phone Authentication (billed per SMS), you must enable billing on your Firebase project.
To enable billing on your Firebase project, open the Firebase Console. On the project dashboard, click on the current plan and select the Blaze plan. You can either create a new billing account or link an existing one. During setup, you can also set a budget amount. Once your usage exceeds this amount, you will receive an email notification. After enabling, the Blaze plan will appear on your project dashboard.
FAQs
Why am I getting the error functions predeploy error: Command terminated with non-zero exit code 2 when deploying Cloud Functions from Dreamflow?
functions predeploy error: Command terminated with non-zero exit code 2 when deploying Cloud Functions from Dreamflow?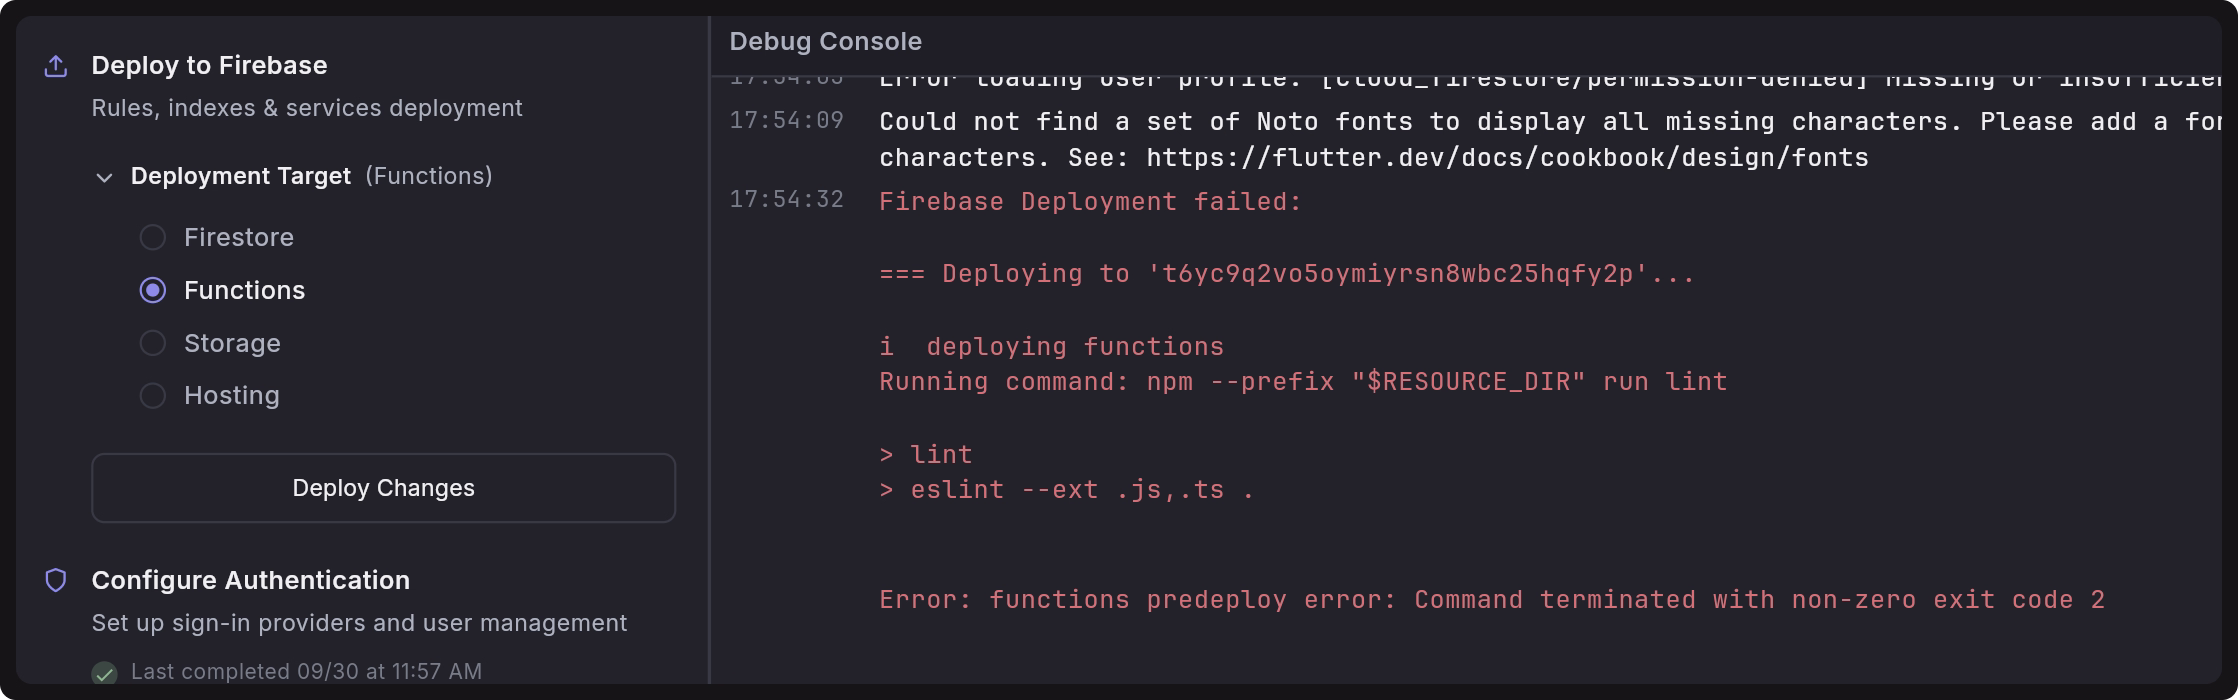 Cloud function deployments usually fail when your Google Cloud Platform (GCP) or Firebase project hasn’t been fully set up with the necessary APIs and permissions.
By default, when you create a new Firebase project, some APIs required by Cloud Functions are not enabled automatically. In addition, the default compute service account may not have the correct roles to deploy functions. Without these APIs and permissions, Dreamflow cannot deploy functions successfully, and you’ll see deployment errors.
Follow the steps below to fix the issue:
-
To be able to deploy and run cloud functions, make sure to enable billing for your Firebase/GCP project.
-
If you haven’t already, enable the authentication in the Firebase console.
-
Next, open your browser and navigate to the following URL:
https://console.cloud.google.com/functions/list?referrer=search&hl=en&project=<projectID>Replace<projectID>with your GCP or Firebase project ID. -
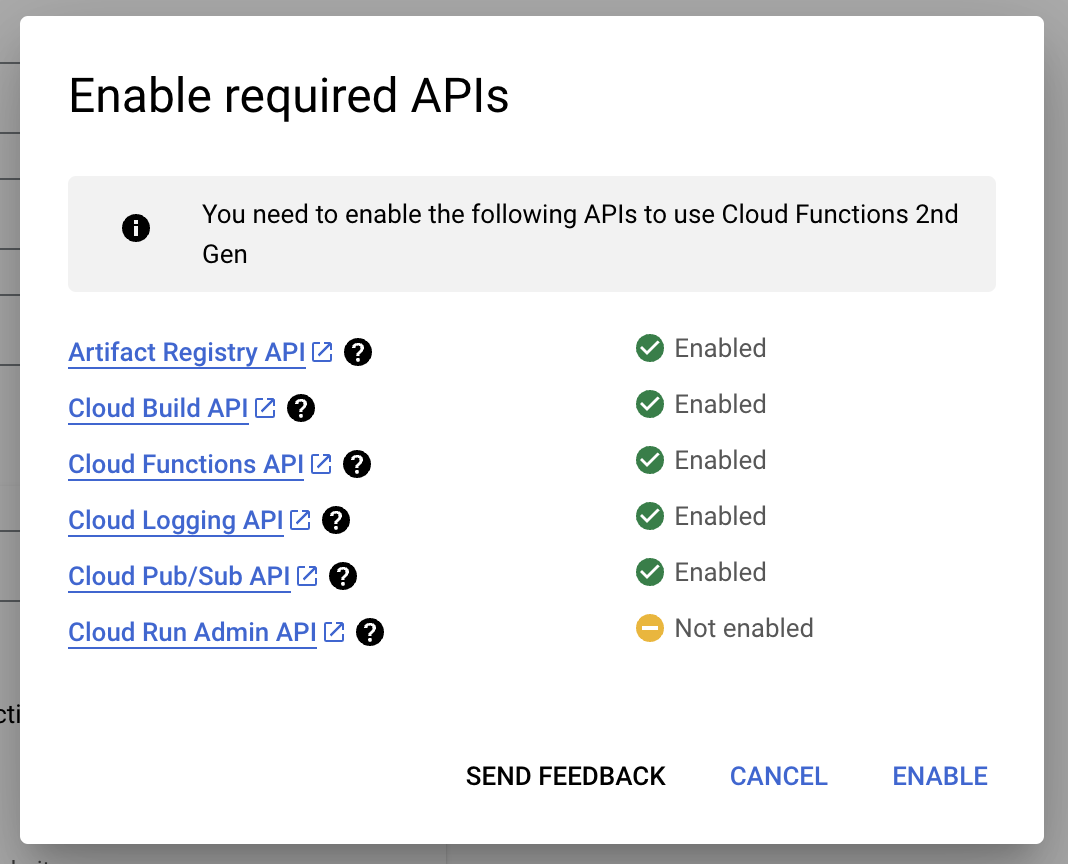
Click on the Create Function button. GCP will prompt you to enable the necessary APIs: Cloud Build and Cloud Functions.
-
After clicking Next, you will be prompted to enable the Cloud Run Admin API.
-
Now, you need to grant the default compute service account the appropriate permissions. In the next page, you will see the option to deploy an example cloud function like
helloHttp. Deploy this function. You will be prompted to grant permissions to the default compute service account. The message will look like:You need to grant the following roles to the build service account to deploy a function: roles/cloudbuild.builds.builder to <projectID>-compute@developer.gserviceaccount.com. -
Click Grant to provide the required permissions and deploy the example cloud function. Once deployed, you can delete this function if you wish.
-
After completing these steps, go to Dreamflow > Firebase > Deploy to Firebase. Under Deployment Target, select Functions and click Deploy Changes.
With the required permissions granted and correct configurations, you should now be able to deploy cloud functions from Dreamflow without any issues.
Why do I see the error [cloud_firestore/failed-precondition] The query requires an index?
[cloud_firestore/failed-precondition] The query requires an index?This error occurs when Firestore needs a composite index to run your query, but the index has not been created yet.
When this error appears, it includes a link to the Firebase Console. Open that link, and it will redirect directly to the required index creation page in your Firestore project. Simply click Save to create the index.
After the index is built (this may take a few minutes), retry running your app. The query should now work without errors.
Why do I see the error [cloud_firestore/permission-denied] Missing or insufficient permissions on screen?
[cloud_firestore/permission-denied] Missing or insufficient permissions on screen?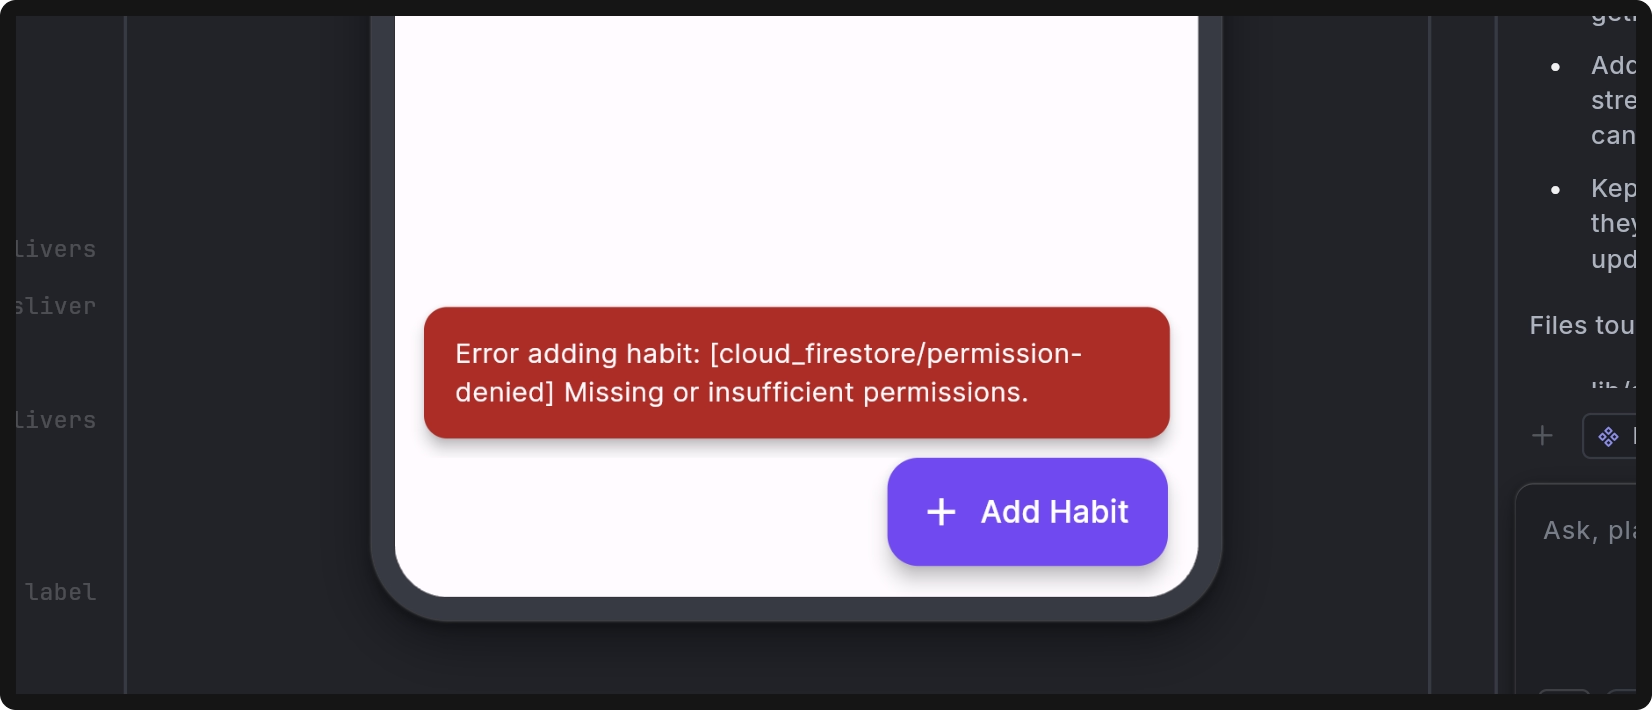
This error occurs when your app tries to read or write data in the Firestore Database without the correct security rules in place.
To fix this:
- Redeploy rules: Go to the Firebase panel in Dreamflow and redeploy your Firestore security rules.
- Update rules if needed: If your current rules are incorrect (e.g., don’t match your app’s data model or intended access control), you need to update them. You can edit the rules manually in the
firestore.rulesfile or update them using the Dreamflow Agent, and then redeploy to apply the changes.
Once the correct rules are applied, the error should no longer appear when adding or retrieving data.
I am unable to connect to Firebase using a custom email (e.g., @company.com)
This error appears when your Firebase project belongs to a Google Workspace (organization) that has the policy constraints/iam.disableServiceAccountKeyCreation enabled. That policy blocks external tools such as Dreamflow from creating or managing service-account keys, which are required to link your project.
To fix it:
- Connect with a personal Gmail account, or
- Ask your organization’s admin to change its IAM policy to allow service-account key creation.
Once the restriction is lifted or you use a Gmail account, the Firebase connection will complete successfully.