Supabase
Dreamflow makes it easy to integrate Supabase into your app with a guided, step-by-step setup. This process connects your project to Supabase, sets up a database, generates client code, and deploys schemas, all without manual setup.
1. Connection
The first step is to connect Dreamflow with your Supabase account so it can create new Supabase projects or link to existing ones.
To begin, open the Supabase module in Dreamflow and click Connect to Supabase. A Supabase authentication window will appear where you can sign in and review the requested permissions. Next, select an organization and click Authorize Dreamflow. These permissions allow Dreamflow to create and manage projects, configure database schemas, and generate API keys on your behalf.
Once complete, Dreamflow will confirm the connection with a Connected status.
2. Project Setup
After connecting your Supabase account, the next step is to set up a Supabase project, which will serve as the backend for your app. You can do this in two ways:
- Select an existing Supabase project: Choose from the list of your existing Supabase projects.
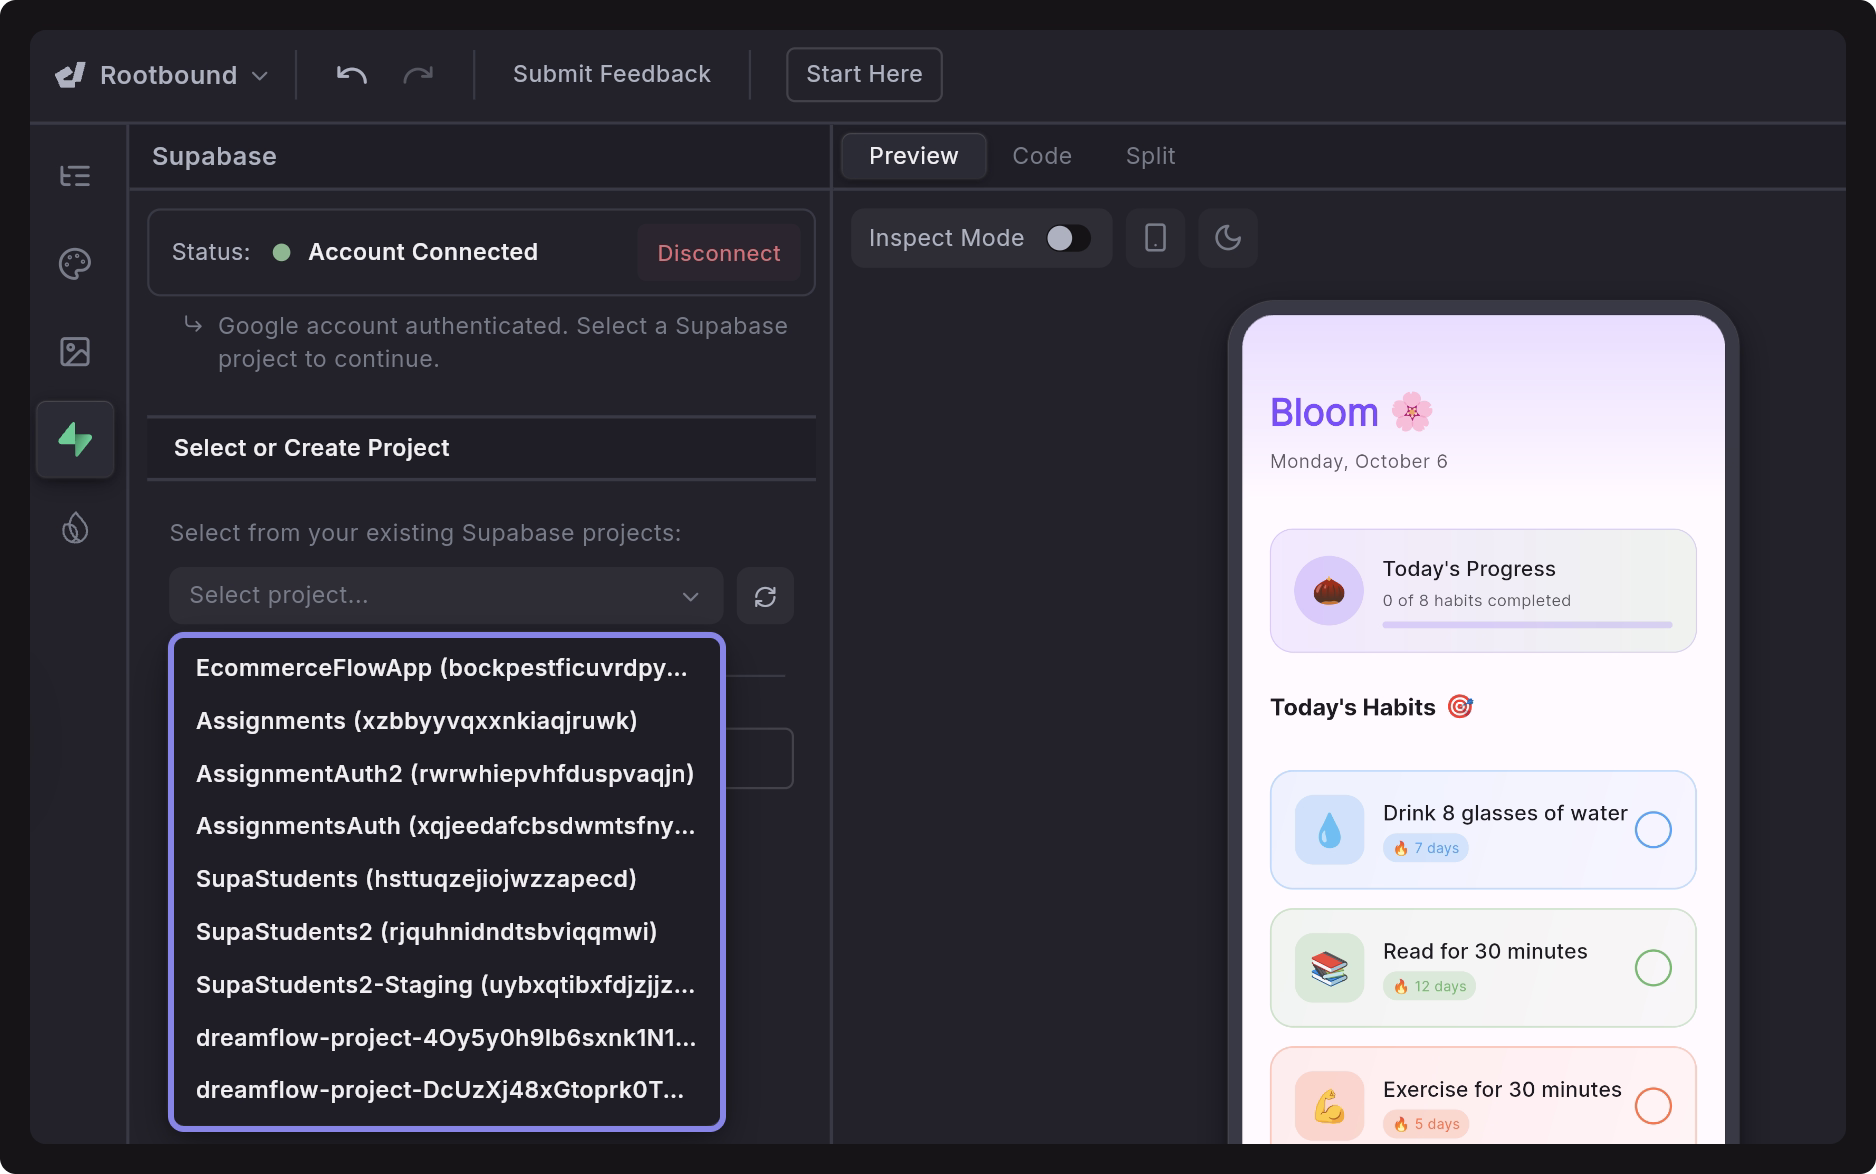
- Create a new Supabase project: Let Dreamflow automatically create and configure a new Supabase project for you.

During new project creation:
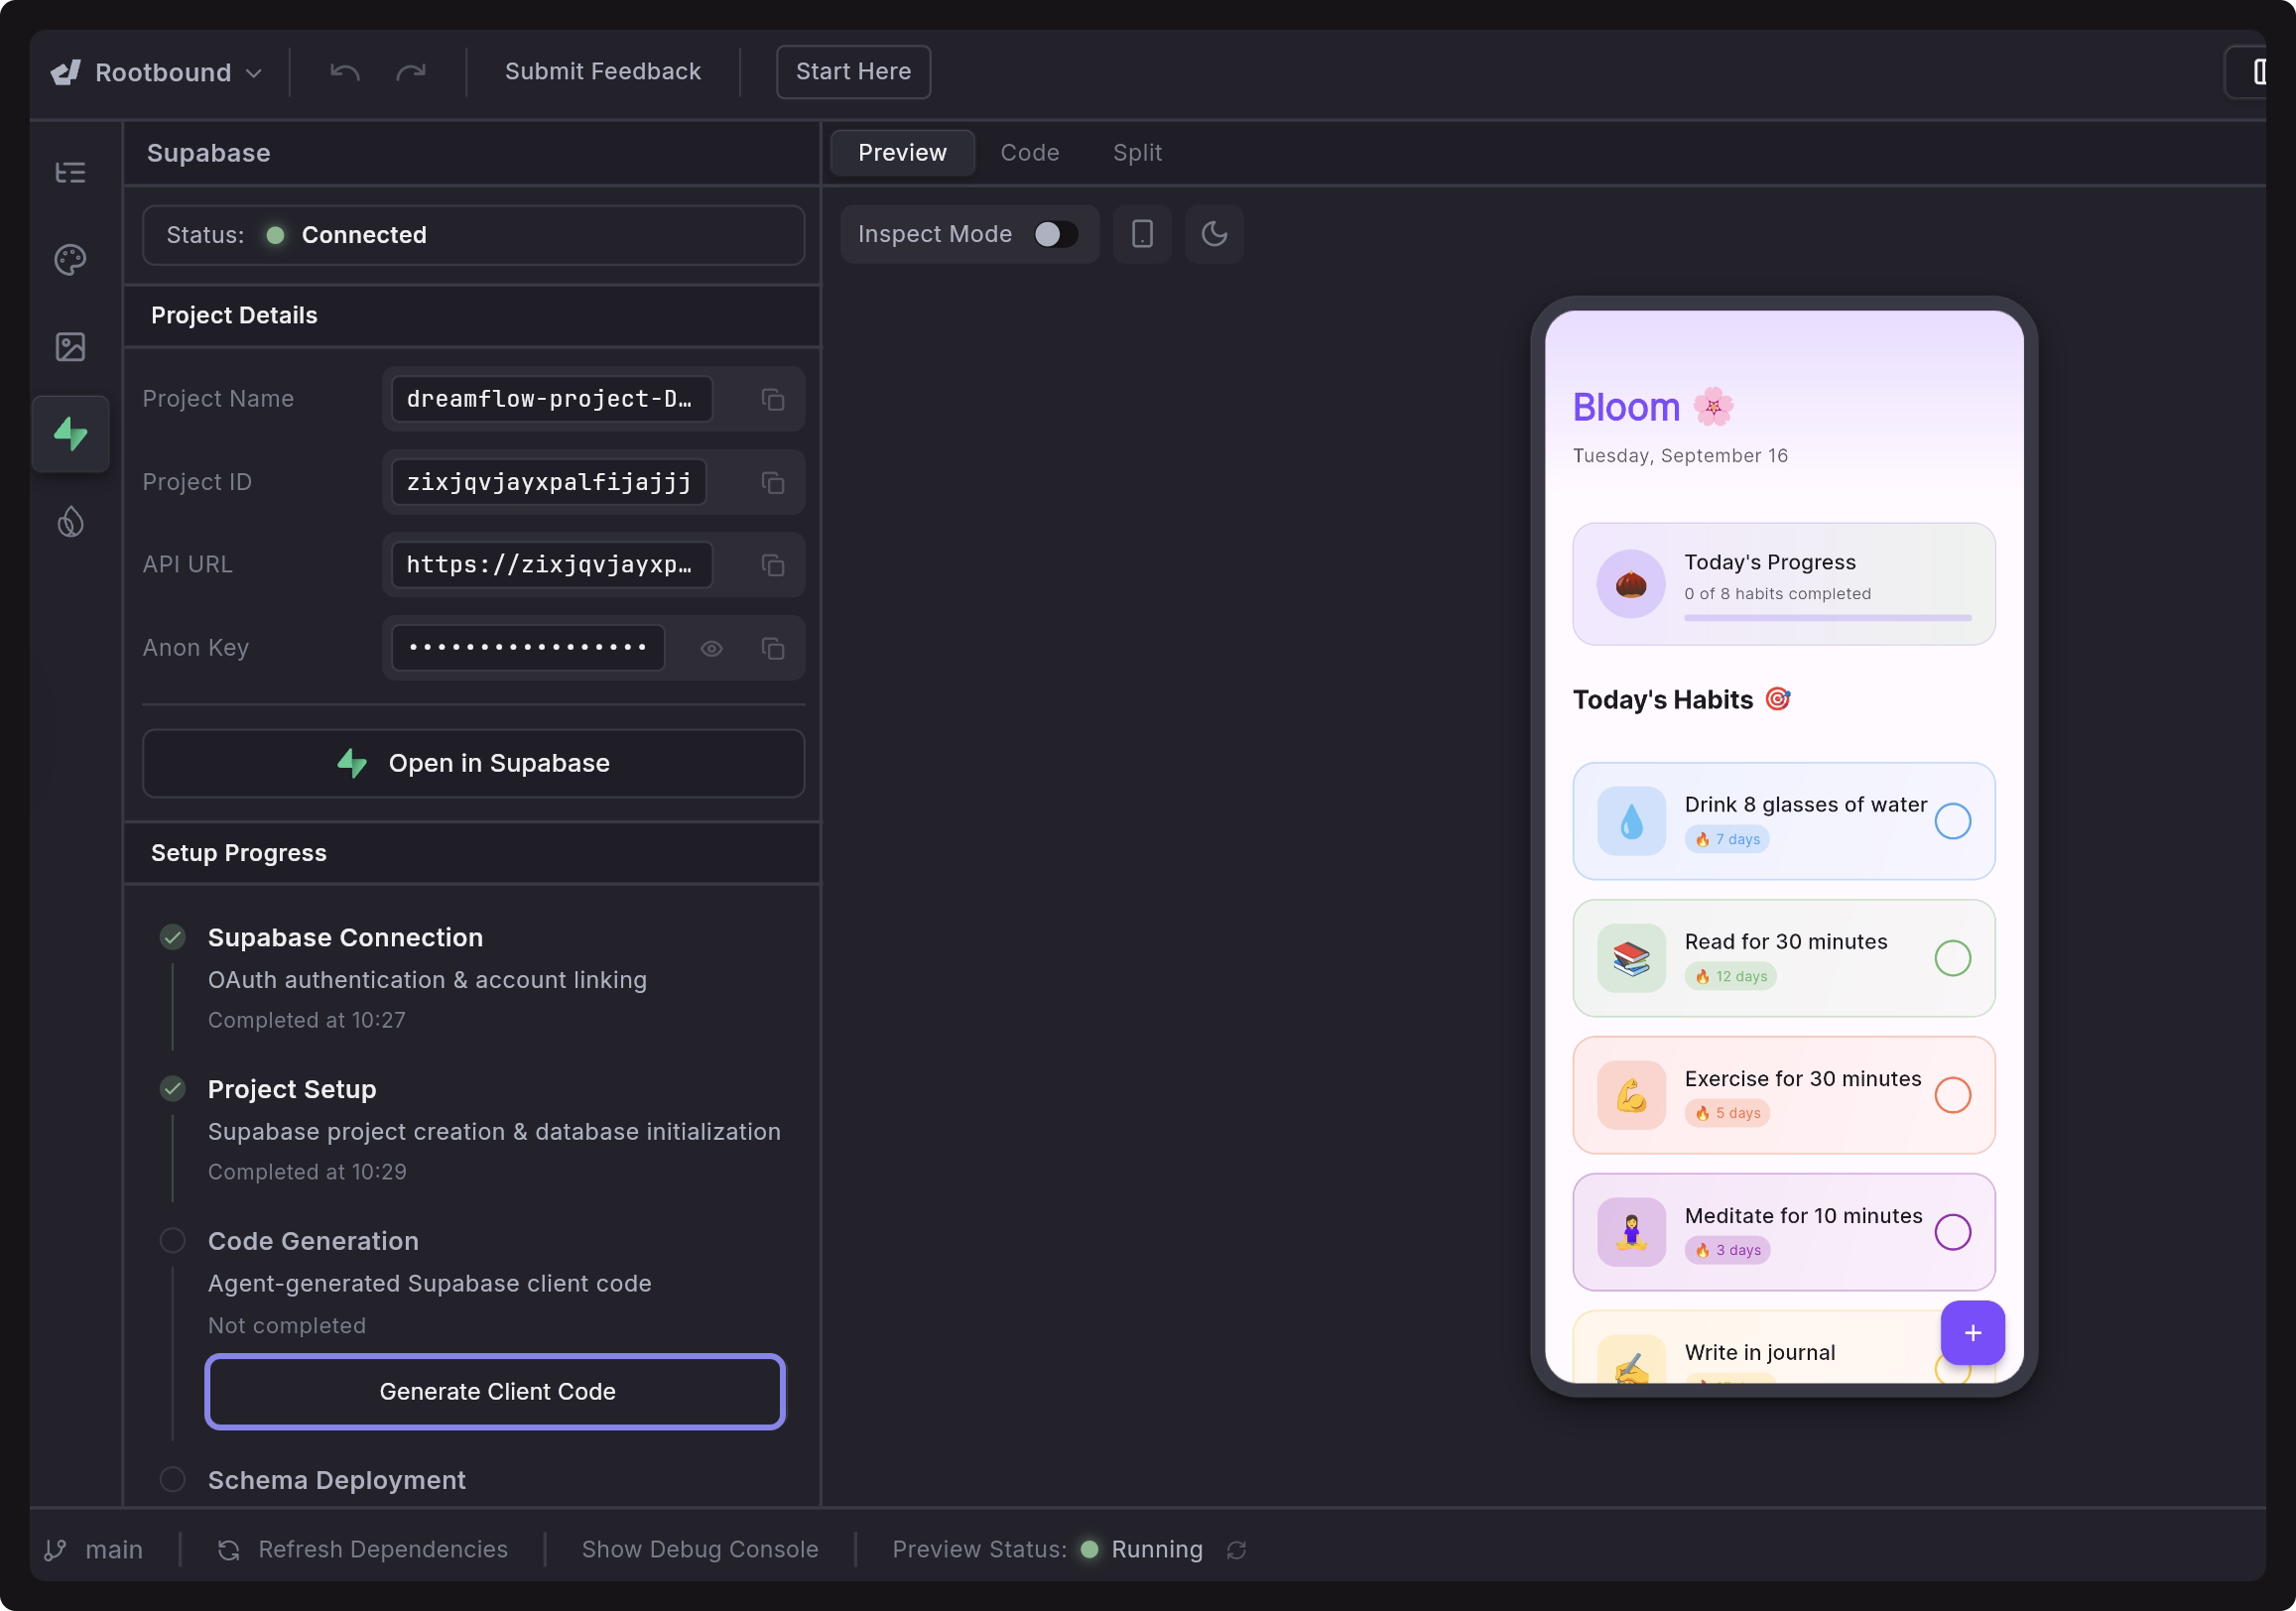
- Dreamflow provisions a new project in Supabase, generating a Project Name, Project ID, API URL, and Anon Key.
- The database is automatically initialized, giving you a fully configured backend environment.
- All credentials are securely linked to your Dreamflow project, allowing you to start building immediately.
This setup may take a few minutes while Dreamflow provisions the resources and configures your database.
You can quickly jump into your Supabase dashboard using the Open in Supabase button.
3. Generate Client Code
Once the project setup is complete, click Generate Client Code to let Dreamflow automatically create ready-to-use Supabase integration code tailored to your app. This step eliminates most of the manual setup by wiring your app directly to Supabase with authentication, data models, and database operations.
Code Generation Breakdown
When you trigger code generation, Dreamflow performs several background steps, including (but not limited to):
- Supabase Configuration:
- Add the
supabase_flutterdependency and updatemain.dartfor initialization. - Generate a
supabase_config.dartfile with project credentials (API URL, Anon Key) and helper functions for database access.
- Add the
- Database Schema (
supabase_tables.sql):- Define the necessary tables for your app (e.g., users, core data entities, relationships).
- Add indexes and constraints for efficient queries.
- Security Policies (
supabase_policies.sql):- Enable Row Level Security (RLS) across all tables.
- Generate policies so users can only access their own data, and operations are protected by authentication checks.
- Service Layer:
- Create service classes (e.g.,
_service.dart) with CRUD operations, query helpers, and error handling. - Include support for real-time updates, history tracking, or analytics if applicable.
- Create service classes (e.g.,
- Models & Data:
- Update models to support Supabase JSON serialization (
fromJson,toJson). - Refresh sample data to match the generated schema.
- Adjust widgets or UI components to bind live data instead of placeholders.
- Update models to support Supabase JSON serialization (
- App Integration:
- Replace hardcoded logic with Supabase-powered queries.
- Wire authentication, database syncing, and state management into the app flow.
By the end of this step, your app will be fully integrated with Supabase, ready to authenticate users, persist data securely, and sync changes in real time with proper RLS policies in place.
4. Schema Deployment
The final step is to deploy your database schema changes to Supabase. You’ll see a list of generated Migration Files under the Schema Deployment menu (in the left side panel). Follow these steps to apply them in the correct order:
- Deploy Tables: Select the table migration file (i.e.,
lib/supabase/supabase_tables.sql) and click Deploy Schema Changes. This will create all the required database tables, along with their defined columns, relationships, and constraints, as specified in your generated schema. - Deploy Policies: Once the tables are successfully created, select the policy migration file (i.e.,
lib/supabase/supabase_policies.sql) and click Deploy Schema Changes. This will enable Row Level Security (RLS) on your tables and apply access control policies that restrict data operations to authenticated users. For example, users will only be able to view, insert, update, or delete their own records in theusersand other tables, ensuring that each user can access only their personal data within the app.
After the initial setup, any new updates or modifications you make will be added to the pending_migrations.sql file. You only need to deploy these new migrations; previously deployed tables and policies do not need to be redeployed.
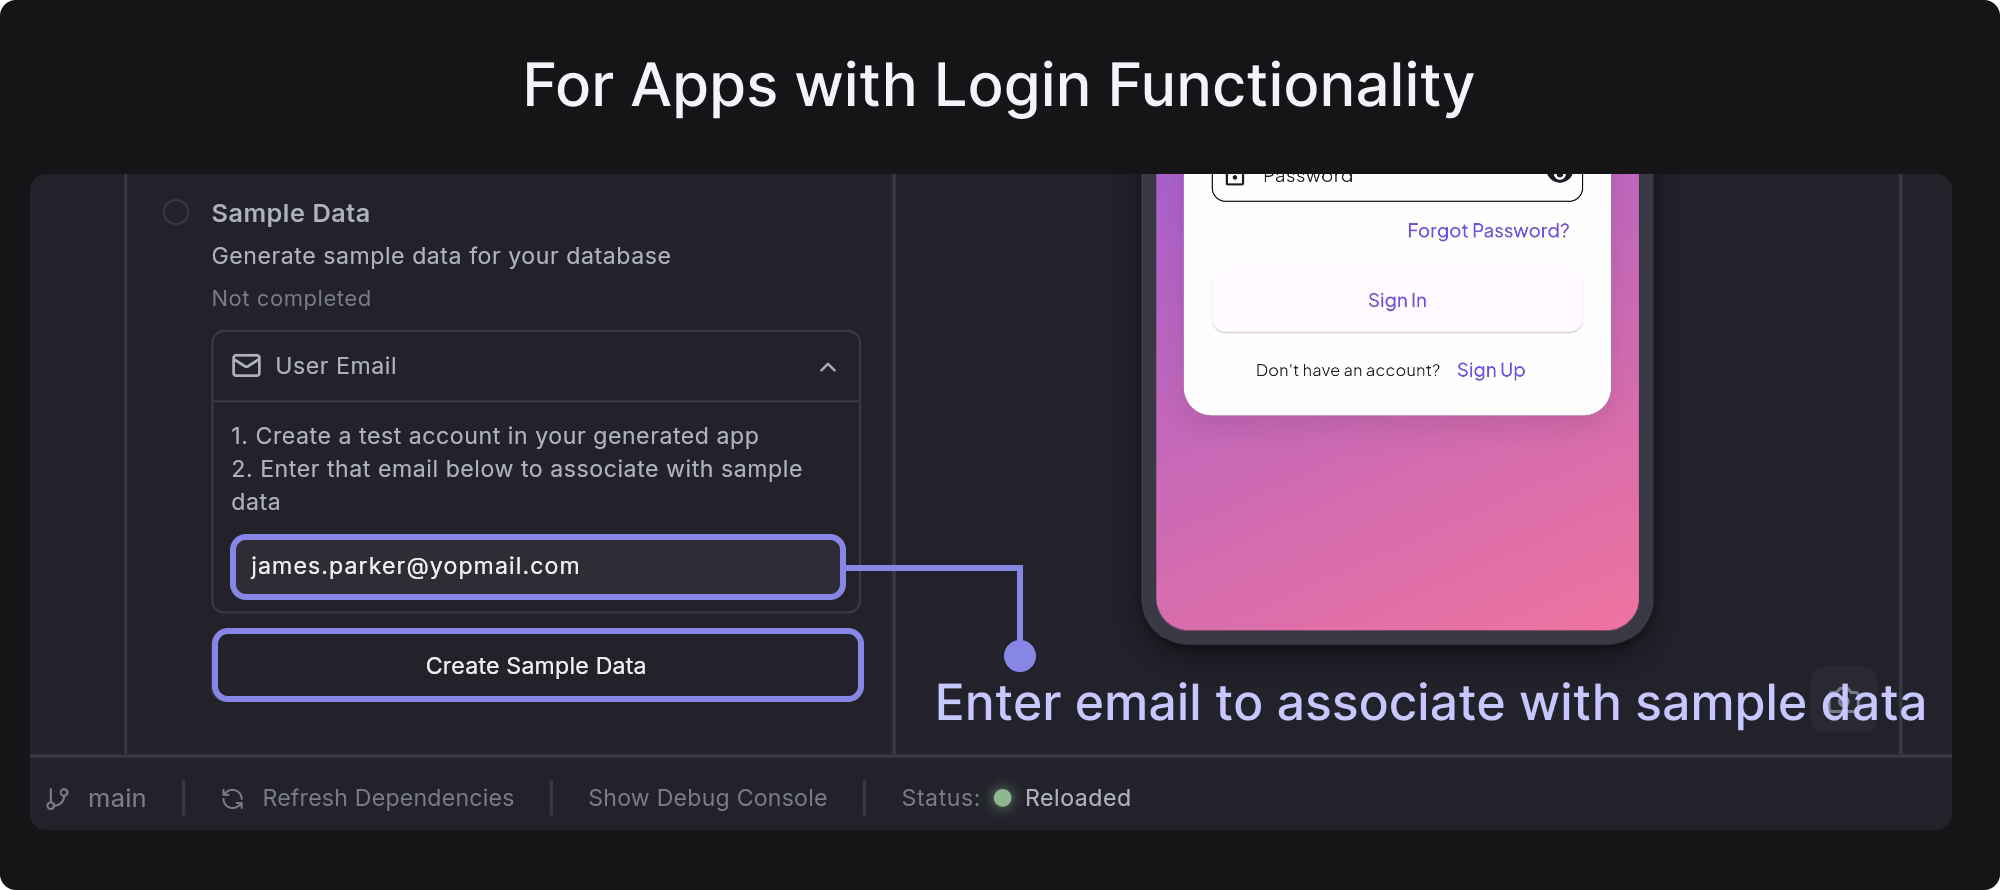
Add Sample Data to Supabase
Dreamflow lets you add sample data to your Supabase project for easier development and testing. The generated data follows your app’s schema, allowing you to quickly verify how your app behaves with populated tables.
To add sample data from Dreamflow, go to the Supabase > Sample Data, and follow the instructions below:
-
For Apps with Login Functionality: First, sign up in your app using an email and password. After logging in, enter the same email address in the User Email field and click Create Sample Data. This will generate sample records linked to that user account.
-
For Apps without Login Functionality: You can skip the email step, as it’s optional. Simply click Create Sample Data to generate test records directly in your Supabase database.
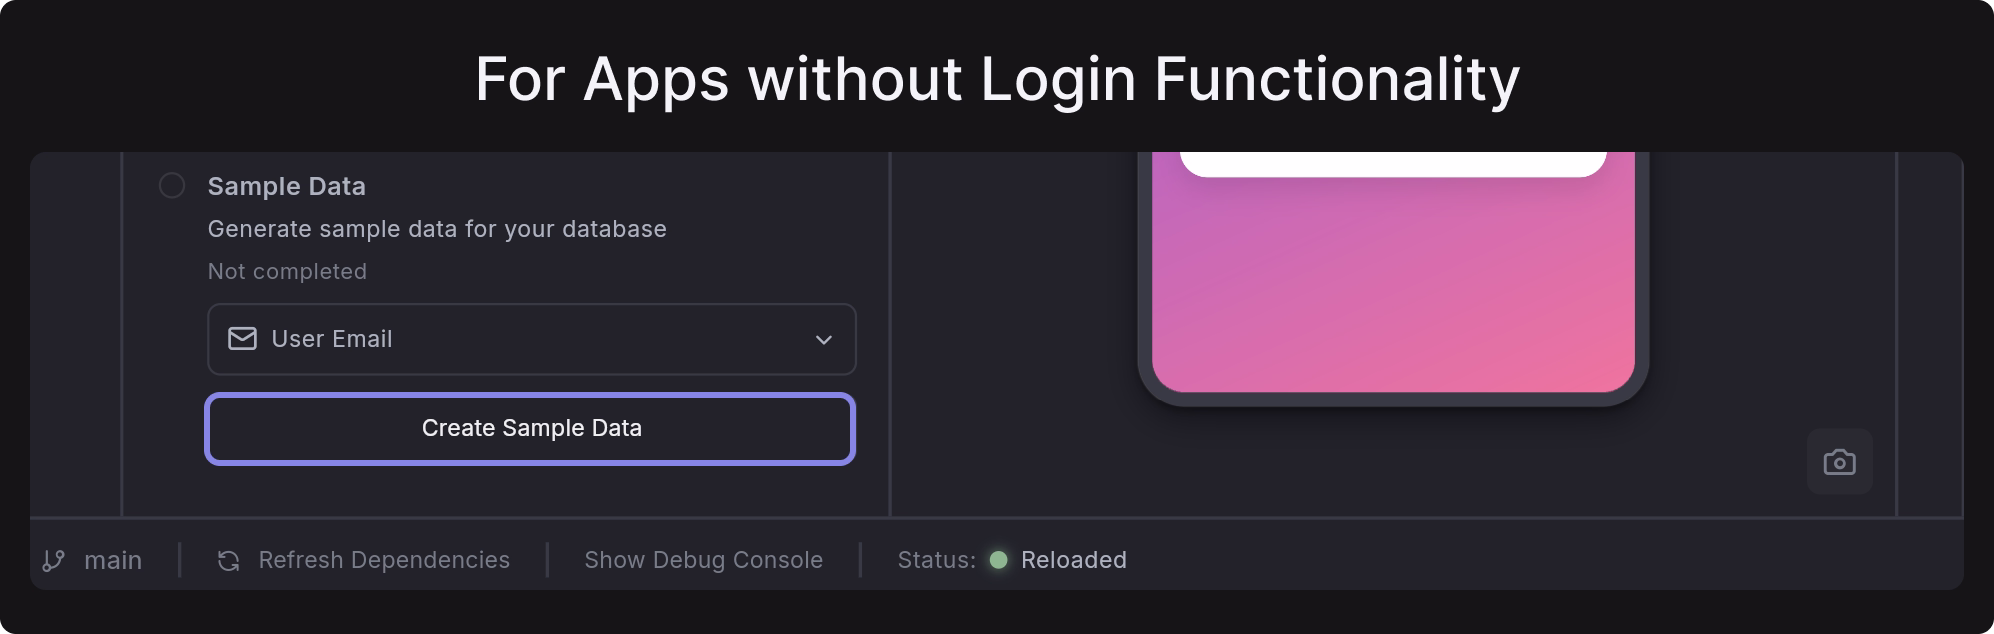
You can only generate sample data once per project. If you need to modify or remove the sample data later, you can do so directly from the Supabase Table Editor.
Edge Functions
Supabase Edge Functions let you run secure, server-side code without needing your own backend. These functions are perfect for tasks that require backend logic, secret handling, or integrations with external APIs such as OpenAI. Because they run on Supabase’s global edge network, they are fast, scalable, and isolated from your client code.
Unlike database functions or triggers, edge functions execute outside the database engine, giving you full flexibility to write custom logic without being tied to SQL or database-level events.
Edge Functions are ideal for:
- Calling external APIs securely (e.g., Stripe, Twilio, OpenAI) without exposing keys in the client app
- Generating personalized AI content such as product recommendations, support replies, onboarding guides, weekly usage summaries, or tailored learning suggestions
- Running scheduled or on-demand automations
- Performing complex business logic that is not suitable for client-side execution
- Enforcing secure access rules using Supabase Auth (require logged-in user)
You can find more examples in the official documentation.
Dreamflow doesn’t support running Edge Functions locally yet because the editor has no built-in terminal or local Deno runtime.
Create and Deploy
Dreamflow provides a built-in workflow to generate, edit, configure, and deploy Supabase Edge Functions directly from your project — no command line needed.
To create and deploy the Edge Function, follow these steps:
1. Create a New Edge Function
- Open the Supabase module from the left sidebar.
- Scroll to Edge Functions and click + to create a new one.
The agent may also determine when parts of your feature implementation should live in the backend and proactively create Edge Function code on your behalf.
- This opens the Agent Panel on the right with a prefilled starter prompt. Simply continue describing what you want your function to do. For example:
//Agent Prompt
Create a Supabase Edge Function that uses OpenAI api to generate a motivational message based on the users habit progress.
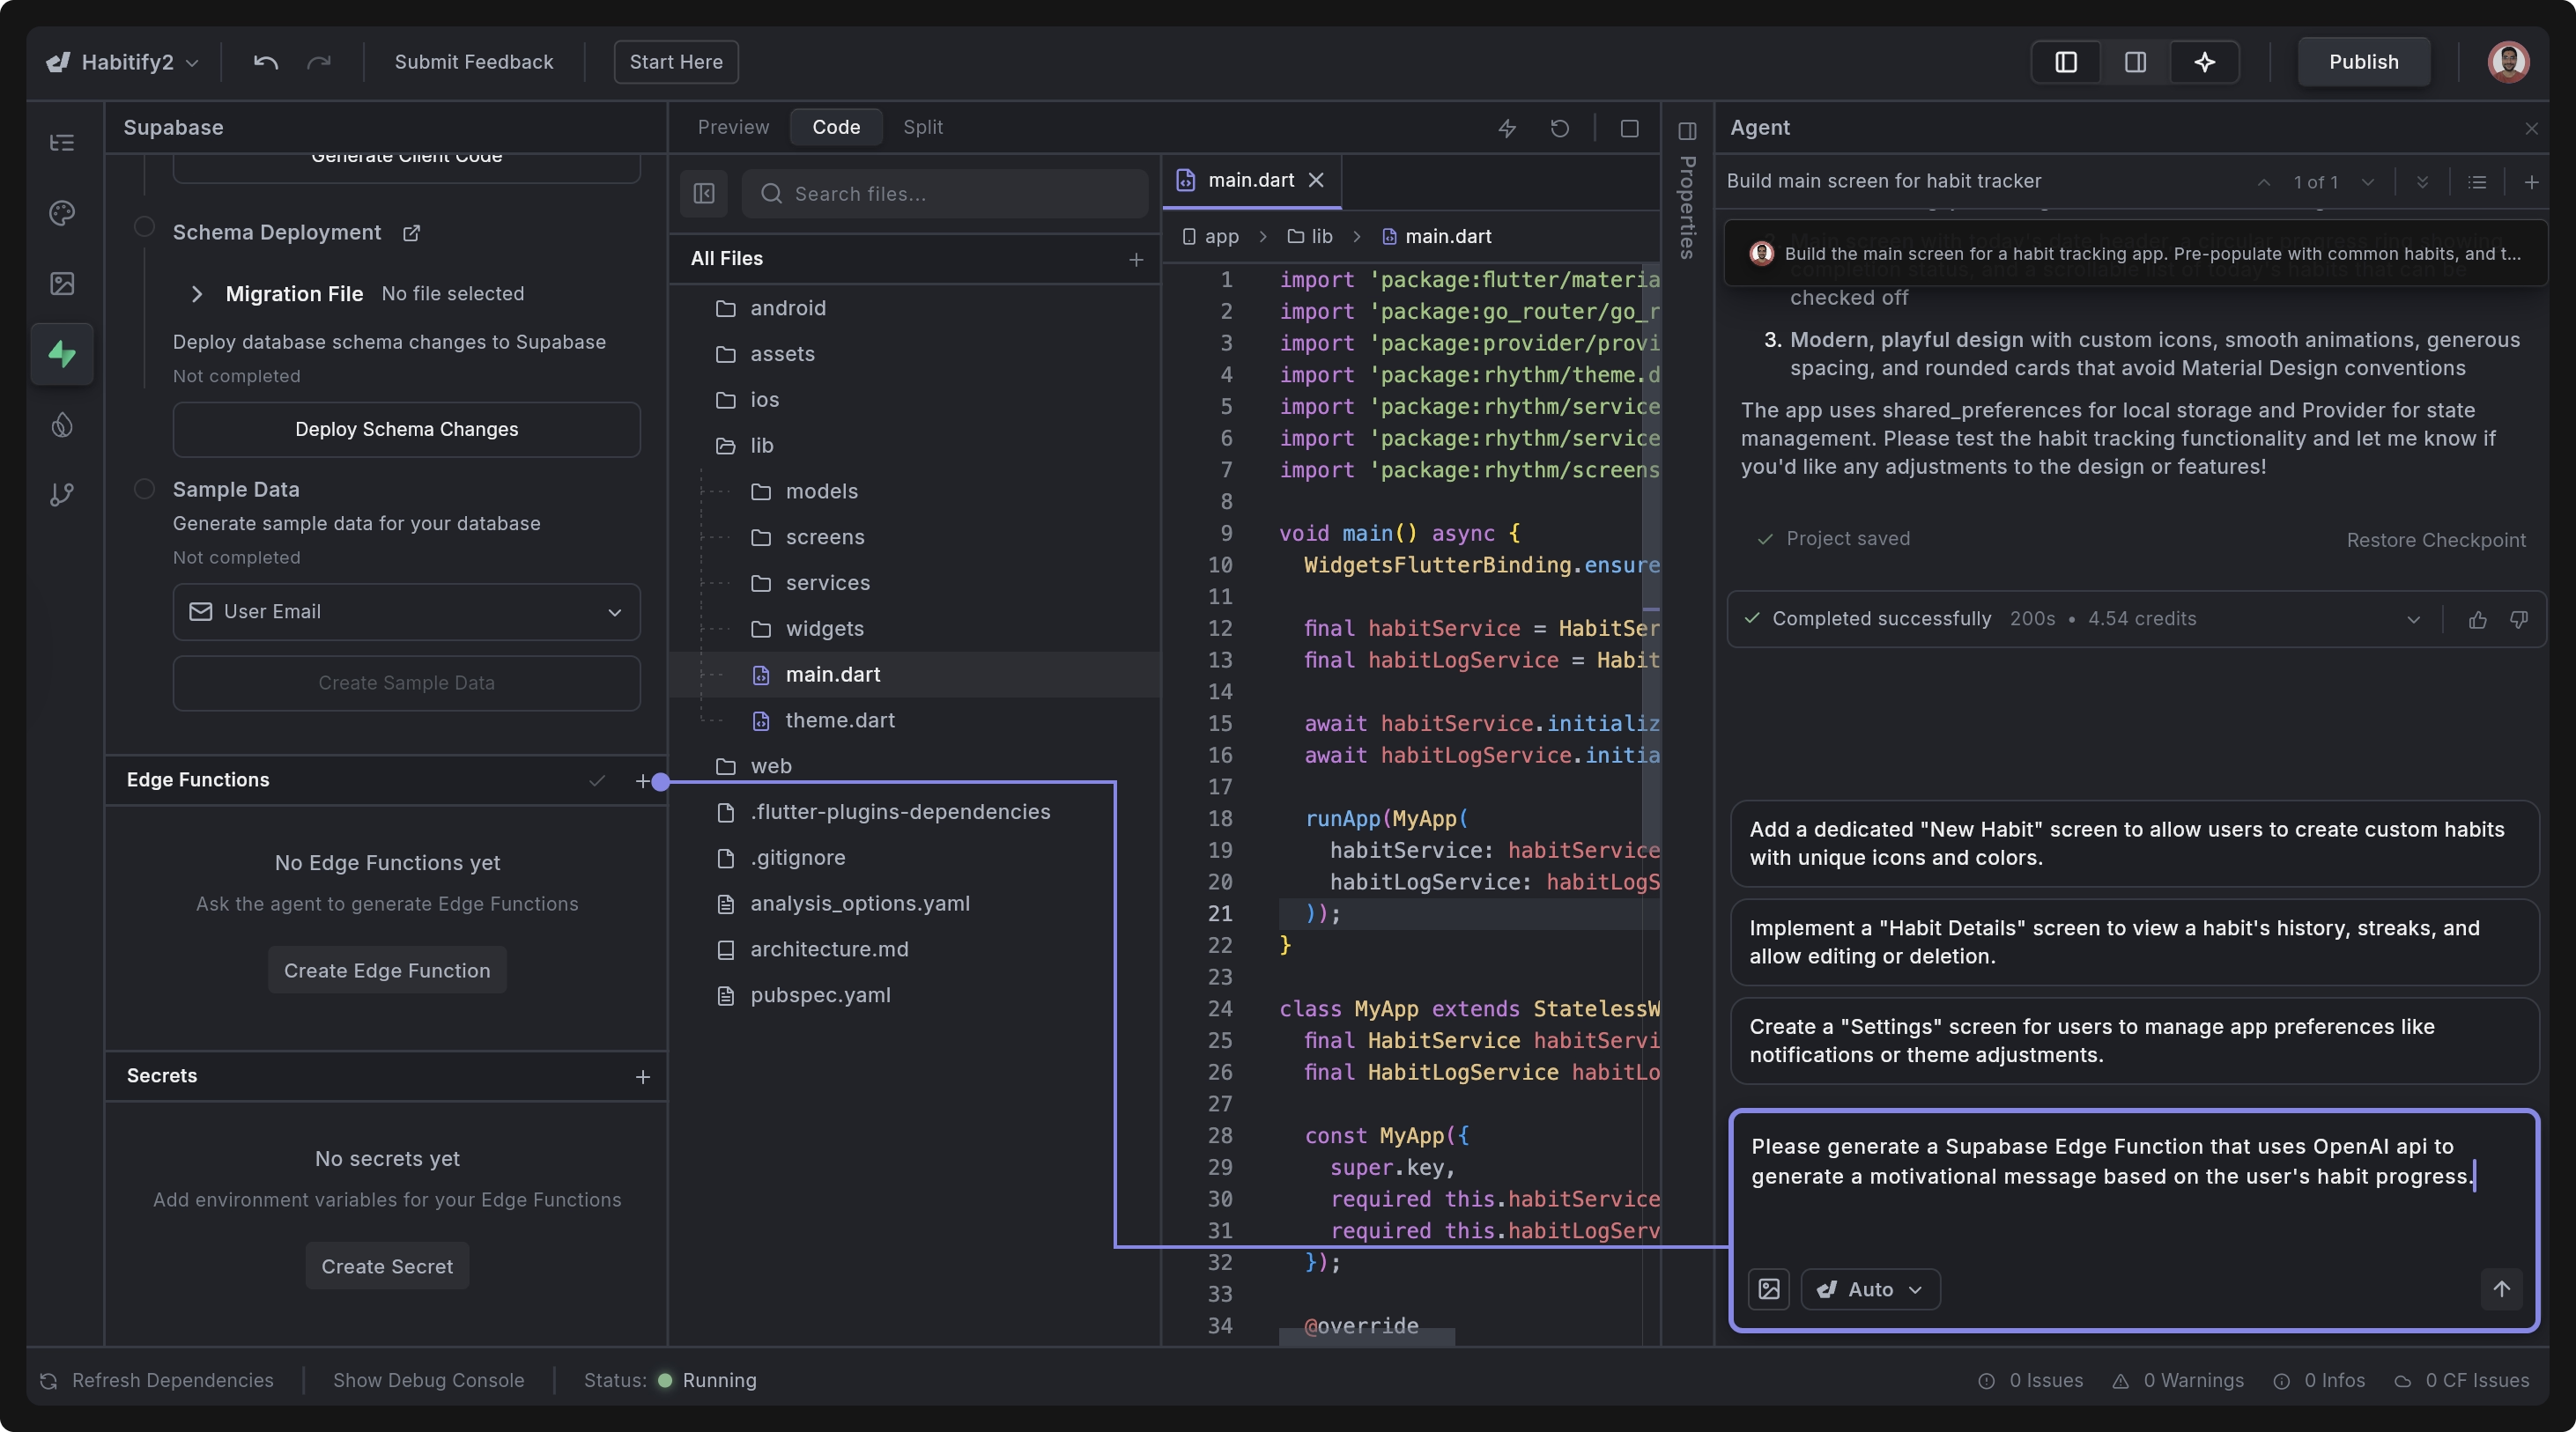
The agent will create a complete Edge Function using Typescript, including folders and index.ts. You will now see the function generated under the following structure:
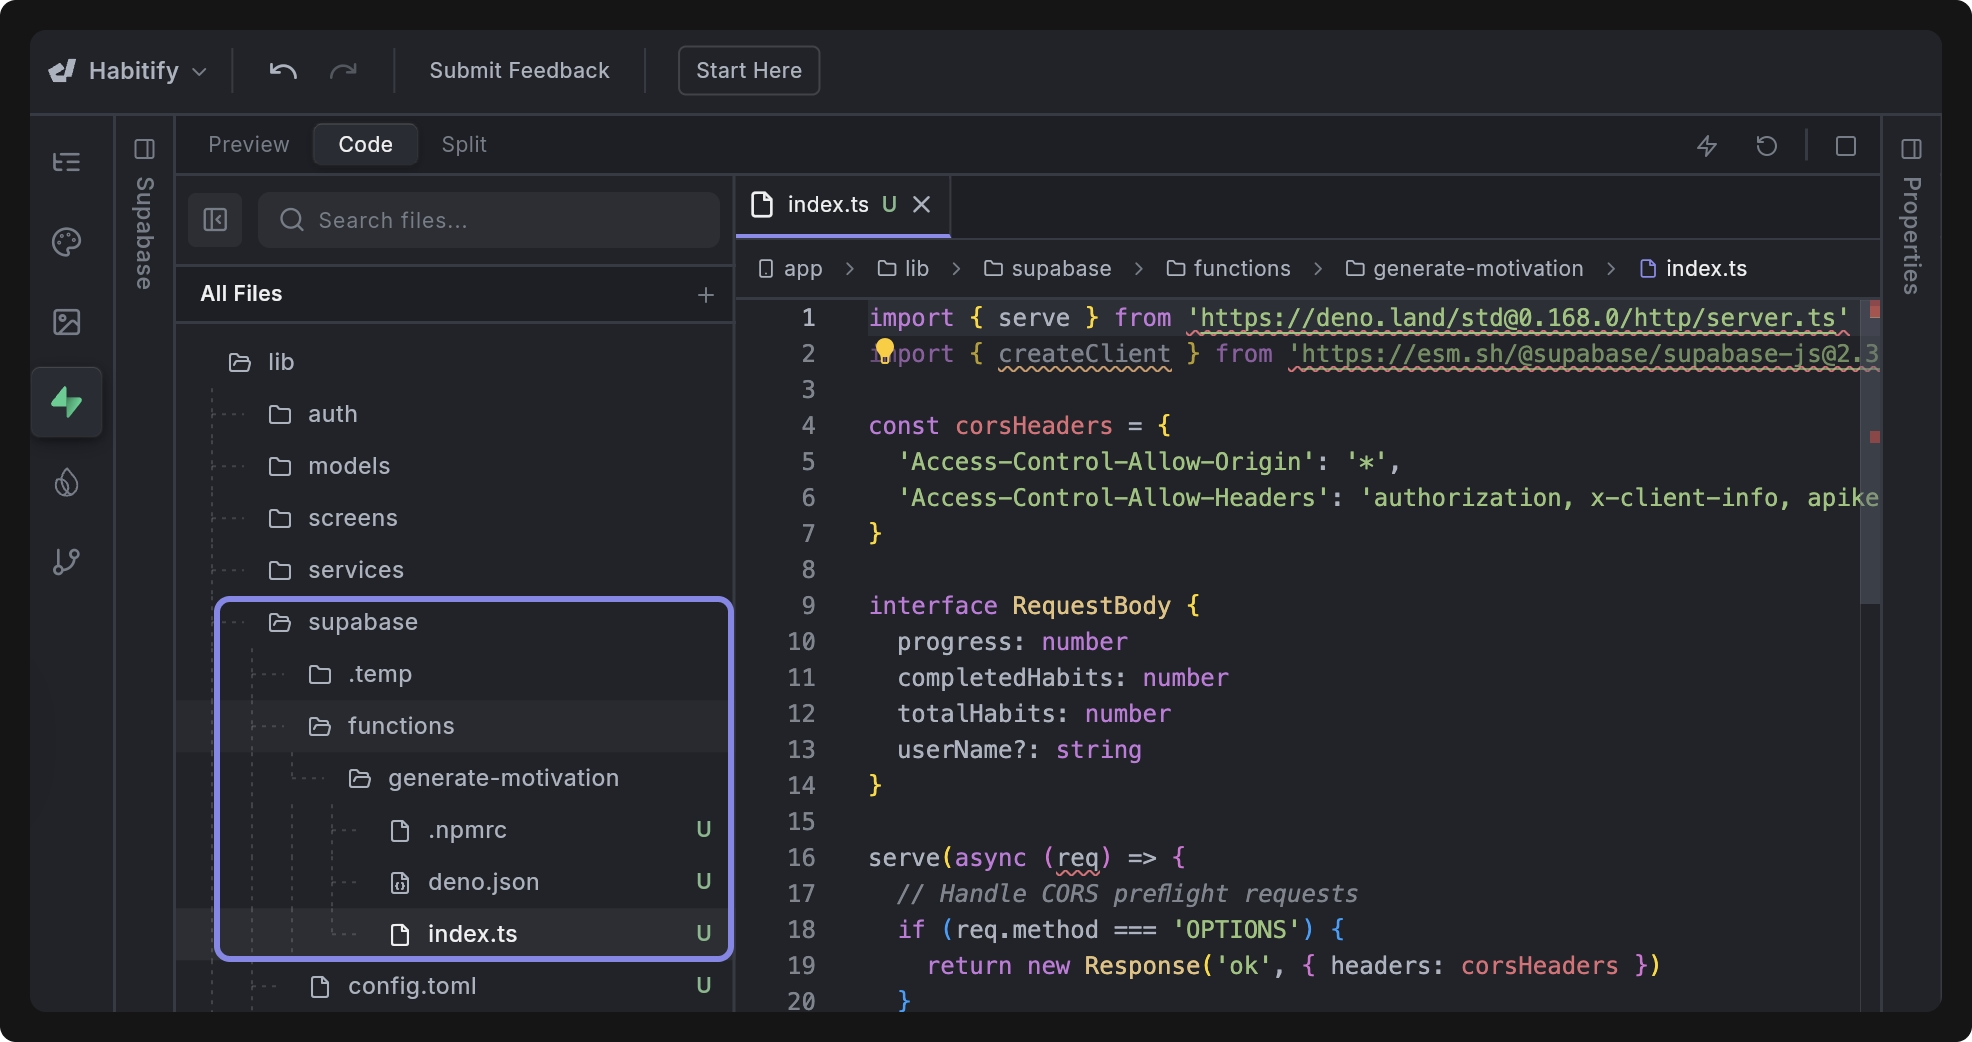
You can open and edit the function like any other file in Dreamflow.
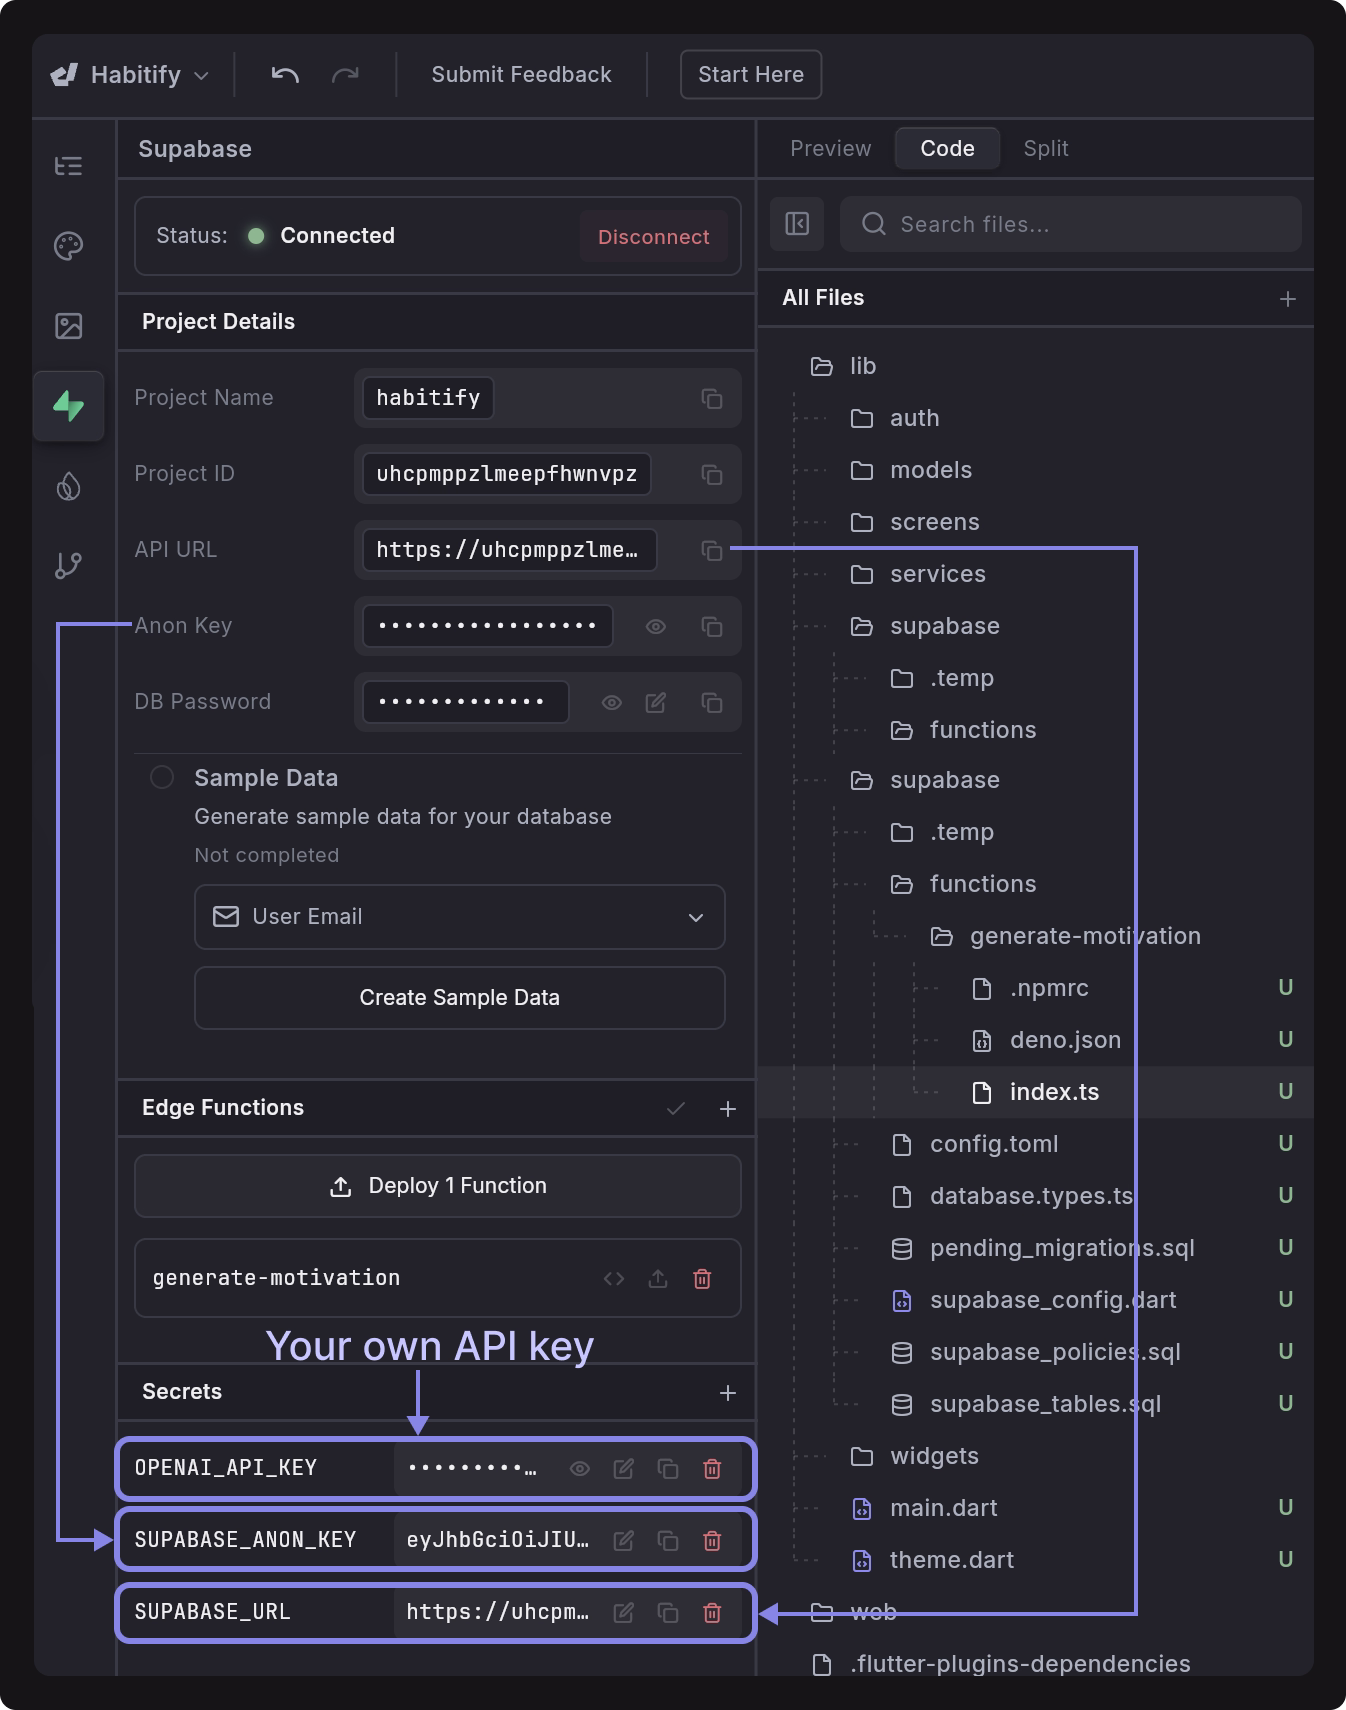
2. Add Required Secrets
If your Edge Functions require secrets like API keys, Dreamflow automatically detects them from your generated code and allows you to add the required values.
To configure your function’s secrets, open the Supabase > Secrets section in Dreamflow and add the values specific to your edge function.
Saving these values in Dreamflow pushes them to your Supabase project.
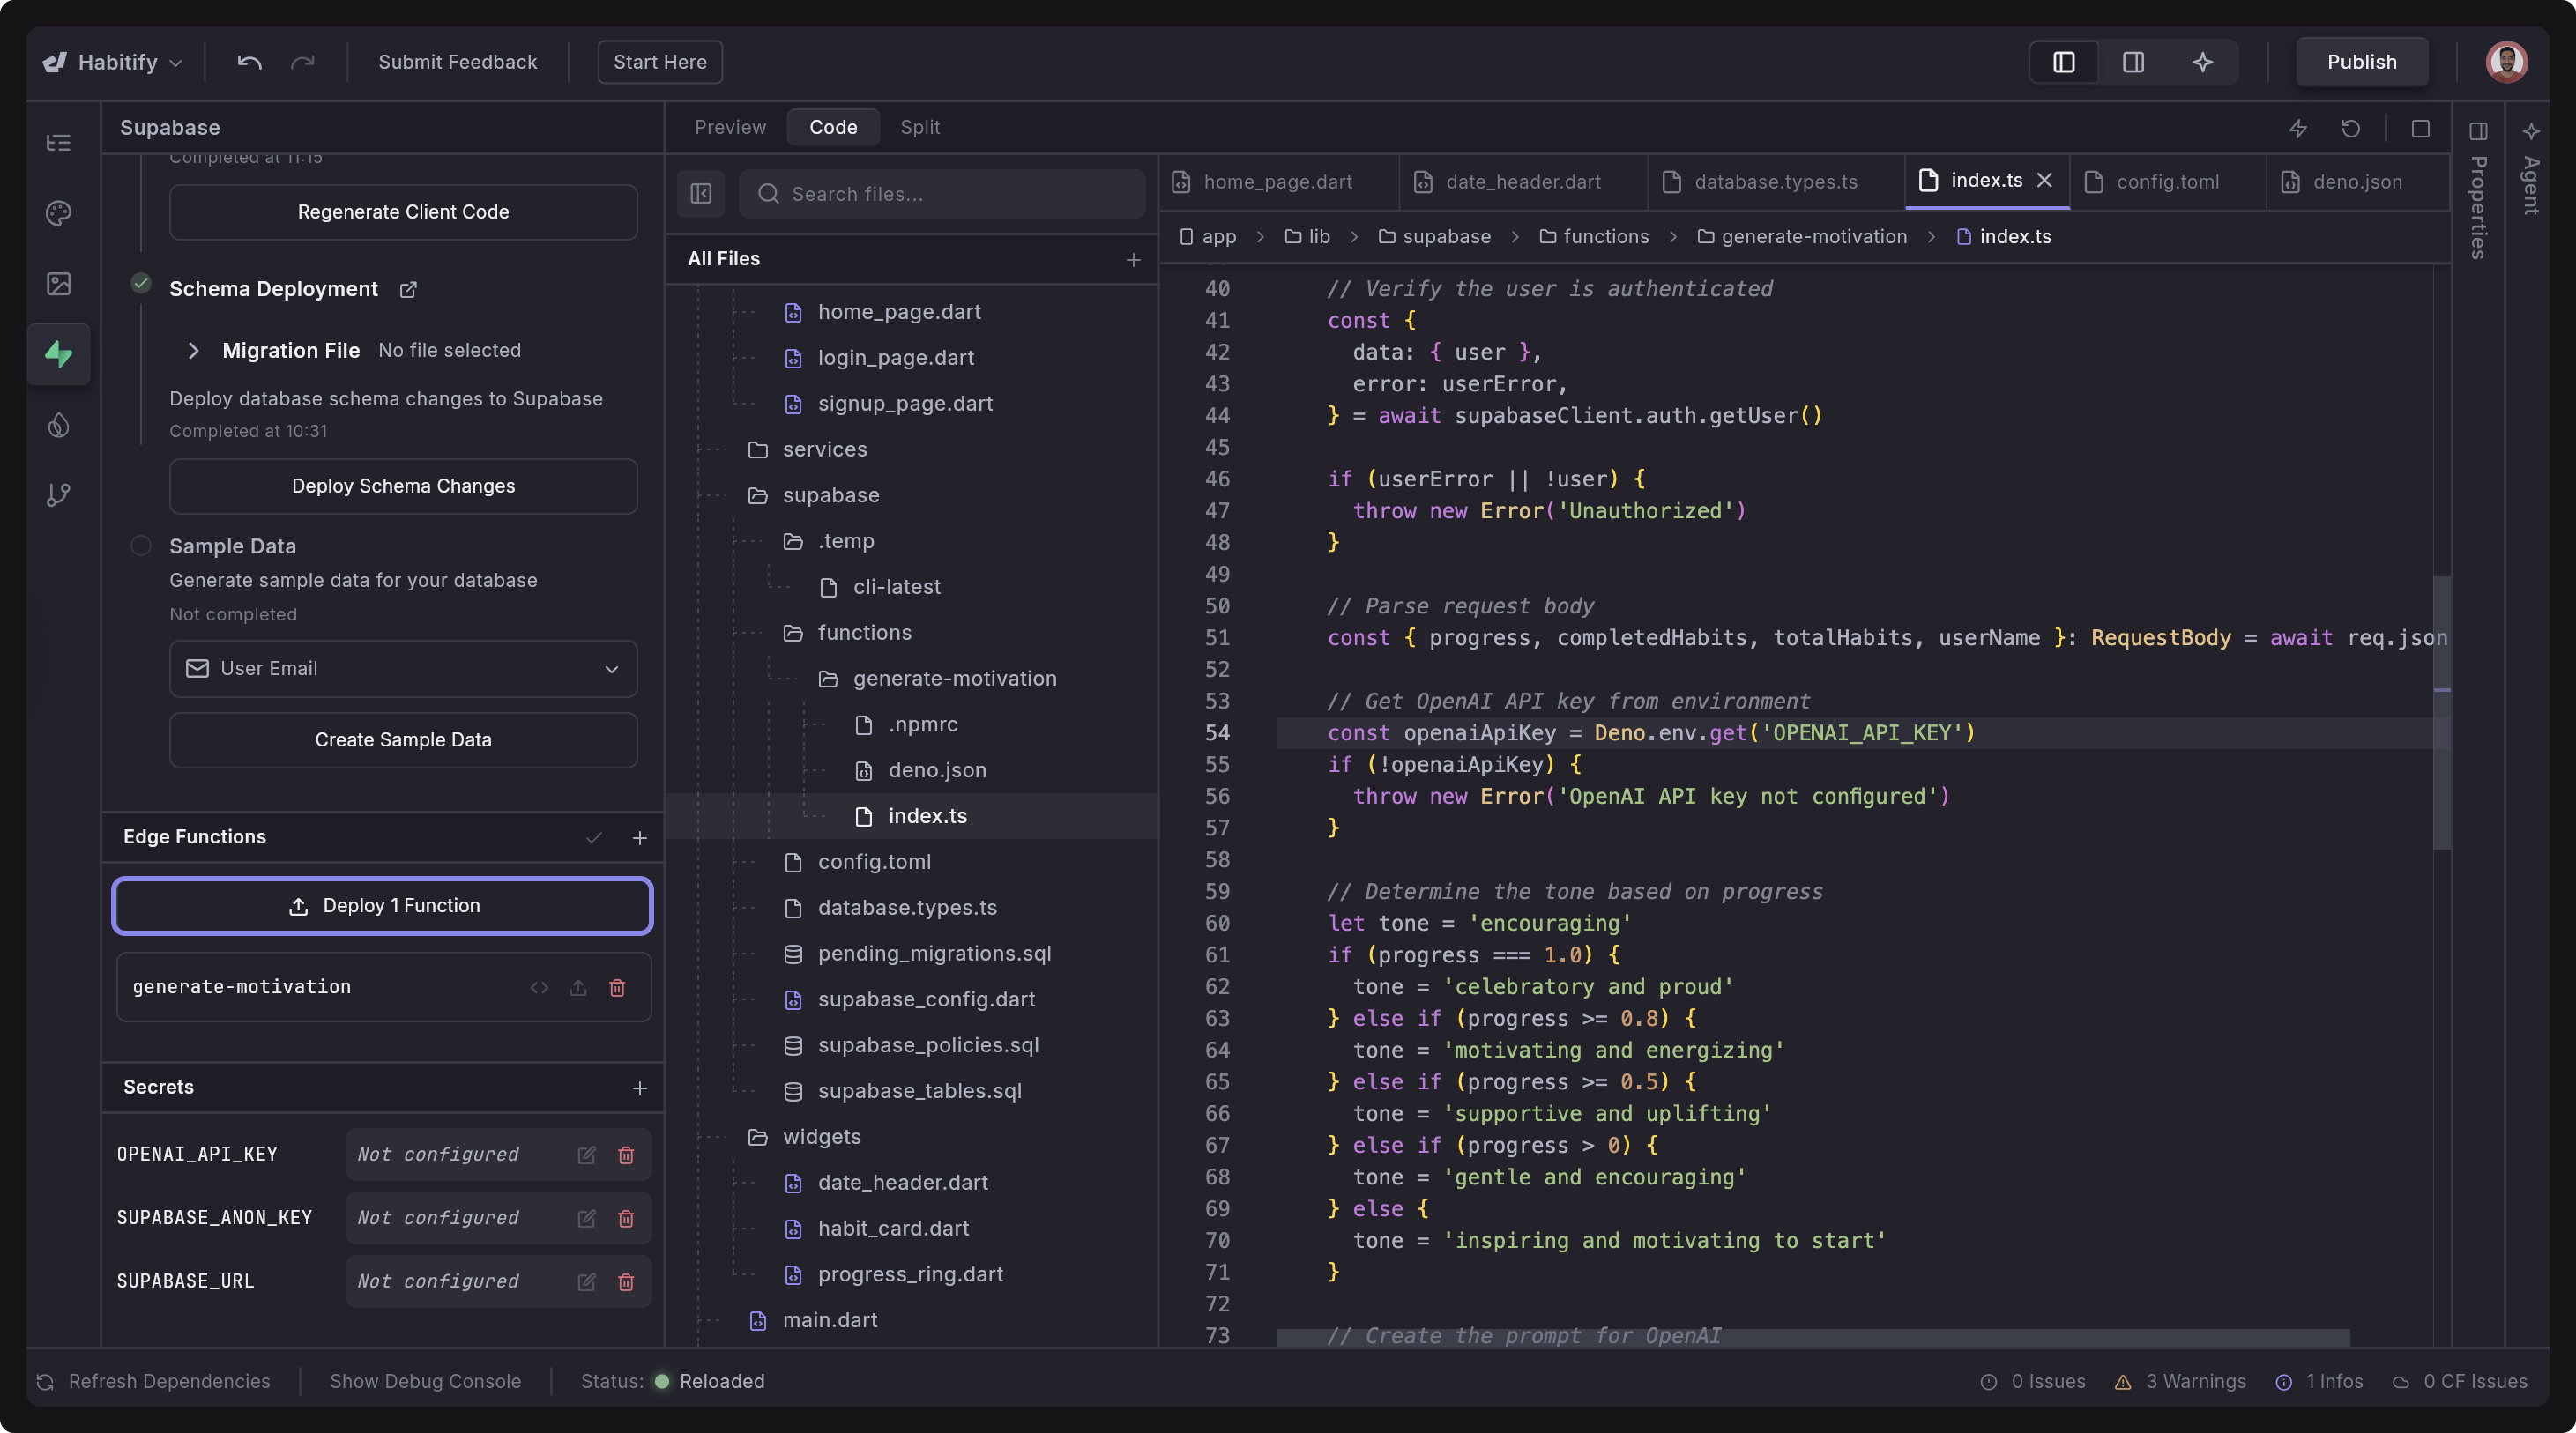
3. Deploy the Function
After reviewing your function and adding secrets you are ready to deploy your function.
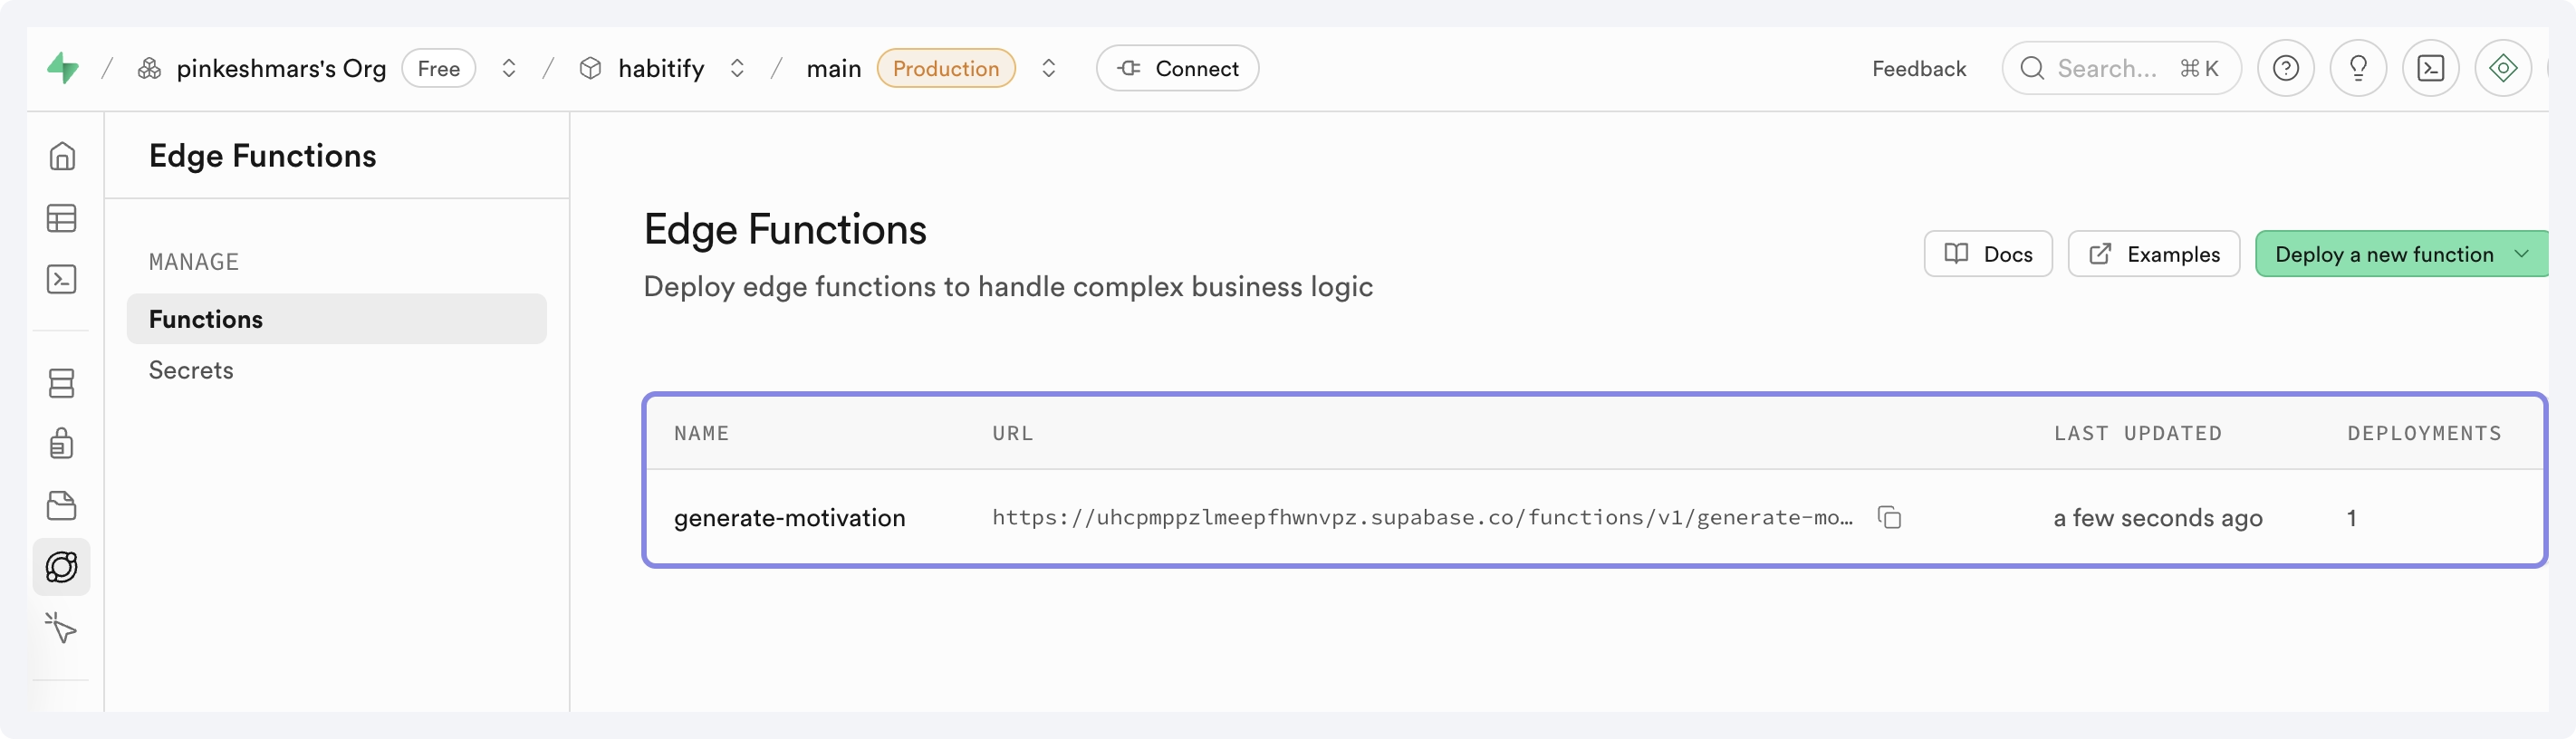
- Open the Supabase > Edge Functions section.
- Click Deploy Function.
- A confirmation dialog appears; click Deploy.
4. Verify Deployment
After deployment, you can open the Supabase Dashboard > Edge Functions page to ensure your function has been properly deployed.
5. Run or Test Your Edge Function
Once your Edge Function is deployed, you can trigger it directly from your app.
Using Agent
You can ask the Agent to connect the function to the correct part of your UI. For example:
Call the `generate-motivation` Supabase Edge Function on the home page and display the returned message in the motivational message widget.
The agent should also automatially wire up the function to the correct parts of your app as you build.
The agent will automatically place the call in the appropriate widget, manage loading states, and update your UI.
Add Manually
If you prefer to call the function manually, here is the recommended method using the official supabase_flutter package. Here’s an example code:
import 'package:supabase_flutter/supabase_flutter.dart';
import 'dart:convert';

Future<String> callGenerateMotivation() async {
  final supabase = Supabase.instance.client;

  final response = await supabase.functions.invoke(
    'generate-motivation',
    body: {
      'progress': 0.6,
      'completedHabits': 3,
      'totalHabits': 5,
      'userName': 'Mike',
    },
  );

  if (response.data != null) {
    return response.data['message'] ?? 'No message returned.';
  } else {
    throw Exception('Failed: ${response.error?.message}');
  }
}
Then, you can call callGenerateMotivation() from anywhere in your app, such as:
ElevatedButton(
  onPressed: () async {
    final message = await callGenerateMotivation();
    print(message);
  },
  child: Text(message),
)
After deploying your Edge Function, you can view detailed insights directly from the Supabase Dashboard. Open your project in Supabase > Edge Functions > select your function. From there, you can:
- View Invocations (every time your app calls the function)
- Check Logs for debugging and server output
- Function Code to update and deploy code directly
- Deployment Details

This is extremely helpful for verifying that your function is running correctly and diagnosing any issues.
Type Generation
Dreamflow can generate fully typed TypeScript definitions based on your database schema. These types ensure your Edge Functions stay in sync with your tables, columns, and relationships, providing safer queries and better autocomplete during development.
For example, without types you might accidentally write:
await supabase.from("profiles").insert({ fullName: "Mike" });
// ❌ Bug: "fullName" is not a column in the profiles table
This won’t fail until the app is actually running.
With generated types, TypeScript immediately catches the mistake:
// ❌ TypeScript error: "fullName" does not exist on type Insert<profiles>
Instead of guessing column names or discovering mistakes only at runtime, you get immediate feedback and accurate autocomplete based on your real schema.
Generate Types from Database Schema
You can easily generate the database.types.ts file by asking the Dreamflow agent.
Use this Agent prompt:
Generate a `database.types.ts` file for my connected Supabase project based on the current database schema.
Types do not update automatically. You must regenerate them whenever your database schema changes.
Use Generated Types
Inside any Edge Function, you can import the generated types:
import { Database } from "../../database.types.ts";
Then you can use them like this:
Example: Type-safe Table Insert
type ProfileInsert = Database["public"]["Tables"]["profiles"]["Insert"];

await supabase.from("profiles").insert<ProfileInsert>({
  id: userId,
  display_name: name,
});
Example: Strongly-typed Row
type ProfileRow = Database["public"]["Tables"]["profiles"]["Row"];

const { data } = await supabase.from("profiles").select("*").eq("id", userId);

const profile: ProfileRow = data[0]; // typed and validated
Best Practices
-
Each Function Lives in Its Own Folder: Every edge function should have its own directory containing an
index.tsentry file. For example:supabase/
functions/
generate-summary/
index.ts
send-email/
index.ts -
Use Shared Modules for Reusable Logic: If multiple functions need the same utilities (like an OpenAI client, validators, or formatting helpers), place them inside
supabase/functions/_shared/. This avoids code duplication and keeps each function focused only on its own task. -
Use
database.types.tsfor Strong Typing: Generate and importdatabase.types.tsto ensure all database queries inside edge functions match your actual schema. This provides autocomplete, prevents schema mismatches, and makes your functions safer and easier to maintain. -
Use Consistent Error Handling Patterns: Implement clear and predictable error handling inside each Edge Function. Wrap risky operations in
try/catch, log errors usingconsole.error()so they appear in the Supabase Dashboard logs, and always return structured JSON error responses.
FAQs
Why can’t I sign up with Supabase Authentication?
If you are unable to sign up in the generated Supabase authentication code, it’s likely due to Supabase authentication settings. By default, Supabase requires email confirmation for new accounts. This means that sign-ups using invalid or dummy email addresses will fail.
To fix this, use a valid email address during sign-up so you can receive and confirm the verification email.
Why can’t I log in with the email I used to generate sample data?
If you generated sample data before adding authentication to your app, logging in with that same email will fail — and this is expected behavior.
When sample data is created, it inserts records directly into the Supabase database, including user details, but it doesn’t go through the actual authentication process. As a result, those users exist in the database but don’t have valid authentication credentials in Supabase Auth.
To fix it, you can delete the dummy user record from the Auth table and then sign up again in your app with that email.
Why do I get “ClientException: Failed to fetch” when calling an Edge Function?
This error almost always happens because the browser blocked the request due to CORS, so your Supabase Edge Function never received it. The browser sends a CORS preflight (OPTIONS) request first. If your function doesn’t handle OPTIONS or doesn’t return valid Access-Control-Allow-* headers, the browser stops the request and it reports “Failed to fetch.”
Fix: Add proper CORS handling inside your Edge Function. The example below includes the required CORS configuration—most importantly the Access-Control-Allow-Origin header—along with the other Access-Control-Allow-* headers and correct handling of the OPTIONS preflight request.
// CORS headers added to allow the browser request to pass
// The key fix is "Access-Control-Allow-Origin": "*"
const corsHeaders = {
  "Access-Control-Allow-Origin": "*", // <-- required for web requests
  "Access-Control-Allow-Headers":
    "authorization, x-client-info, apikey, content-type", // required for Supabase auth + JSON
  "Access-Control-Allow-Methods": "GET, POST, OPTIONS", // allow methods including OPTIONS
};

Deno.serve(async (req) => {
  if (req.method === "OPTIONS") {
    return new Response("ok", { headers: corsHeaders });
  }

  const url = new URL(req.url);
  const habit = url.searchParams.get("habit") ?? "daily";
  const tone = url.searchParams.get("tone") ?? "encouraging";

  return new Response(JSON.stringify({
    message: `Tiny step, big impact. Your ${habit} practice is blooming — keep it ${tone}!`,
  }), {
    headers: { ...corsHeaders, "Content-Type": "application/json" },
  });
});
After updating, redeploy your edge function and test it. Then open Supabase Dashboard → Edge Functions → Logs to verify that the request is now reaching the server.
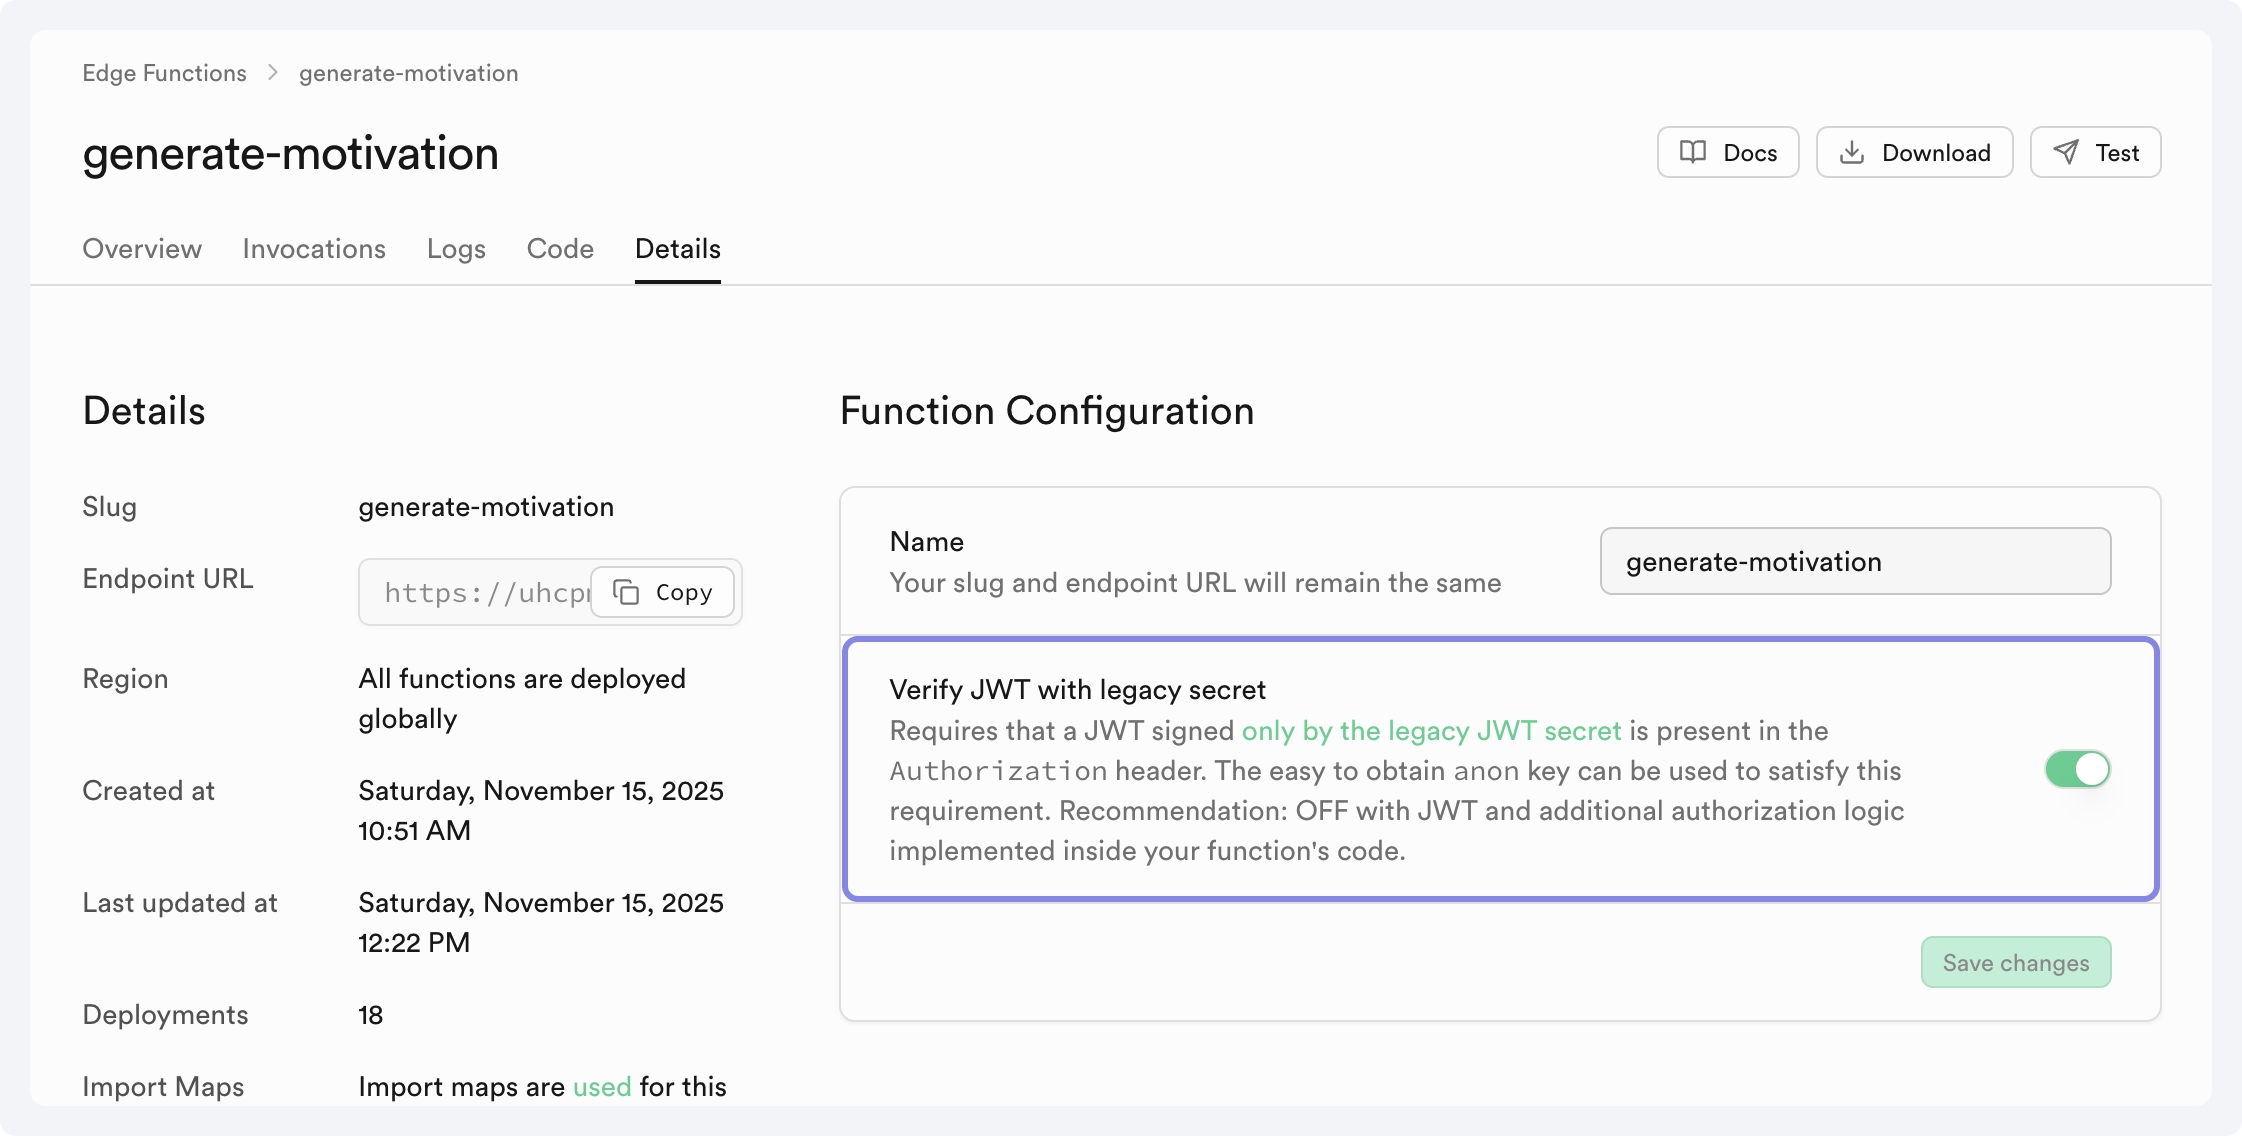
Do I need to be logged in when calling my Supabase Edge Function?
It depends on whether the function requires JWT verification. If the “Verify JWT with legacy secret” toggle is enabled in your Supabase Dashboard, the function expects an authenticated request with a valid JWT in the Authorization header. In that case, you must be logged in before calling the function; otherwise the server will reject the request with a 401 Unauthorized (visible in function logs).
How do I access the logged-in user inside an Edge Function?
When your app makes a request and the user is logged in, the user’s JWT is automatically included in the Authorization header. Inside your Edge Function, you can read this header and fetch the authenticated user like this:
const authHeader = req.headers.get("Authorization");
const { data: user } = await supabase.auth.getUser(authHeader);
The user will contain the full Supabase Auth user object. If the request has no token or an invalid token, user will be null.
Why am I getting “Error: Function invocation timed out” and how do I fix it?
This error appears when your Edge Function takes too long to finish, often because it’s waiting on a slow external API call without a timeout. For example, a request like await fetch("https://slow-api.example.com/report") can hang indefinitely, causing the function to hit Supabase’s execution limit and fail.
To fix this, add a timeout using AbortController:
const controller = new AbortController();
const timeout = setTimeout(() => controller.abort(), 5000); // 5s timeout

const response = await fetch("https://slow-api.example.com/report", {
  signal: controller.signal,
}).finally(() => clearTimeout(timeout));
Then return a clear error when the timeout occurs:
try {
  // fetch with timeout
} catch (err) {
  if (err.name === "AbortError") {
    return new Response(
      JSON.stringify({ error: "Upstream service timed out" }),
      { status: 504, headers: { "Content-Type": "application/json" } }
    );
  }
}
This prevents your function from hanging, ensures it fails cleanly, and avoids timeout errors in production.